Spreadsheet Integration
Spreadsheets such as Excel documents and Google Sheets often contain semi-structured data that is suitable to be linked into a knowledge graph. TopBraid EDG contains a number of features that help to implement such an integration.
Note
This page is about the integration with cloud-based spreadsheets such as Google Sheets and Excel 365 documents stored on SharePoint that was introduced with TopBraid 8.2 and extended to work with uploaded files with TopBraid 8.3. Other features of the TopBraid platform can be used to work with individual spreadsheet files: Import > Import Spreadsheet using Pattern, Import > Import Spreadsheet using Template, Importing Spreadsheets (for ADS scripts).
Overview
In addition to importing individual spreadsheet files, TopBraid’s spreadsheet integration can be used to seamlessly connect a TopBraid asset collection with data stored in a cloud-based spreadsheet. The integration goes both ways: you can start with existing instances from your asset collection and let the system generate a spreadsheet which can then be edited by subject matter experts, or you can start with an existing spreadsheet and bring some of its content into an asset collection. And you can do so incrementally, so that the knowledge graph gets updated after edits by domain experts (pull), or that spreadsheets mirror data stored in TopBraid for consumption by external applications or users (push).
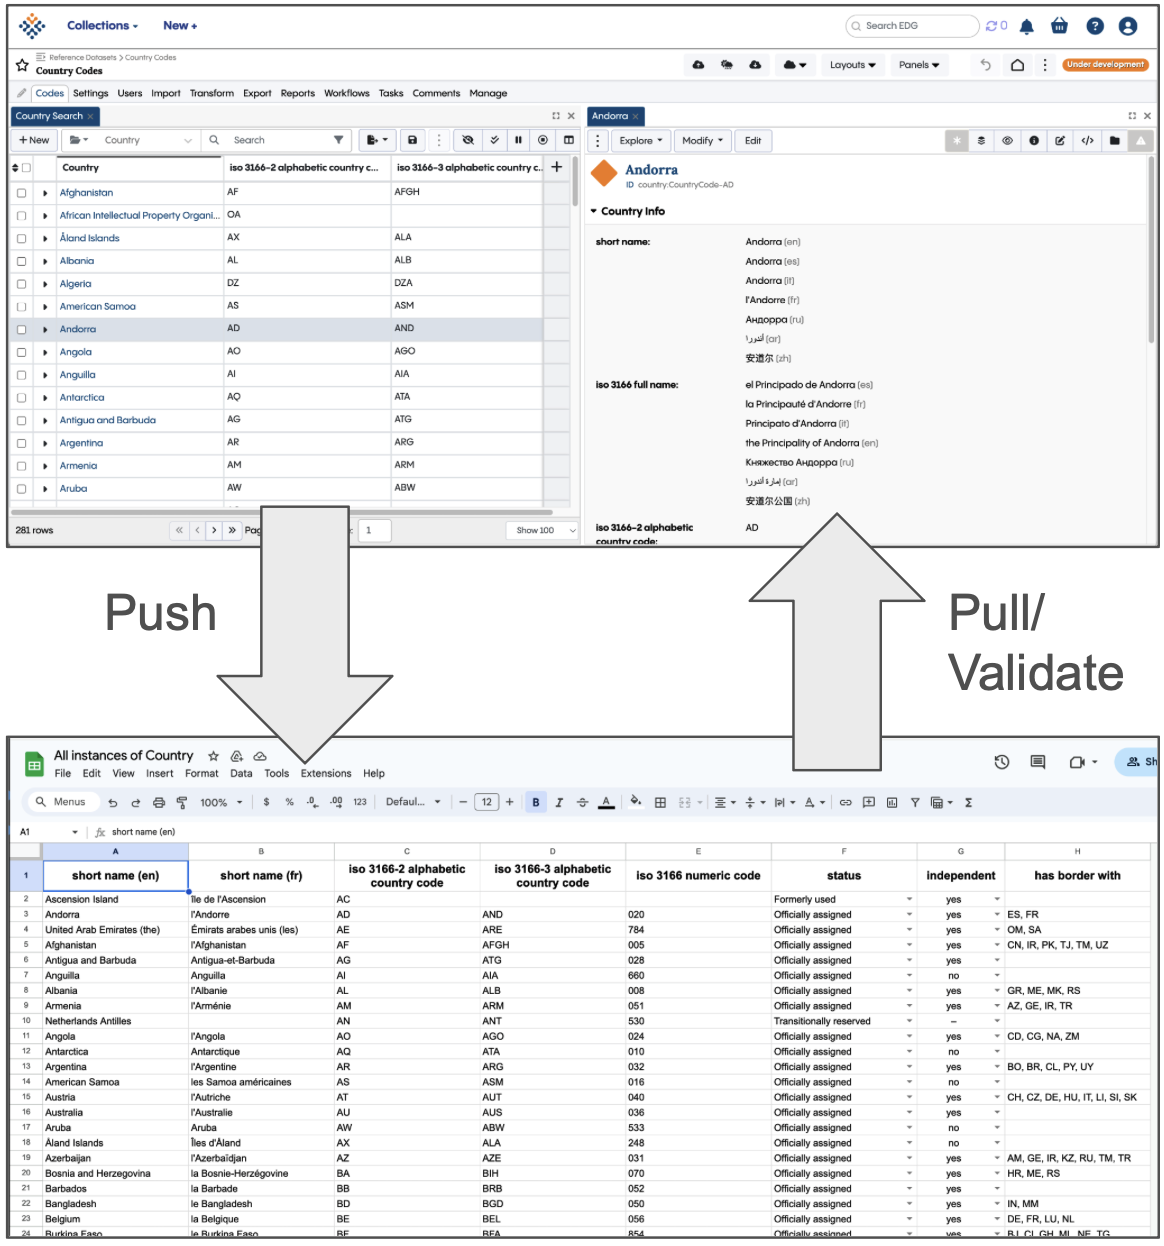
You can even use TopBraid to validate data from spreadsheets, and highlight incorrect data in the spreadsheets so that subject matter experts can correct these problems. When importing data from spreadsheets, you can use workflows to have a safe environment in which you can preview incoming changes until they are ready to be merged into an asset collection’s production copy.
Connecting TopBraid with Google Sheets
To connect TopBraid with Google Sheets in your (existing) Google workspace, you need to create a Google Cloud project and give it sufficient permissions to access the Google APIs for reading and potentially writing to individual Google Sheets. The process is outlined below.
Note
TopBraid will interact with Google Sheets through a dedicated service account with a special email address. This means that programmatic access from TopBraid is cleanly separated from the (human) users that read and write the spreadsheets. The TopBraid service account will automatically have read and write permissions for all spreadsheets that are created from TopBraid, but by default it will not have any permissions on pre-existing spreadsheets that happen to be on the Google workspace. To grant TopBraid access to such existing spreadsheets, the service account needs to be explicitly invited.
Note
Furthermore, when Google Sheets are created through the service account, then the service account will become the
owner of the workbook. Only owners can delete Google workbooks. To delete such workbooks, either use the ADS API
or navigate to the instance of sheets:SpreadsheetDataIntegration that defines the mapping (e.g. by clicking on the
corresponding link on the Push or Pull dialogs), and then use Modify > Delete Google Workbook….
The set up of the Google Workspace needs to be performed by someone with sufficient permissions in your organization.
Create a Google Cloud project as described at https://developers.google.com/workspace/guides/get-started
For this Google Cloud project, enable these APIs: Google Sheets API and Google Drive API
Create a service account and remember its email address as generated by Google
When setting up the authentication, download the credentials json file for this account.
Once this has been completed, a TopBraid Power User or Administrator can go the Google Workspaces section of the Product Configuration Parameters Admin Page and create an instance of the class Google Workspace Configuration. In that instance, enter the (exact) display name of the Google workspace project and the generated email address. After saving those, copy the content of the credentials json file into the password field and save that.
To verify that this is connection is established, go to an asset collection such as a Taxonomy and double-check that the header area contains a button with a cloud on it, with actions to create and import spreadsheets:
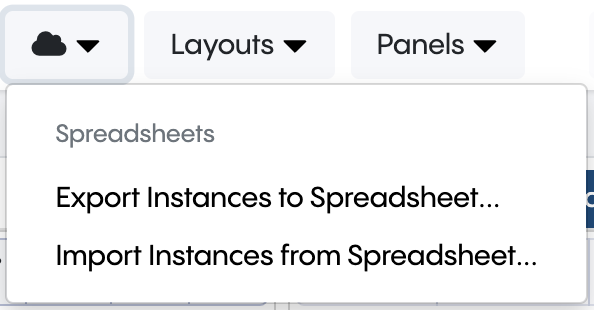
Note that this button is not available for users who do not have editor permissions for the asset collection, or when the asset collection or workflow is in a read-only state.
Export Instances to Spreadsheet
Once you have set up a Google Workspace or Microsoft 365 connection for TopBraid, you can use the Export Instances to Spreadsheet feature to create a new spreadsheet containing data from instances of any class in your asset collection. The feature will first ask you to select a class of which you want to export instances of. For example, if you are in the Country Codes reference data set (from the TopBraid EDG samples), you could select the class Country. This will then open a dialog such as the following:
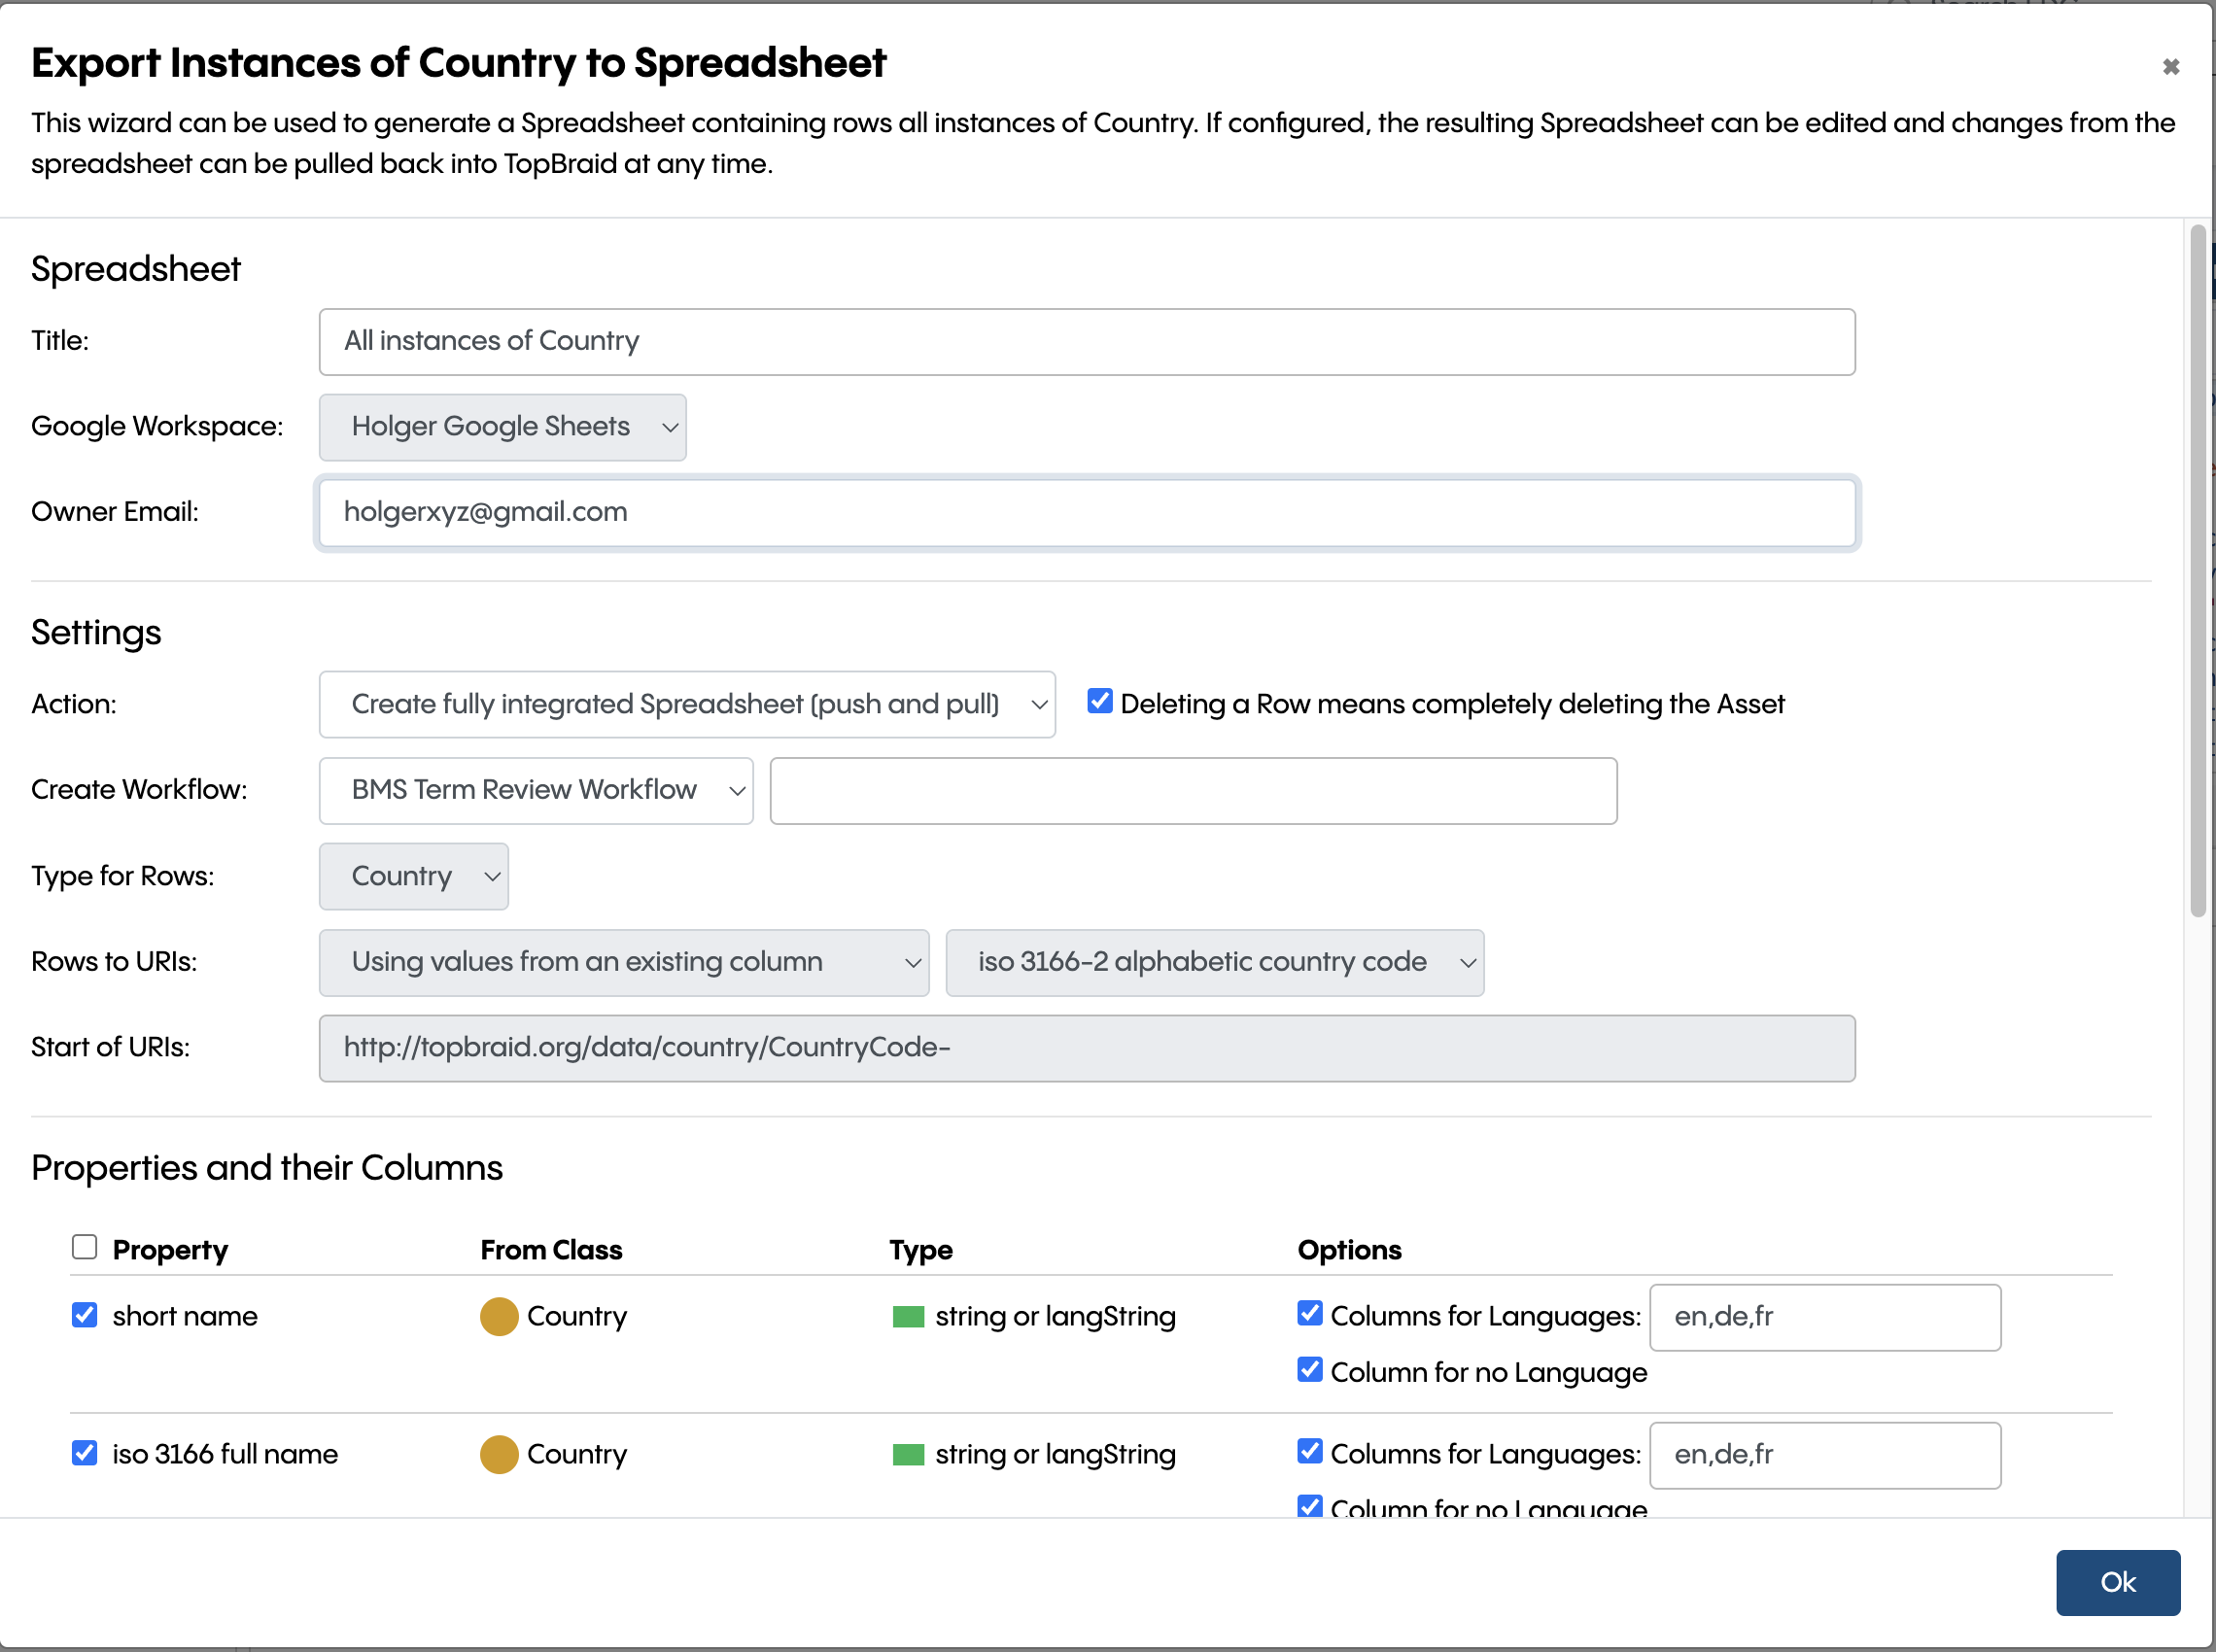
Most of the fields in this dialog will be pre-filled with suggested defaults.
Title: The name of the spreadsheet that will be generated.
Google Workspace: If you have multiple workspaces, you can switch between them here.
Editor Email: For Google Sheets: The email address of the user that will become a (human) editor of the spreadsheet. This person can then invite other people to the spreadsheet. TopBraid itself will also have read and write access to the spreadsheet, obviously. Given that the Google API service account will remain the Owner of the spreadsheet, only the service can fully delete it. For the time being, this means that you may need to use the ADS API
IO.workbooks.getWorkbook(id).delete();from the Script Editor Panel, where id is the value that you can find asworkbookIdin thedash:propsof the Data Integration instance for the spreadsheet.Action: In the default mode Create fully integrated Spreadsheet (push and pull) it will be possible to synchronize data between the spreadsheet and TopBraid in both ways: push means to update the spreadsheet to reflect changes in the asset collection, and pull means to update the asset collection when the spreadsheet has changed. TopBraid users have full control over when those push and pull operations are executed, and they may happen within workflows.
Deleting a Row means completely deleting the Asset: When a pull is performed to update the asset collection, and a row has been deleted, then all statements for the asset that is represented by the row will be deleted. This is relevant when a spreadsheet contains only a subset of all properties of the assets. If the option is unchecked, then the values that are not visible would “survive” when a row gets deleted.
Create Workflow: Optionally, you can create a workflow that is connected to the spreadsheet. If you elect to do so, you can pull changes from the spreadsheet into the workflow where you have better means to validate and update the changes before they are committed to the production copy of the asset collection (or not).
Type for Rows: The class of the instances to export into the spreadsheet.
Rows to URIs: Defines the policy to map between the asset identifiers (URIs) and the columns in each row.
Using unique identifiers in the first column: the spreadsheet’s first column will contain the URI (usually abbreviated as qname) of the asset that the row represents.
Using values from an existing column: construct URIs from a Start of URIs concatenated with the values of a given column. This is often a good option if each asset has exactly one unique property value such as an ID or a code. This is the only option when the class of the instances declares a primary key using
dash:uriStart.
The lower part of the dialog is used to define the mapping from properties to columns:
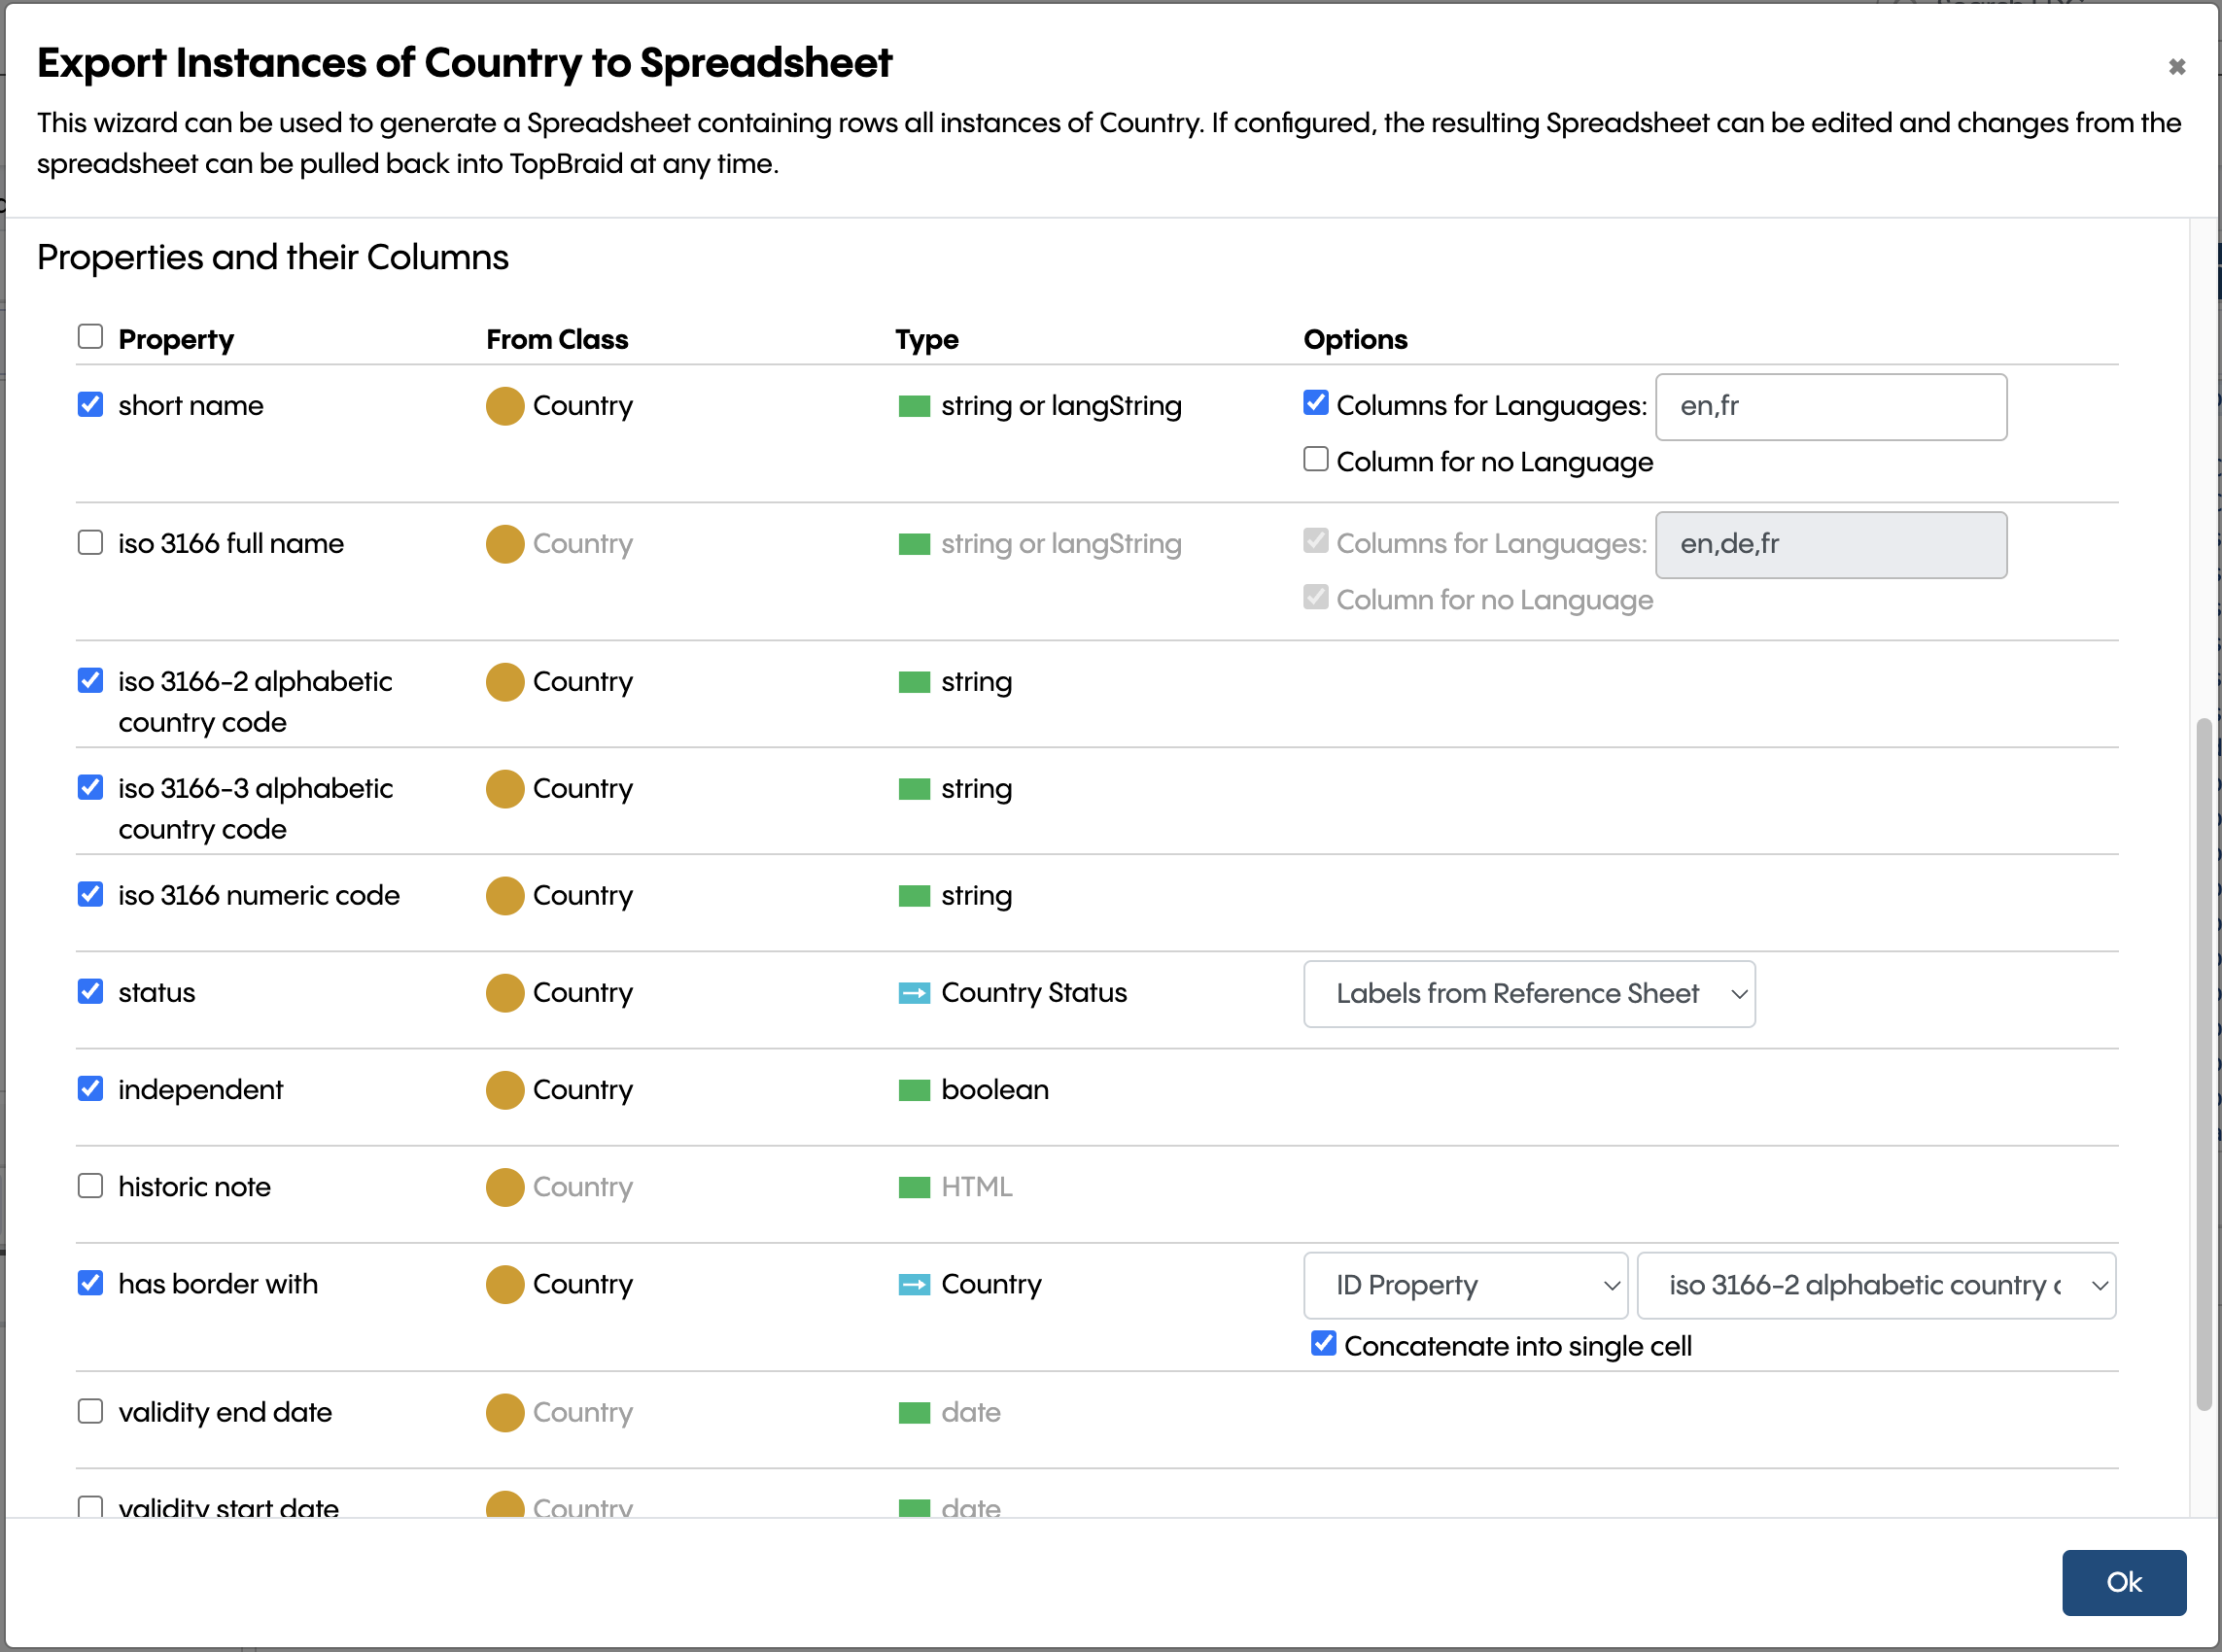
You can select or unselect each property that has been declared for the class using the checkboxes in the first column. By default, all properties where any of the instances has values are pre-selected.
Depending on the declared type of the properties, you have various options on how they will be rendered in the spreadsheet.
With the configuration from the dialog shown above, the resulting spreadsheet may look like this:
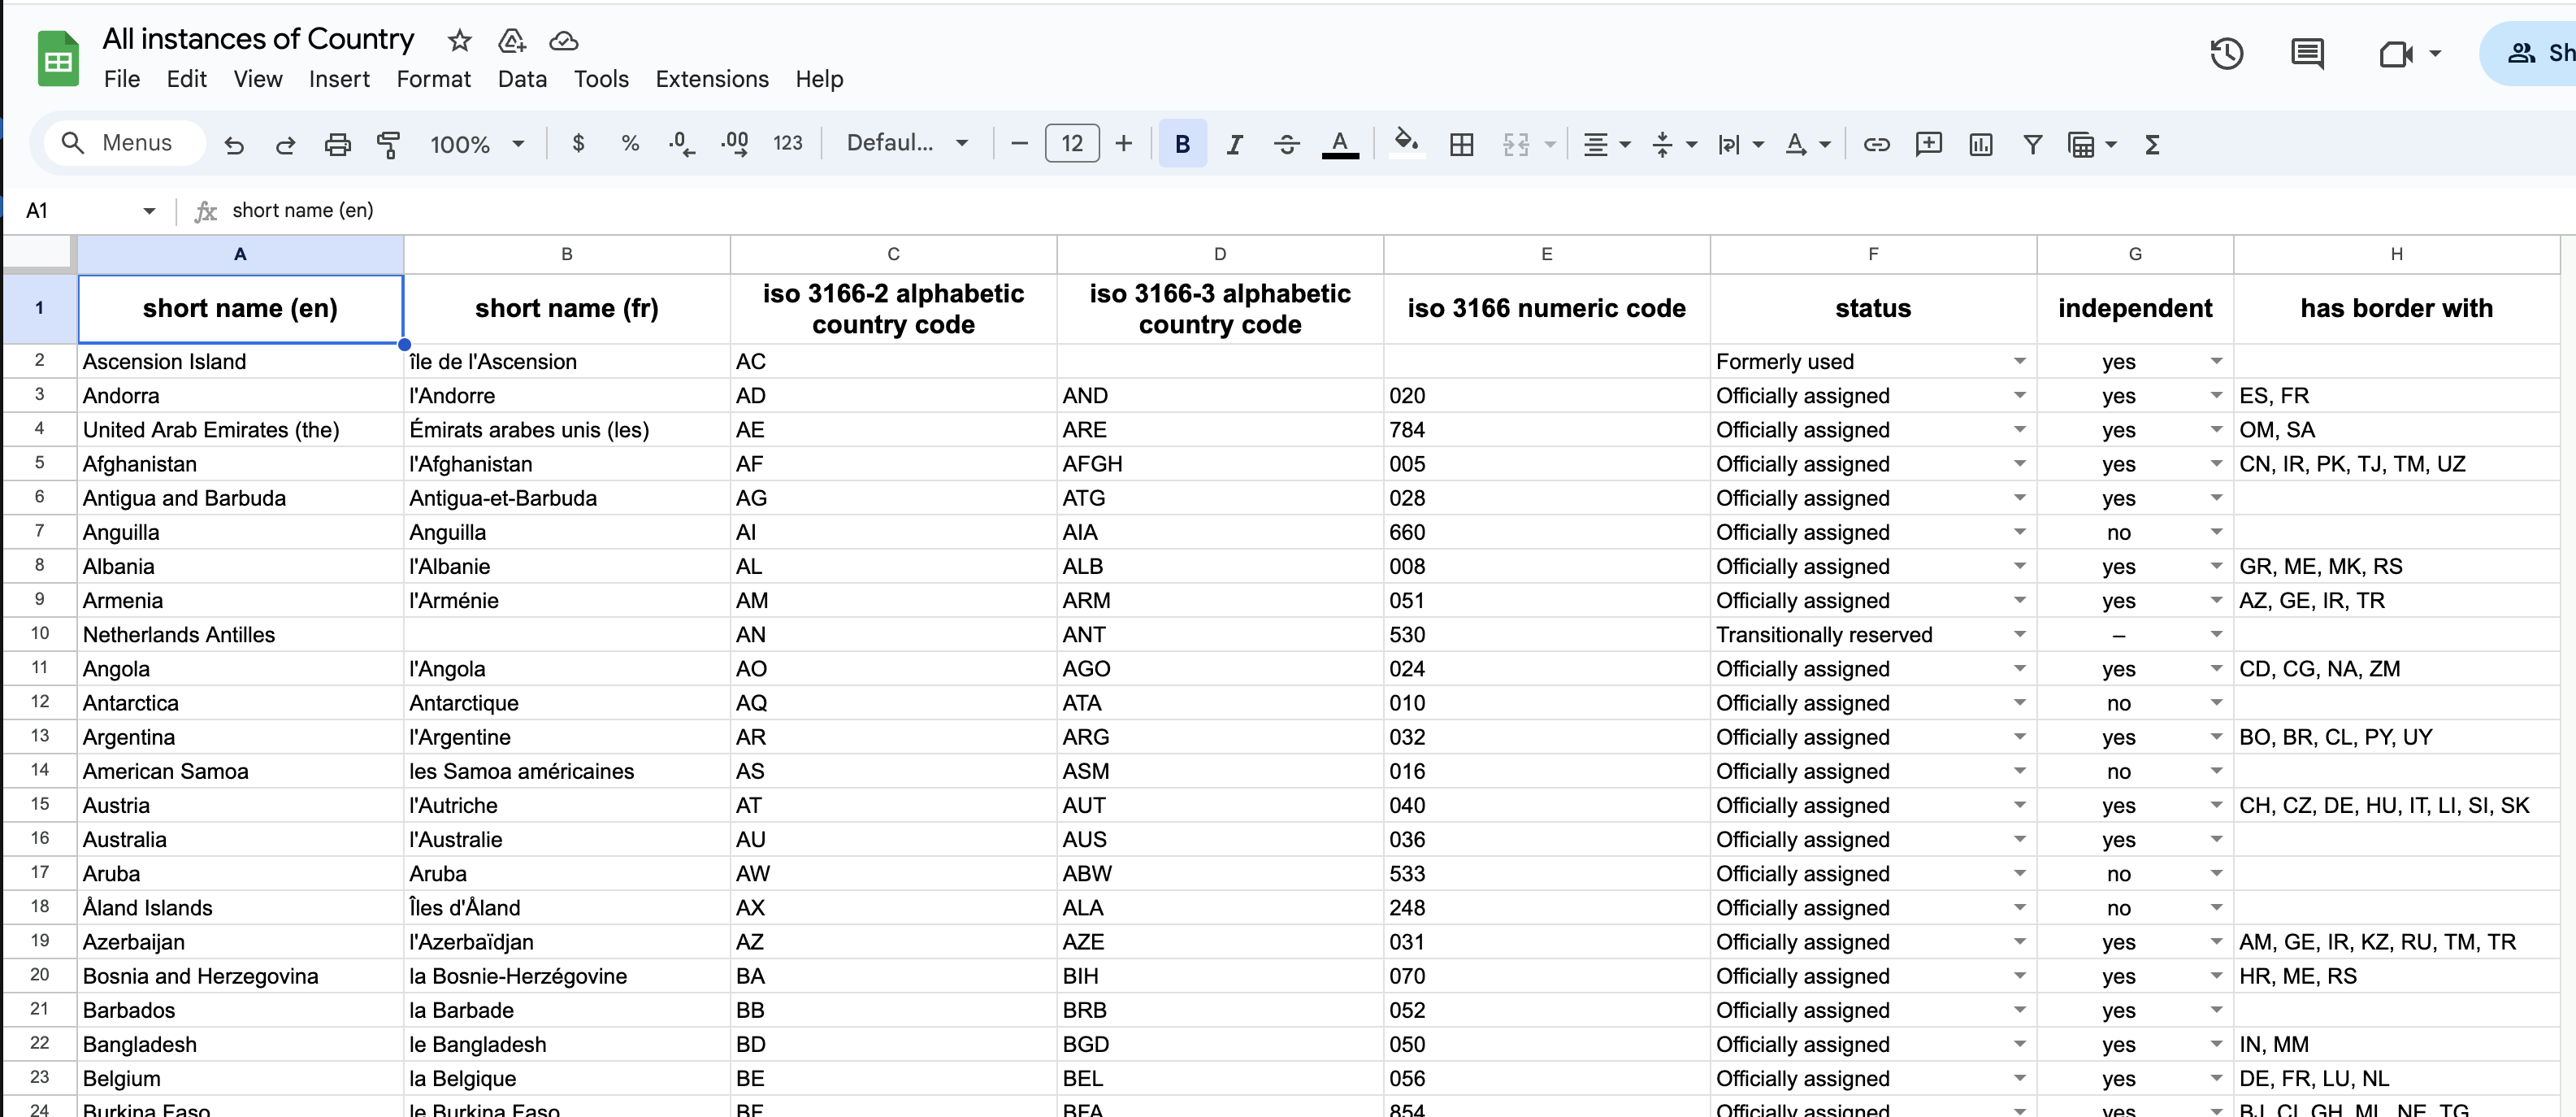
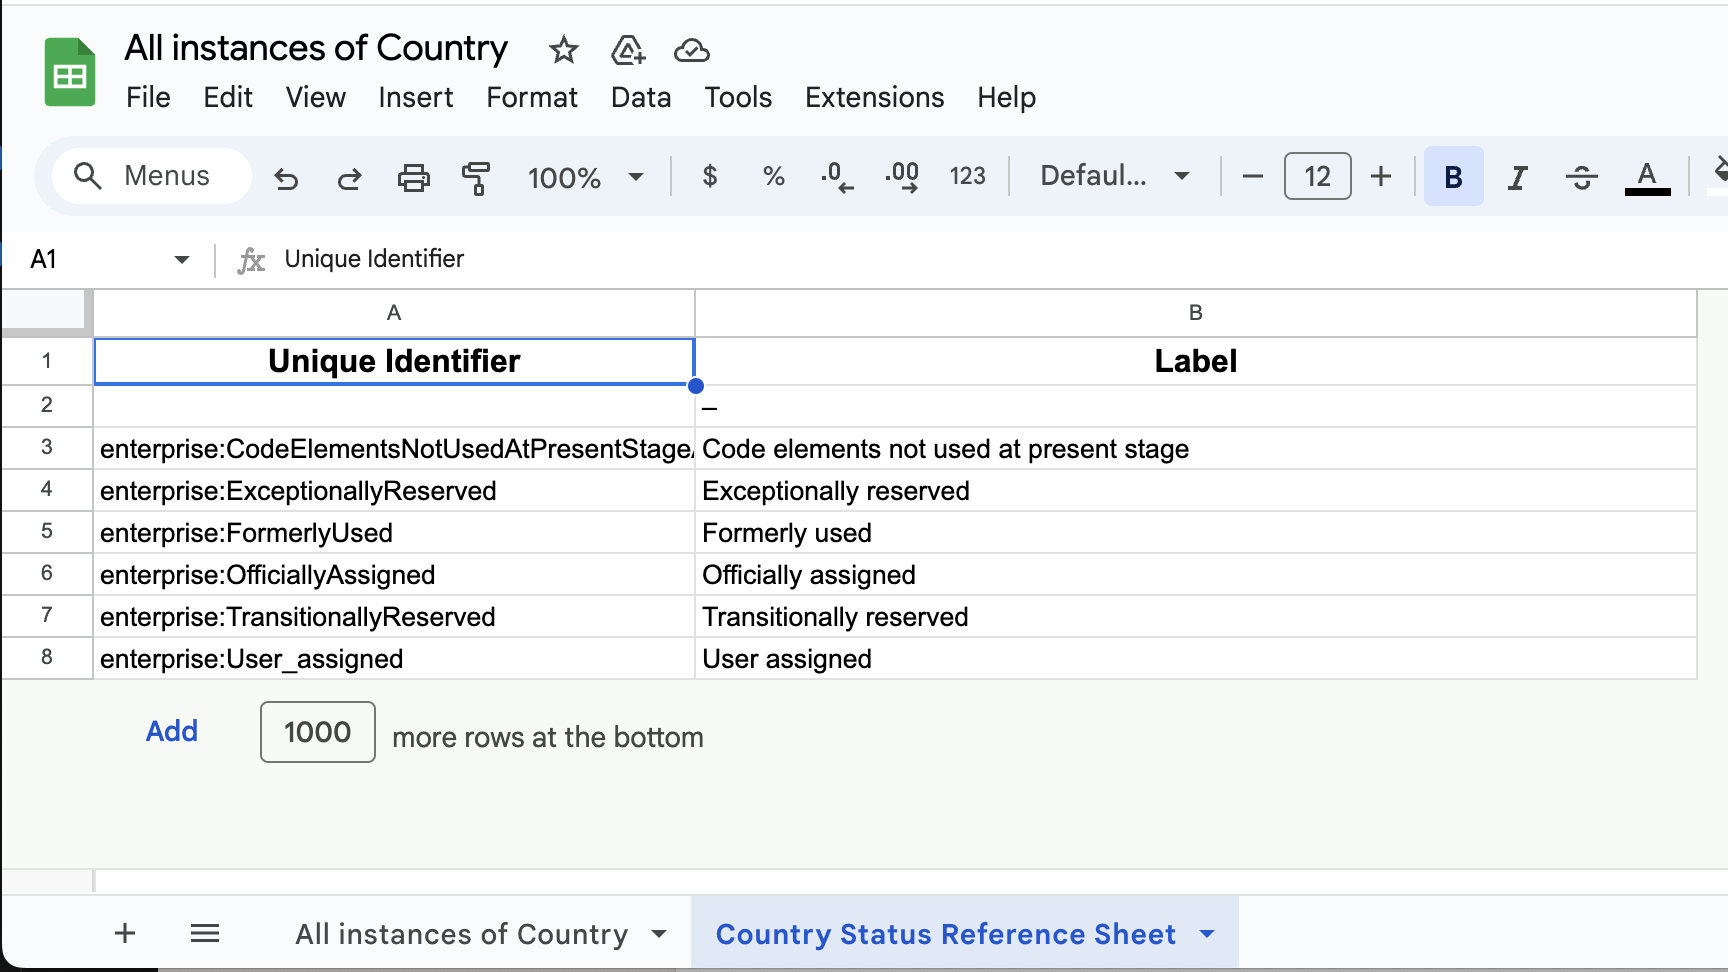
In this case, because we selected to create a reference sheet for the instances of Country Status, it will produce this second sheet and use a drop-down box to pick values of them in the country status column:
Exporting any Set of Assets
In addition to the Export Instances to Spreadsheet action from the header drop down, you can use the operation Export to Spreadsheet on any other set of assets, using the Batch Actions Menu. For example, you can select some or all instances of a class in the Instances Panel as shown below.
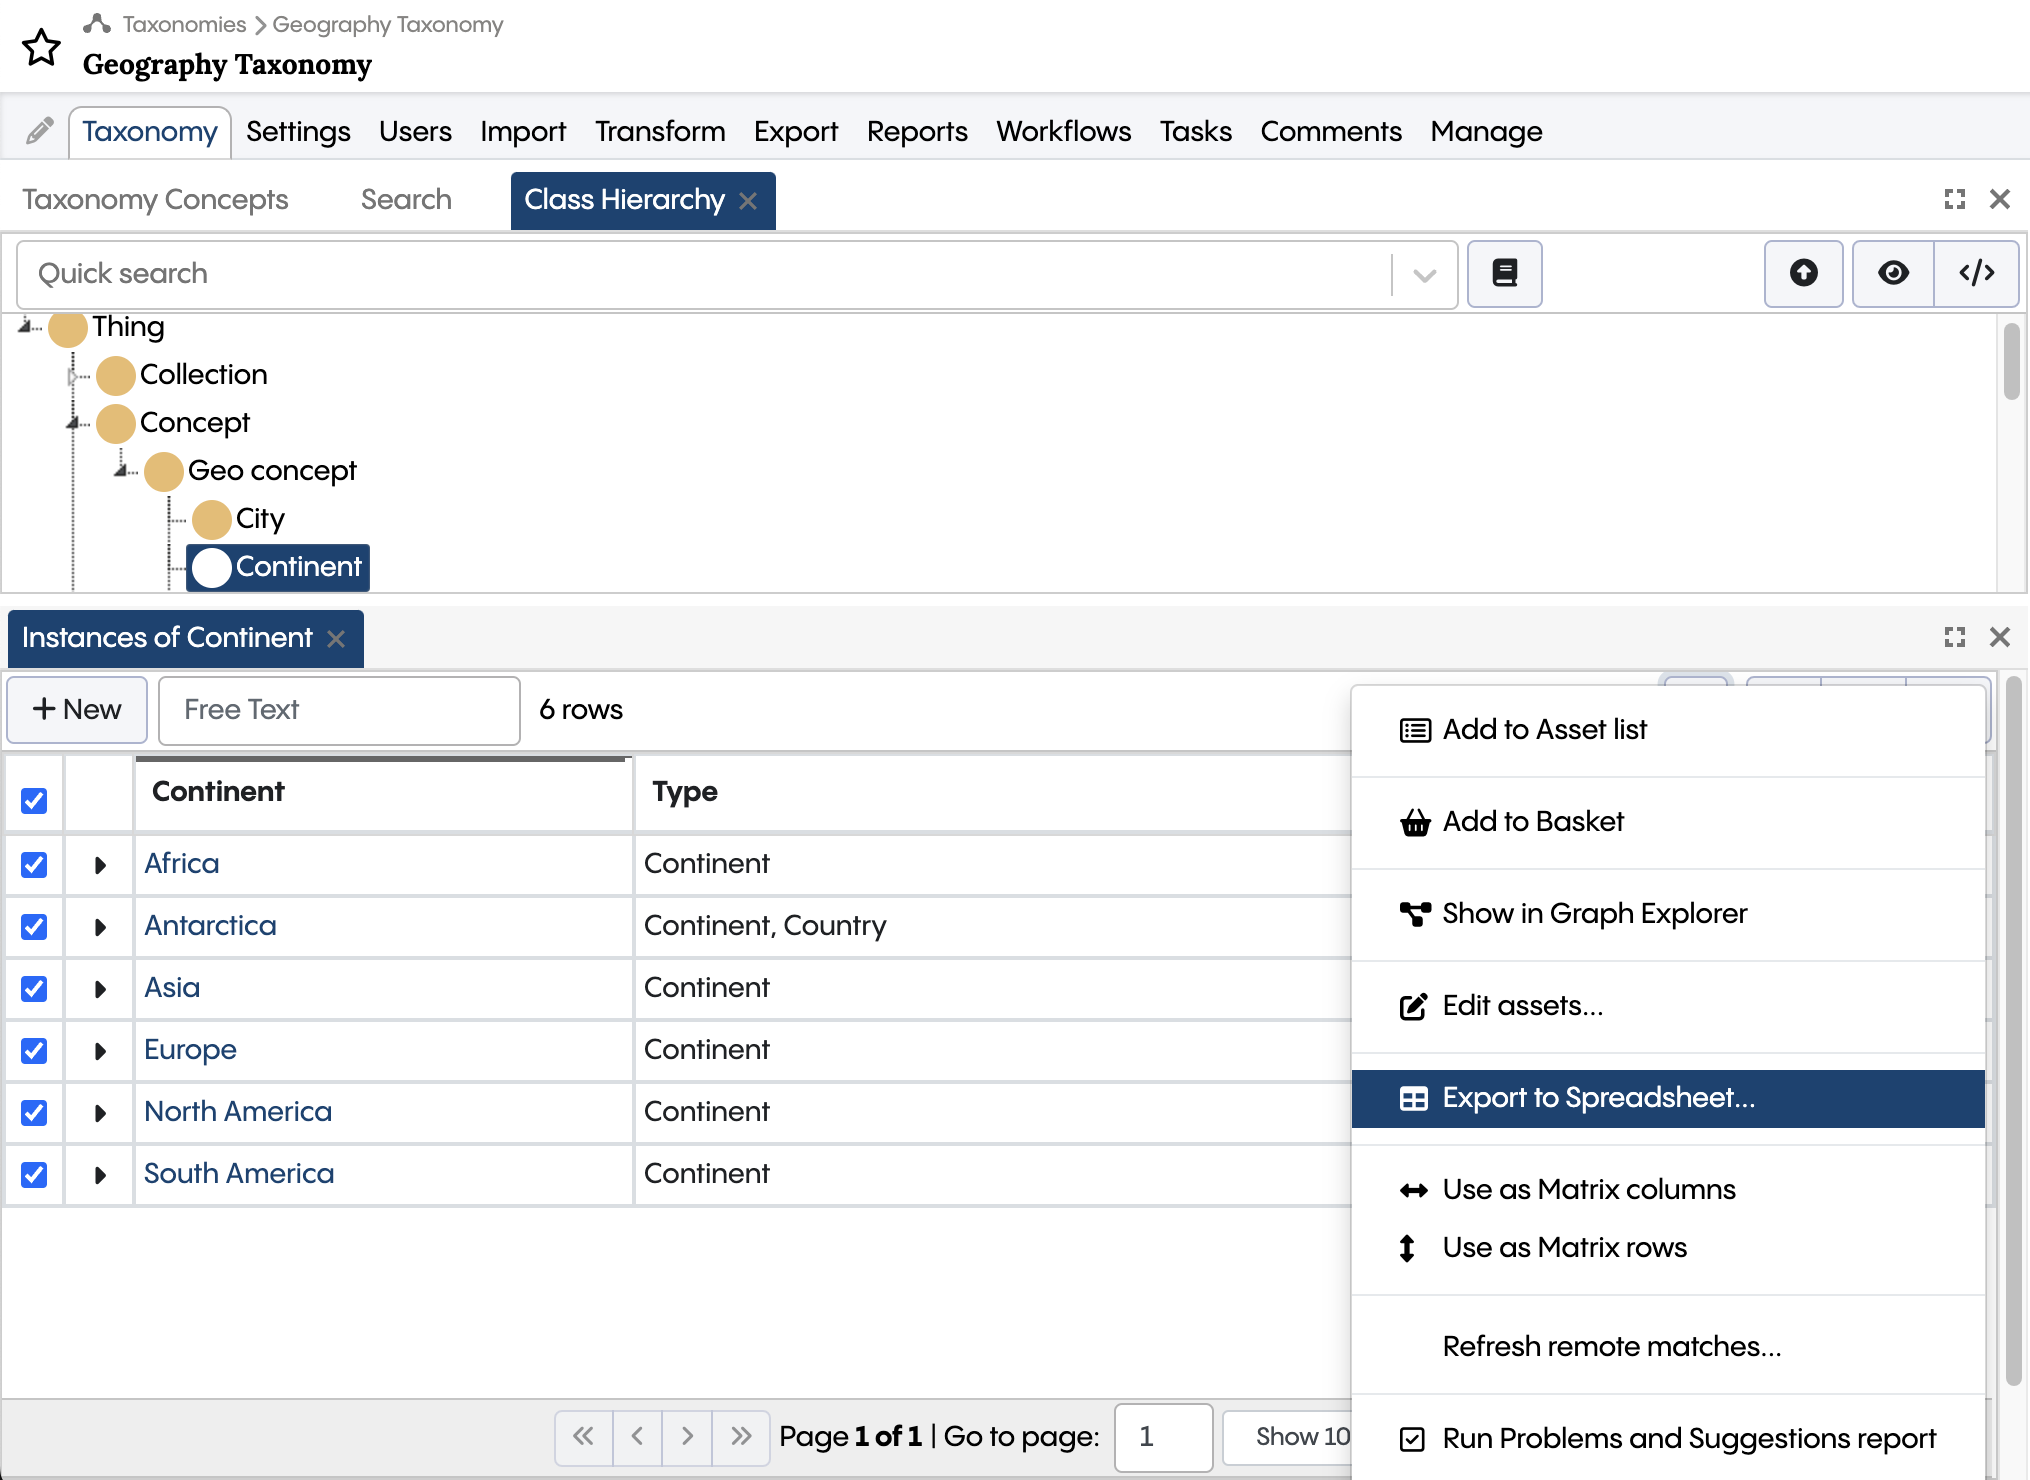
Other places from where this operation can be executed include the Search Panel, the Asset List Panel and the SPARQL Results Table Panel.
The batch action opens the same dialog as shown above, but with the selected assets instead of all instances of a given class.
Pulling Changes from a Spreadsheet
After you have exported assets into a spreadsheet, the spreadsheet can be edited and the changes can be copied back into the asset collection. To do so, you can use these buttons in the header of the asset collection’s editor:

The “download” button on the right is used to open the Pull Changes dialog:

You may have multiple mappings to spreadsheets here, and then you can select which ones to pull from. Pressing Ok will download the spreadsheet from the cloud and update any changed values, potentially adding new assets or deleting existing assets. If you’re unsure about the impact or just want to simulate the edits, you can use the Preview button or operate from within a workflow.
Validating a Spreadsheet
The button to the left of the Pull button can be used to perform validation of the spreadsheet itself, without modifying the asset collection. This will simulate the Pull operation and then run the SHACL constraints that are defined for the assets represented on the spreadsheets.

If the spreadsheet contains data that violates the constraints, the corresponding cells in the spreadsheets will be marked with a red background:
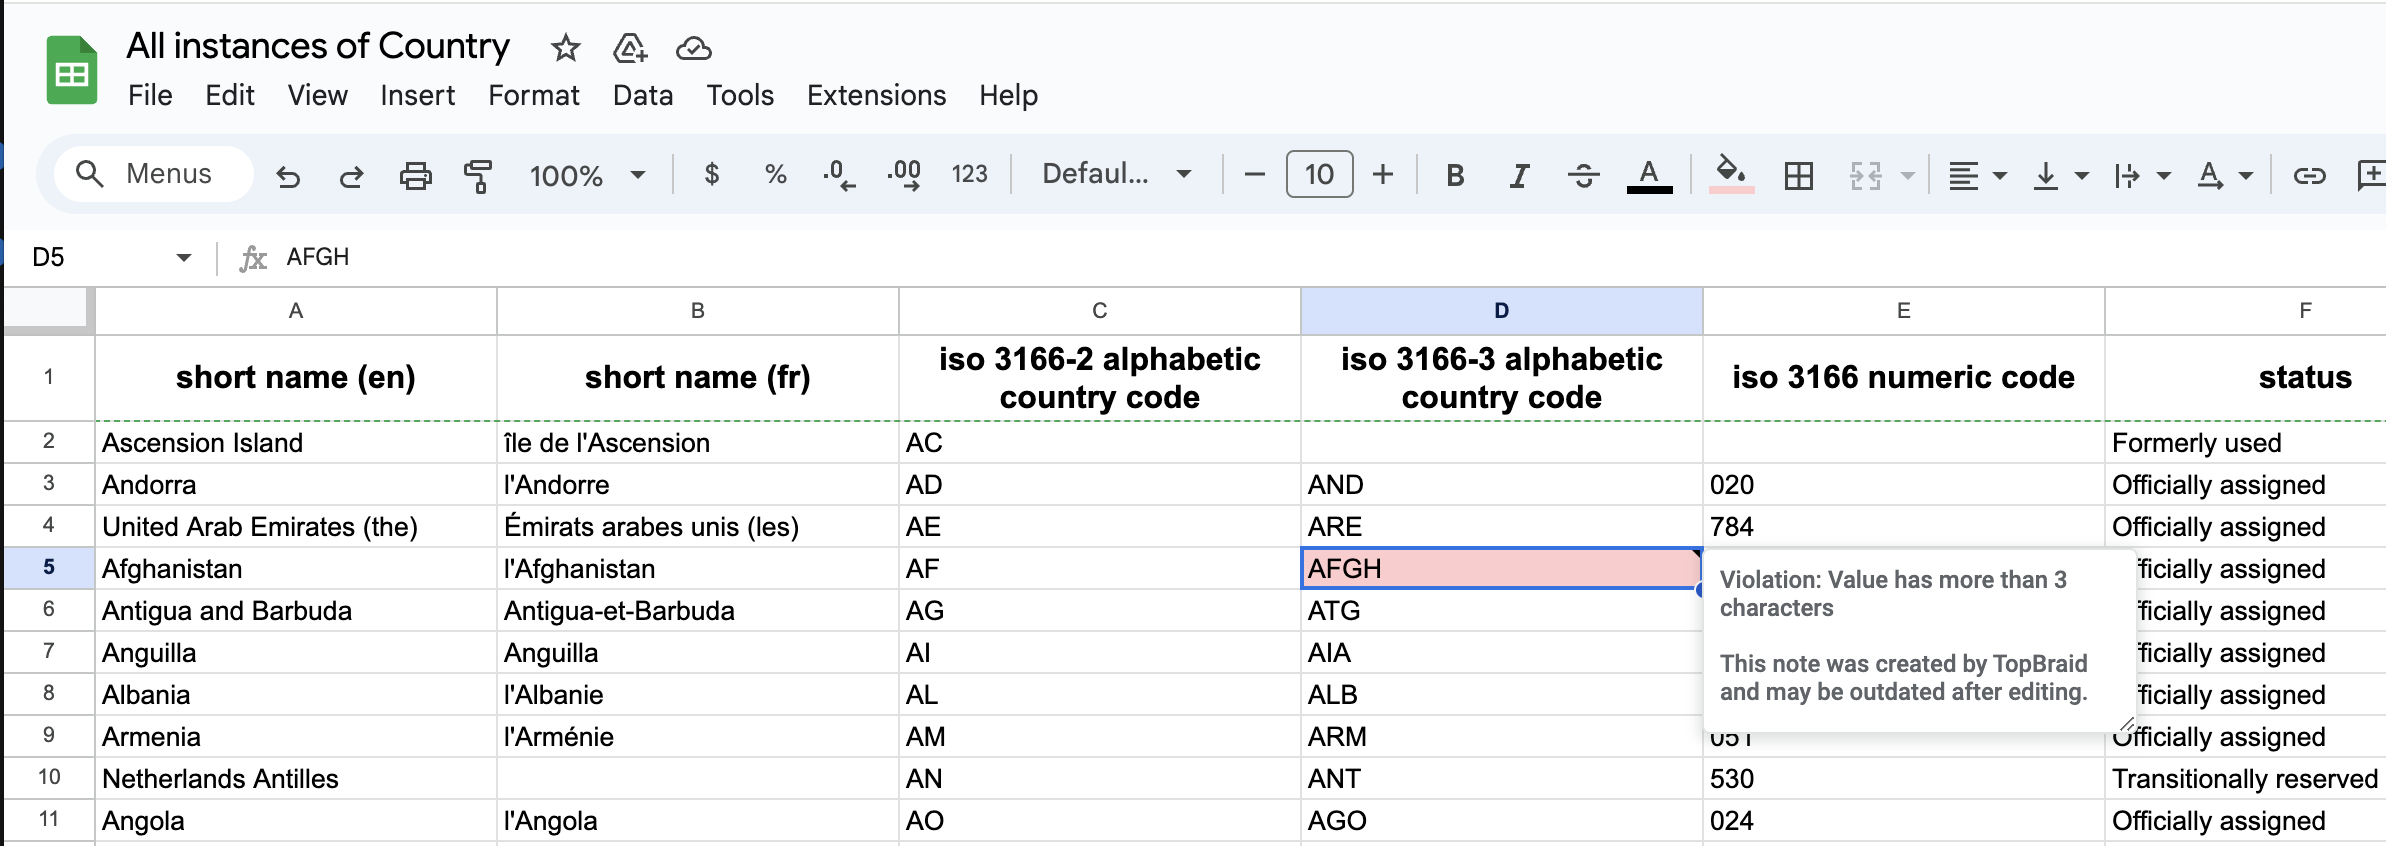
The people editing the spreadsheet may use this information to fix the data in the sheet and then someone will access to the Validate button can re-run the validation or even pull the changes into the asset collection.
Pushing Changes to a Spreadsheet
Press the Push button from the data integrations section of the application header to update a spreadsheet from changes in the asset collection. In its current implementation, this will essentially re-run the initial export and overwrite the sheets using the same mapping rules.
Import Instances from Spreadsheet
The global data integration drop down button contains a menu item Import Instances from Spreadsheet which can be used to define a mapping from a cloud-based spreadsheet or an uploaded file to instances of a selected class in the current asset collection.
For example you could start with an existing table of countries such as this:
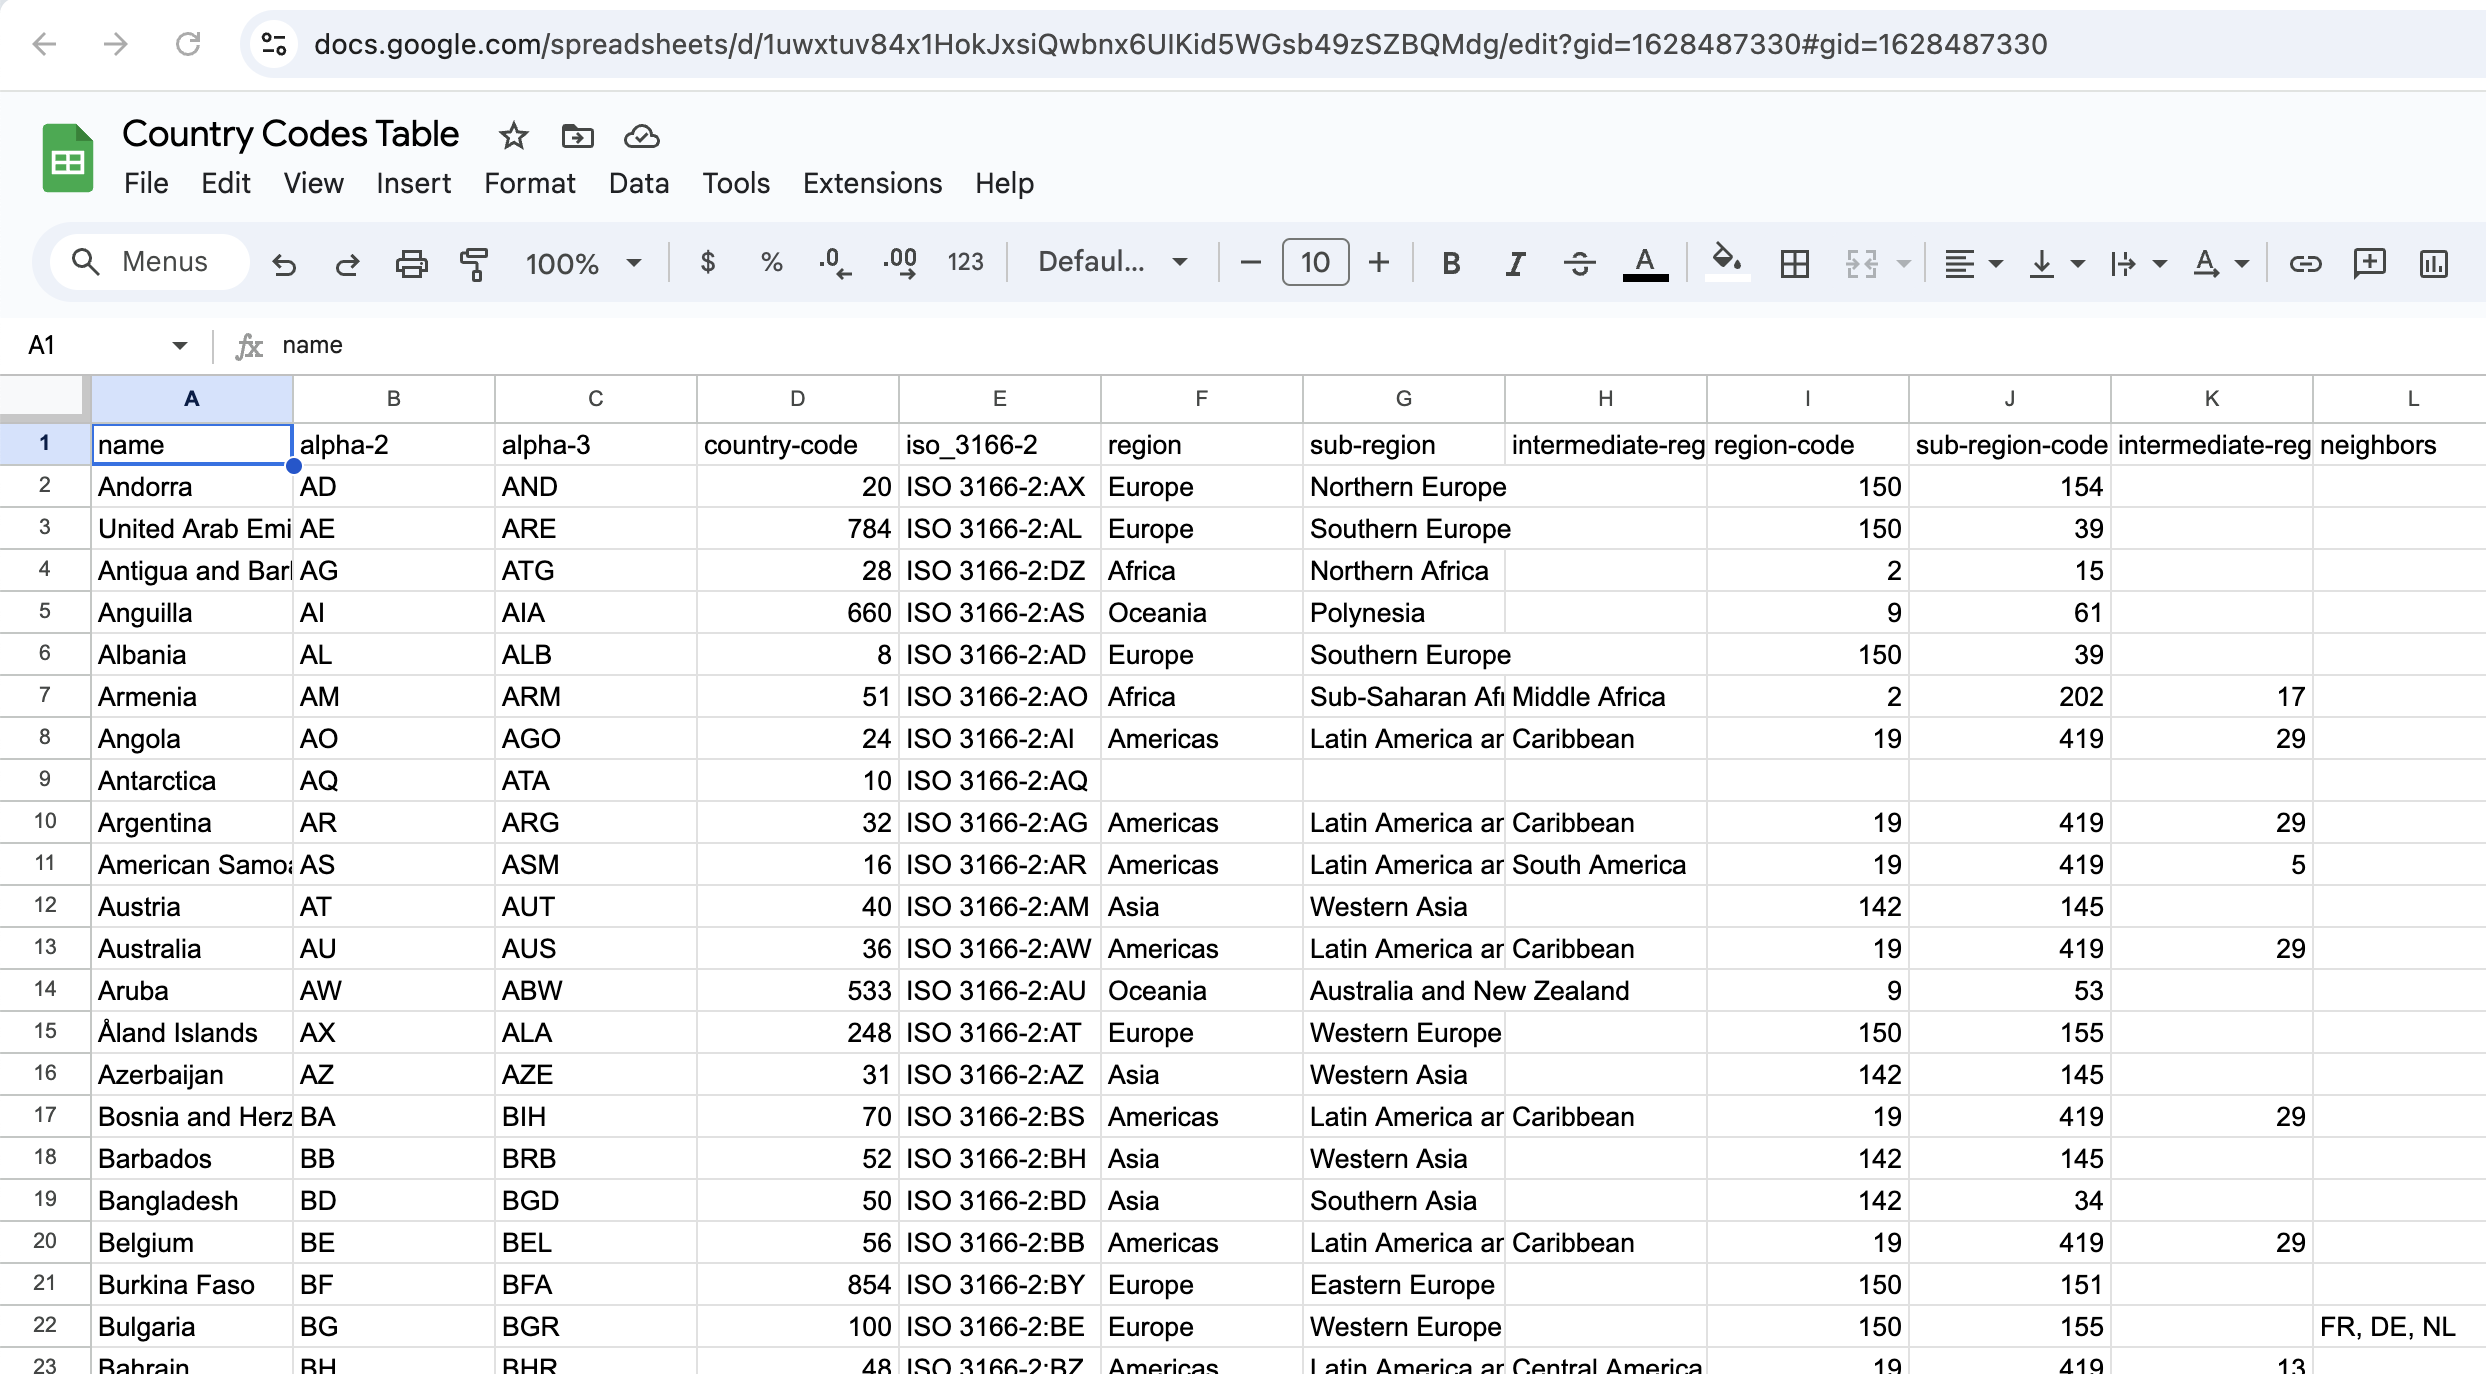
Import Instances from Spreadsheet is a bit like the inverse operation from Export Instances to Spreadsheet but produces a similar mapping that can then also be used to go in both directions - push, pull and validate.
It opens this dialog in which you start by selecting the source, for example by pasting the URL of an existing Google Sheets document:

Here, this needs to be the URL of a spreadsheet that the Google service account created in Connecting TopBraid with Google Sheets has access to. To make sure this is the case, use the Share button in the upper right corner of the Google Sheets page and invite the service account (with the same email that was configured in the product configuration page).
Alternatively, you can select an Excel file from SharePoint or upload an individual Excel, TSV or CSV file.
Once you have successfully connected to the spreadsheet, TopBraid will look at the structure of the spreadsheet and expand the dialog like this:
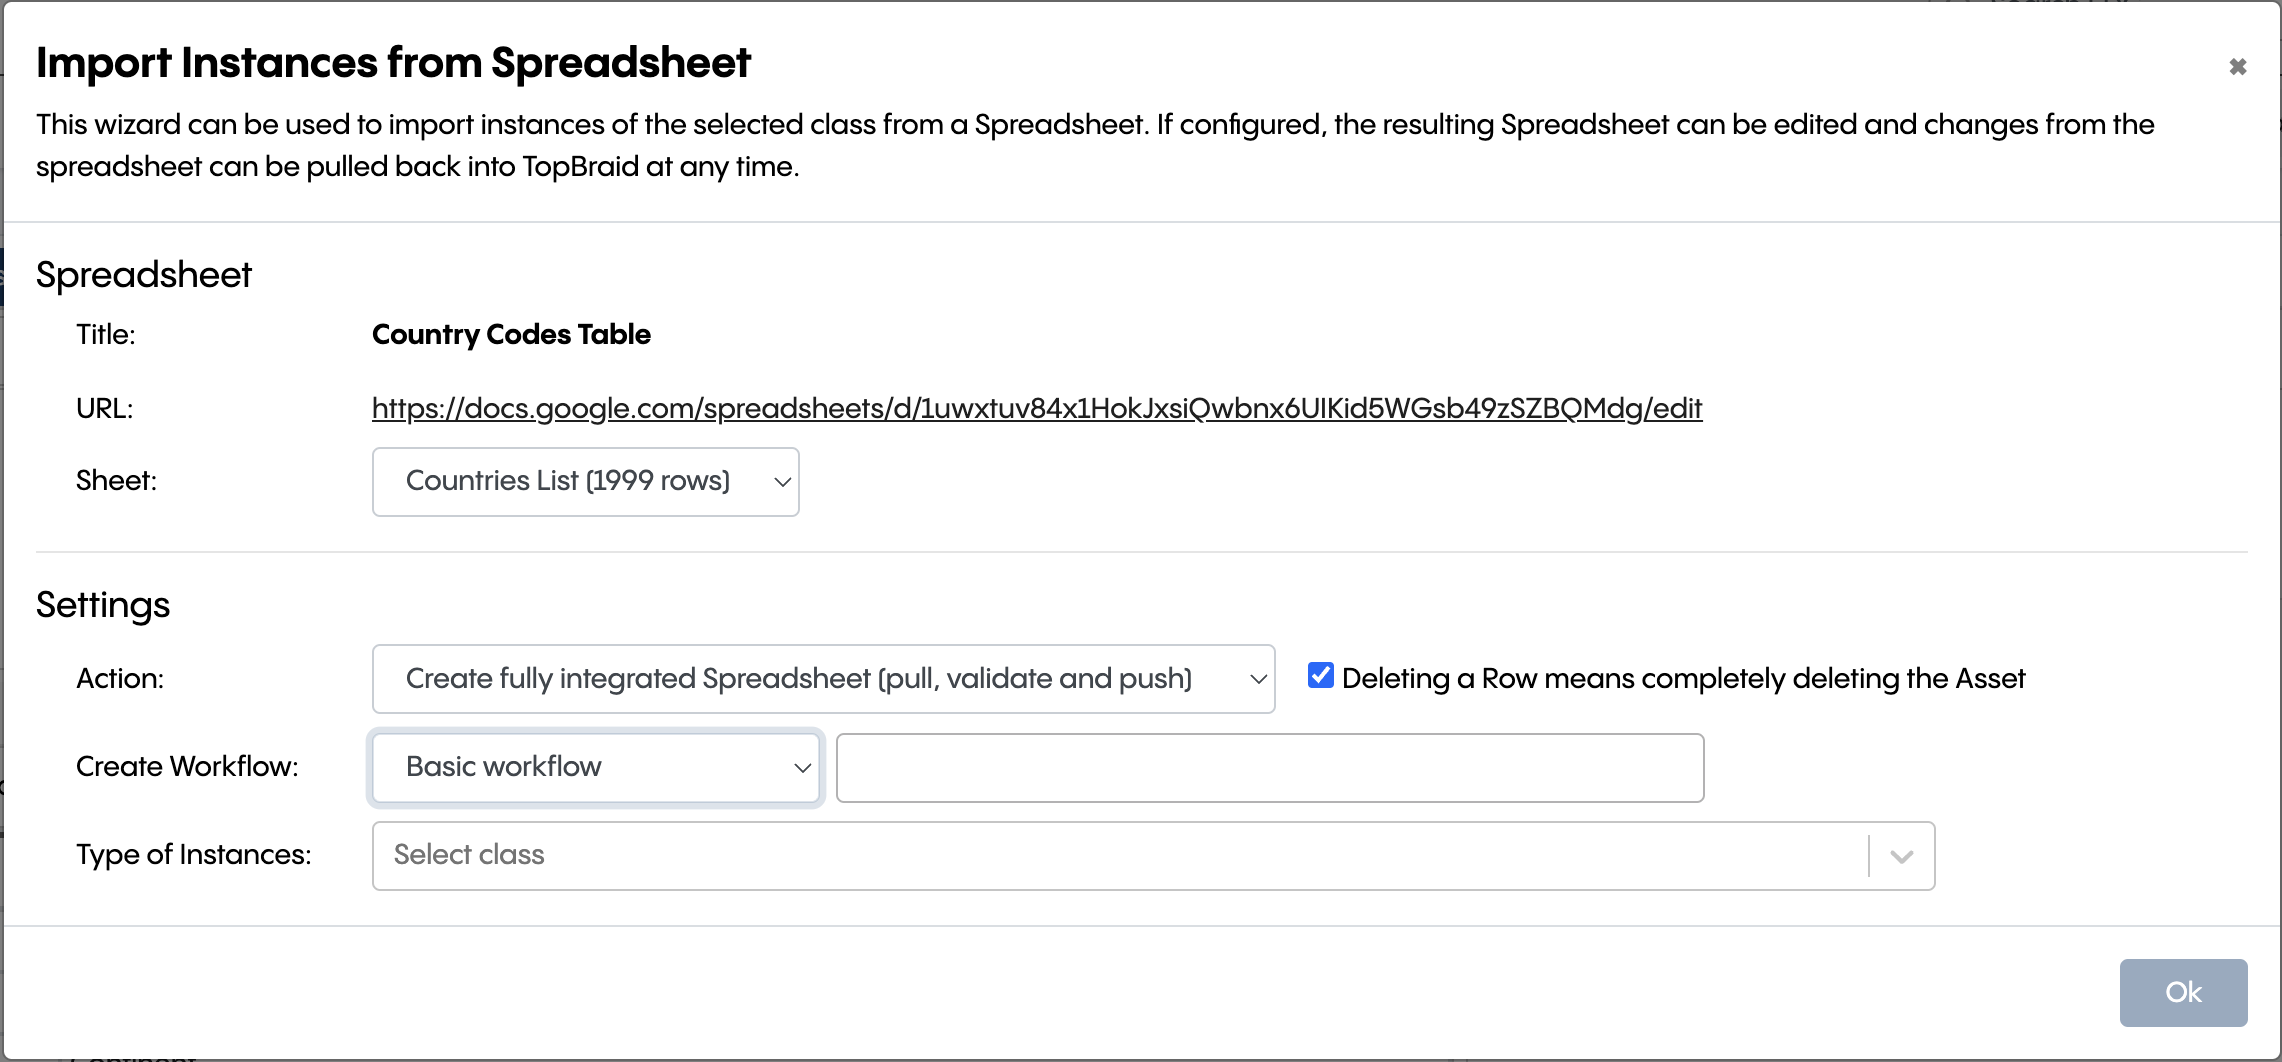
The settings here are:
Action: Create fully integrated spreadsheet (pull, validate and push) is the default setting, allowing full round-tripping between the spreadsheet and TopBraid.
Create Workflow: Optionally, you can create a workflow that is connected to the spreadsheet. If you elect to do so, you can pull changes from the spreadsheet into the workflow where you have better means to validate and update the changes before they are committed to the production copy of the asset collection (or not).
Type of Instances: Select the (default) target class that the rows represent. Note that this can be individually overridden for each row, if one of the column gets mapped to the
rdf:typeproperty.
Once the type has been selected, the dialog will expand further and offer fields to configure the mapping of each column to properties of the target class:
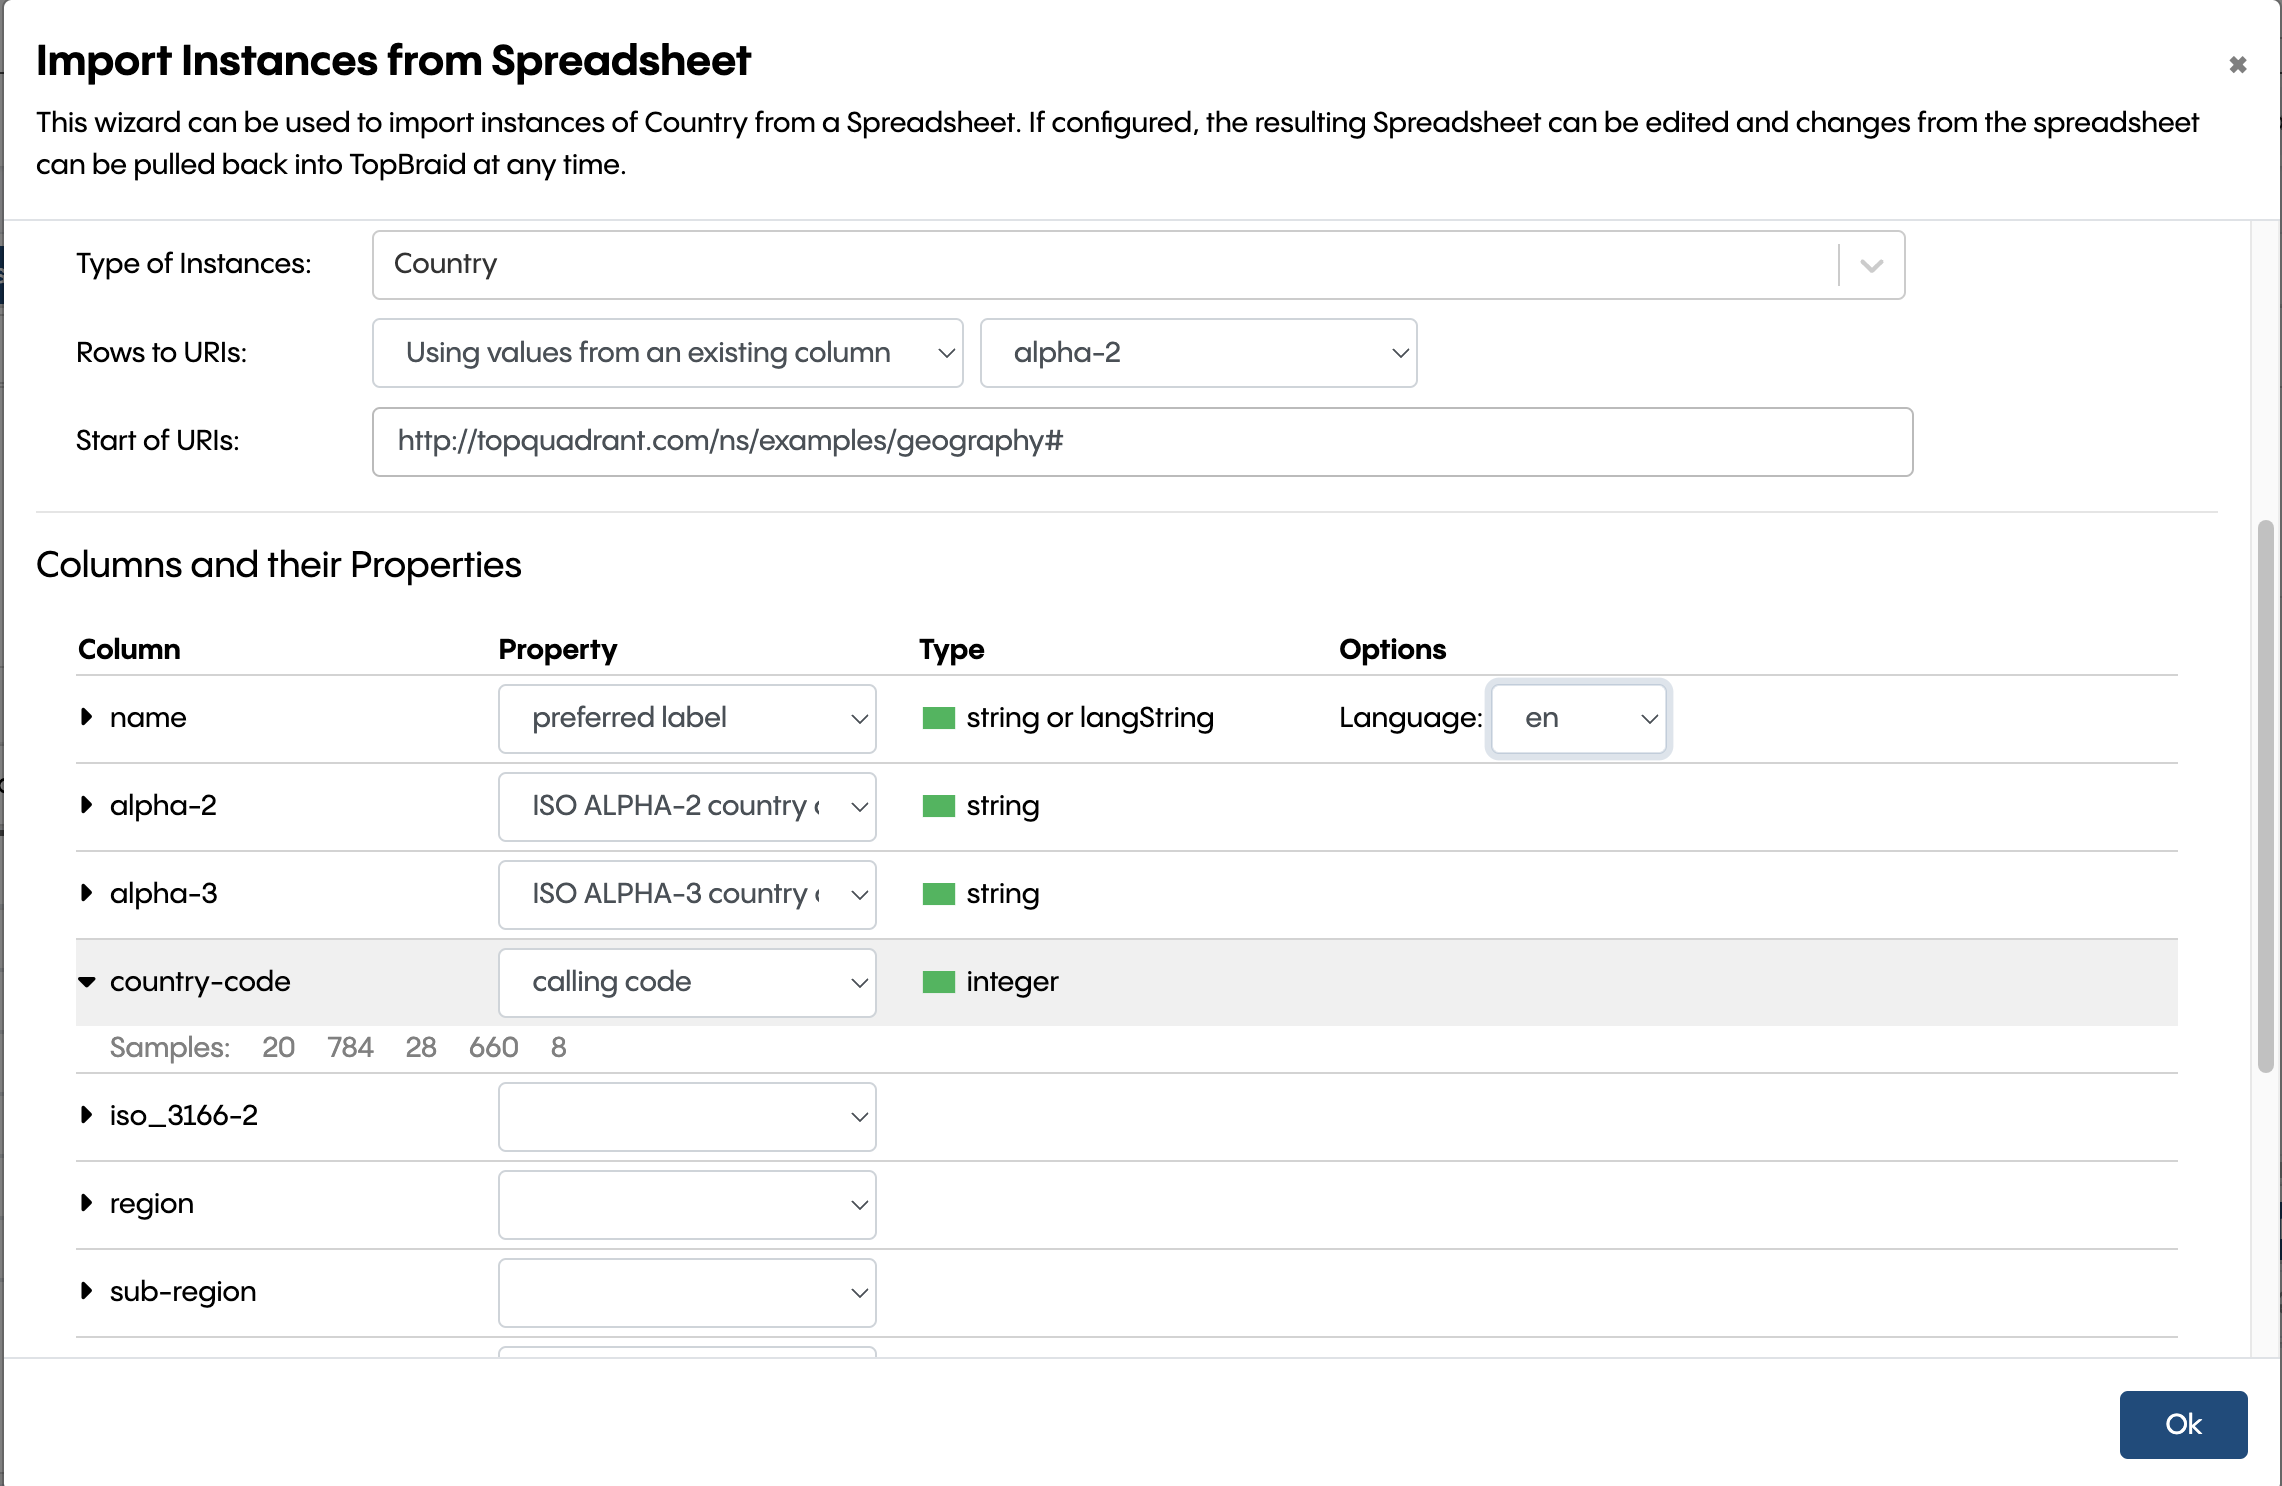
In the Columns and their Properties section you will see a list of all columns from left to right. You can expand the twistie on the left of the column name to see some sample values.
Note
In the current implementation, TopBraid assumes that spreadsheets contain the column names in the first row and all remaining rows contain cell data. In practice some spreadsheets start with empty rows or columns. We may make this configurable in the future, but for now you may need to make sure that the spreadsheets are formatted in this predictable manner.
To copy values from a column into the TopBraid asset collection, select a property from the drop down. Depending on the declared type of the property, you will see different options on how the values will be converted.
Press Ok to import the data into the current asset collection or workflow. If you have kept pull support active, this import can be repeated at any time when the spreadsheet has changed using the Pull button in the header of the asset collection’s editor screen.
Advanced Background on the Spreadsheet Mappings
When a spreadsheet integration has been created - either by the Import or Export operations described above,
and the Action has been left at its default with push and pull support, then TopBraid will create an instance
of the system class sheets:SpreadsheetDataIntegration which is a subclass of dash:DataIntegration.
Each instance of this class defines instructions such as the link to the spreadsheet and details of the mapping
between columns and properties.
In particular the dash:props property contains a JSON object such as this:
{
  "worksheetTitle": "All instances of Country",
  "defaultType": "http://topbraid.org/schema/enterprise#Country",
  "columns": [
    {
      "name": "short name (en)",
      "predicate": "http://www.w3.org/2000/01/rdf-schema#label",
      "datatype": "xsd:string",
      "lang": "en"
    },
    {
      "name": "short name (fr)",
      "predicate": "http://www.w3.org/2000/01/rdf-schema#label",
      "datatype": "xsd:string",
      "lang": "fr"
    },
    {
      "name": "iso 3166-2 alphabetic country code",
      "predicate": "http://topbraid.org/schema/enterprise#iso3166_2AlphaCode",
      "datatype": "xsd:string",
      "uriStart": "http://topbraid.org/data/country/CountryCode-"
    },
    {
      "name": "iso 3166-3 alphabetic country code",
      "predicate": "http://topbraid.org/schema/enterprise#iso3166_3AlphaCode",
      "datatype": "xsd:string"
    },
    {
      "name": "iso 3166 numeric code",
      "predicate": "http://topbraid.org/schema/enterprise#iso3166NumericCode",
      "datatype": "xsd:string"
    },
    {
      "name": "status",
      "predicate": "http://topbraid.org/schema/enterprise#status",
      "class": "http://topbraid.org/schema/enterprise#CountryStatus",
      "mapping": "labelsFromSheet"
    },
    {
      "name": "independent",
      "predicate": "http://topbraid.org/schema/enterprise#independent",
      "datatype": "xsd:boolean"
    },
    {
      "name": "has border with",
      "predicate": "http://topbraid.org/schema/enterprise#hasBorderWith",
      "idProperty": "http://topbraid.org/schema/enterprise#iso3166_2AlphaCode",
      "class": "http://topbraid.org/schema/enterprise#Country",
      "mapping": "ids",
      "concat": true
    }
  ],
  "workbookId": "GoogleSheets:Holger Google Sheets:1Rn9WtjkKuyjKDD6jkaEAEgj5yGXVzt6EZ52G6sFnh7E"
}
Expert users can potentially modify, copy or delete those Data Integration instances.
For example, if you have multiple similar spreadsheets that follow exactly the same structure, you can
simply clone a Data Integration instance and just replace the workbookId field.
You can find some details of the available configuration fields that define the mapping in the comment at
sheets:SpreadsheetDataIntegration.
The file sheets.ttl also contains the ADS scripts that perform the actual transformations.
The scripts use the IO.worksheets API.