Content Classification in EDG
Content Classification with TopBraid EDG
Licensing and Enablement
The availability of any asset collection is determined by what is (a) licensed and (b) configured under Server Administration. To install a license or to view the currently licensed features, see Product Registration Admin Page. To configure which licensed collection types are currently enabled or disabled, see Product Configuration Parameters Admin Page. For general licensing information and available asset collections and packages, see TopQuadrant.com.
Introduction
This document describes TopBraid Tagger and AutoClassifier, an add-on TopBraid EDG module designed to help you analyze your information assets –web pages and documents in many formats – to identify the context and meaning of each asset. This module can catalog your content, automatically extracting available metadata and help you add new metadata.
TopBraid Tagger and AutoClassifier uses state-of-the art AI to automatically enrich the content by assigning to them the most relevant tags from your controlled vocabularies (Taxonomies and Ontologies). Auto-classifying your content resources by connecting them to relevant vocabulary terms, delivers improved search, navigation and automates lifecycle management of content.
In addition to automatically assigning relevant terms to content, users can also manually tag or annotate content resources. In both cases, the result of tagging is a set of connections between the content and a vocabulary. For example, a resource representing a news story can be linked to vocabulary terms of Election and Weather through a property named “has subject”, stating that a given news story has topics of Election and Weather.
These relationships—tags—can be used to enrich search, browsing, and other applications by managing metadata on concept-to-vocabulary relationships. The role of Tagger is to make it easy to manage and create these relationships. Asset collections that store these relationships are called Content Tag Sets. This guide focuses on working with Content Tag Sets. Corpora is the second type of asset collection that is enabled when you add the TopBraid Tagger and AutoClassifier module.
See also
See Working with Corpora for working with this type of collections.
Content Tag Sets could also be used to create mappings between two taxonomies or two ontologies. However, if you do need to build a mapping between two vocabularies, please see Working with Crosswalks. It is likely to be a better fit for your use case.
Just like Crosswalks, Content Tag Sets only store relationships. For example, information in a Content Tag Set from the example above would have the general form:
{  <story> <hasSubject> <Election> .
   <story> <hasSubject> <Weather> .
}
Information about the news story and about the vocabulary terms (or tags) is stored in the asset collections that are connected using the Content Tagset. The first collection (containing information about the story) is called content graph. Typically, it is a Corpus. The second collection (containing information about tagging terms) is called tagging vocabulary. Typically, it is a Taxonomy, although it could also be an Ontology.
Create New Content Tag Set
When a new Content Tag Set is created, EDG requires the user to select a Content Graph and a Tagging Vocabulary.
The drop-down for the selection of the content graph will show all corpora, data graphs, taxonomies and ontologies. Typically, you would select a Corpus.
As mentioned above you could use Content Tag Sets to connect two taxonomies or two ontologies. However, Crosswalks are a better option for this. The capability to select a taxonomy and/or an ontology remains available to support compatibility with versions that did not offer Crosswalks. This may be changed in the future versions.
Additionally, the role of a content graph may be played by a file in EDG’s workspace. EDG Administrators can identify files that are to be used as content graphs. They would then also show up in the drop-down selection for a content graph.
Tagging vocabulary is either a taxonomy or an ontology. The drop-down selection will show available ontologies and taxonomies.
User will also be asked to:
Select a Default Tag Property – a property that will, by default, be used to connect assets in the content graph with the vocabulary terms. Auto-tagging will always use the default property. When tagging manually, users can select among other properties. After creation, the Manage tab will let you select other properties that may be used for tagging.
Optionally, select a Root Class for the content types tree – this is similar to selecting a Main Entity for other asset collections. By default, if your content graph is a Corpus, the root will be Document.
Please see the Working with Asset Collections for all the general features of asset collections such as import/export, user permissions, reports and settings. Specific Content Tag Set only information is contained within this page.
Managing Tag Sets
The Manage tab for Content Tag Sets contains an additional feature:
Select Tag Properties lets you modify, by checking or unchecking checkboxes, the list of which properties from the property graphs should be available on the Tagger drop-down property list.
The Export tab for Content Tag Sets contains this additional feature:
Normalized Concepts (Troubleshooting) Generates a normalized version of the Tagging Vocabulary used in this Content Tag Set, as it would be seen by AutoClassifier, and returns it in the Turtle format. This can be used to check, for example, if desired language-specific labels are selected over other languages when dealing with multilingual vocabularies.
Tagging Documents
To manually tag documents click on the Taggings tab at the top of the page. This will take you to the editor application. This guide describes the new editor released as part of TopBraid EDG 6.3. Please refer to doc.topquadrant.com for the “old” editors.
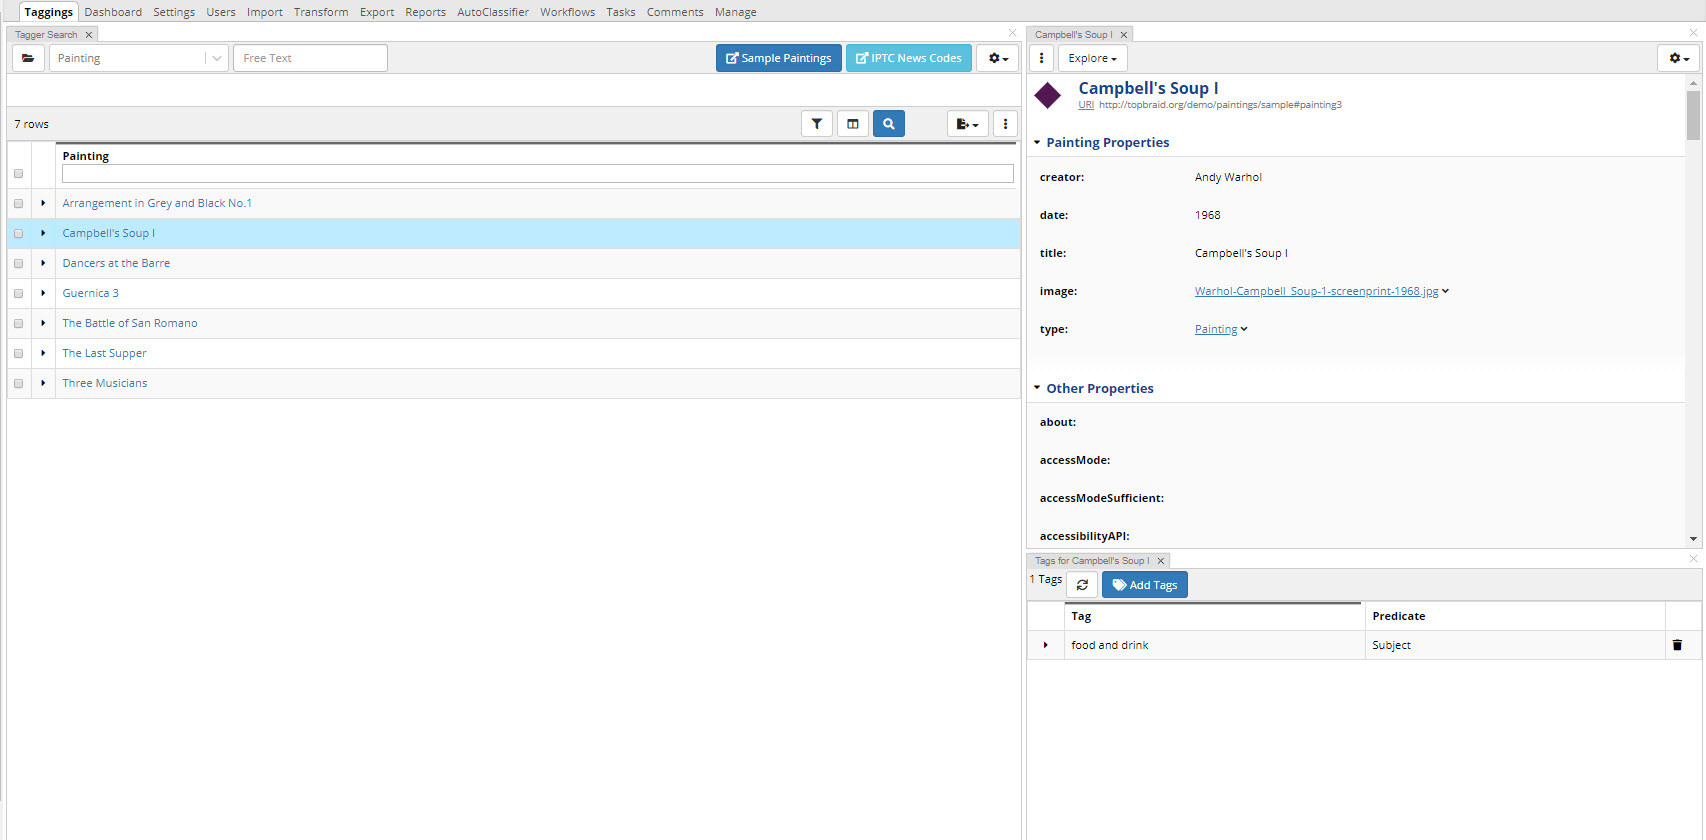
TopBraid EDG Taggings Tab
The Tagging editor has very similar features to the other collection editors for searching, panel and layout options.
See also
Please see Using Forms to View and Edit Asset Information to learn more about using the features of the EDG editor.
To add a tag, use the Tags panel located in the bottom right by default. Shown above for “Campbell’s Soup”. You can delete tags through this panel as well.
The Add Tags button brings up a new dialog. Here you can search for your concept with a hierarchy tree view or switch to the search view by using the magnifying glass icon. Continue to add tags here until you are finished and then select close button. You can add one to many.
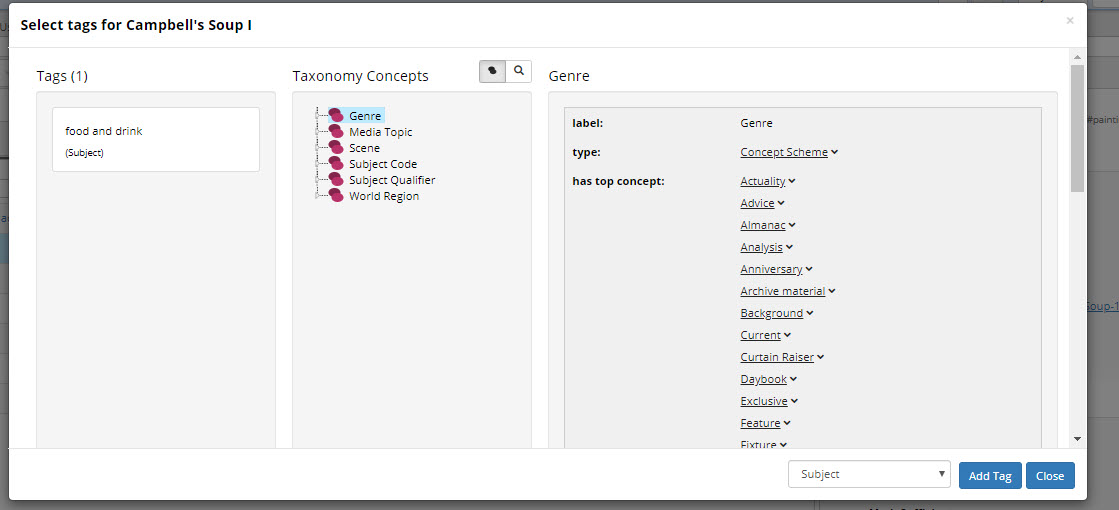
TopBraid EDG Tags Panel
Tagging can also be done through the Add tag panel.
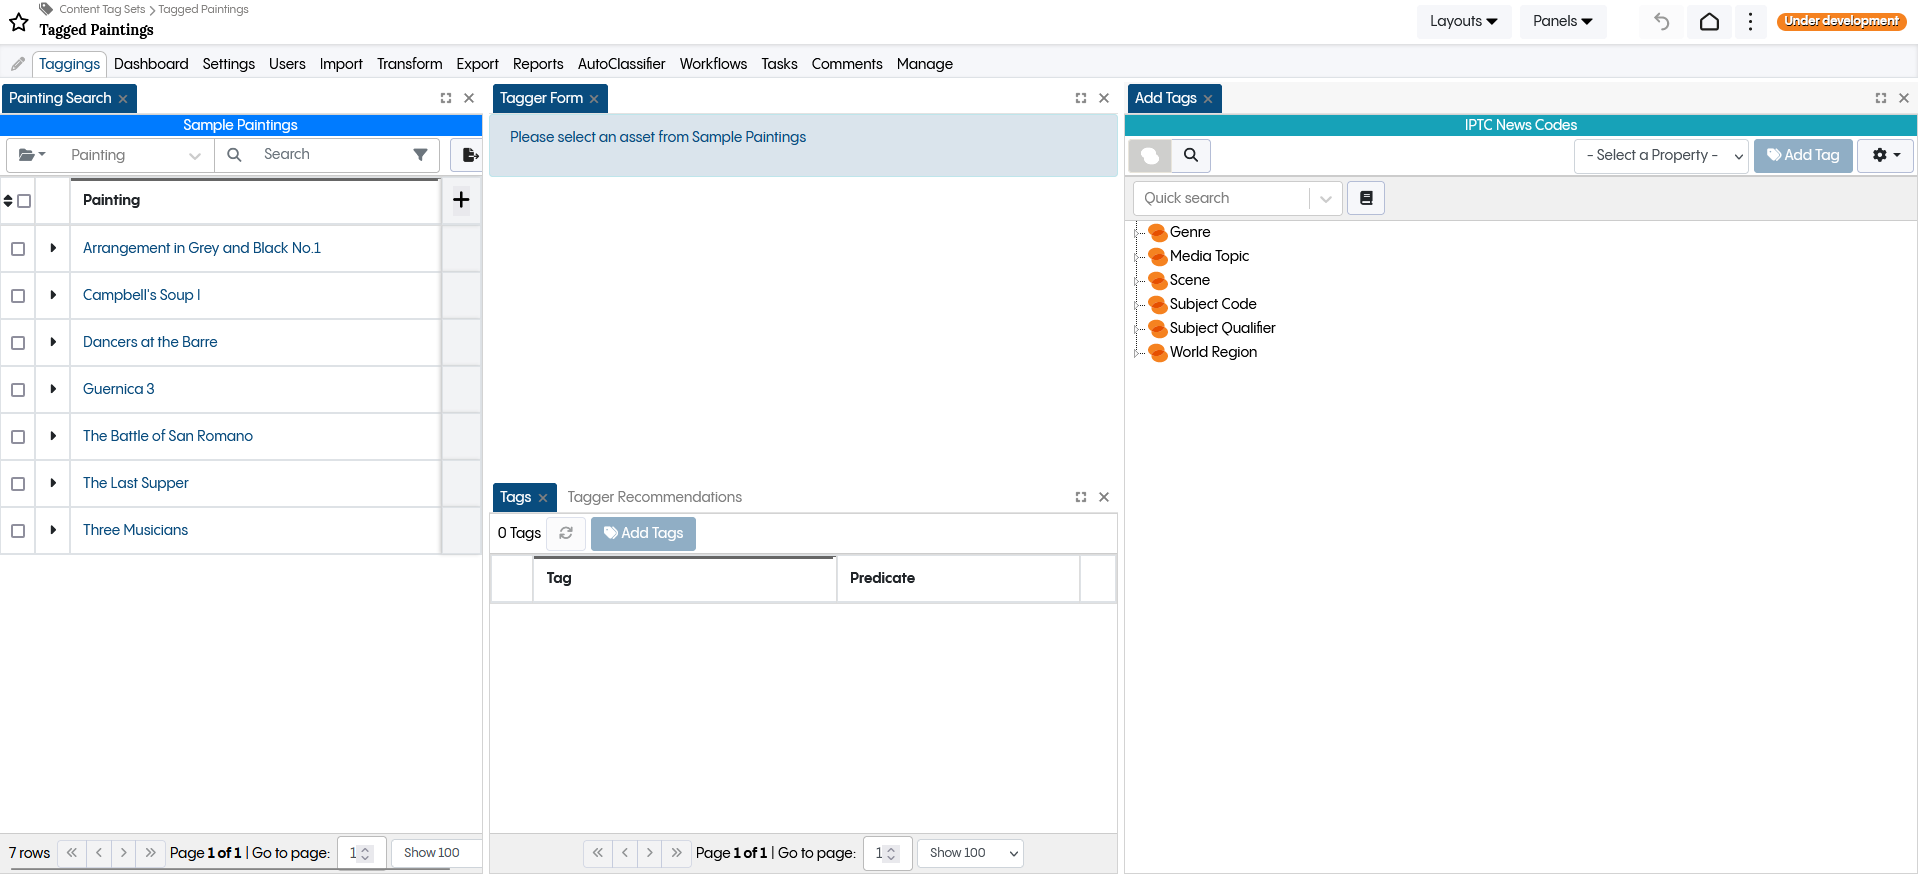
TopBraid EDG Add Tag panel
Tagging through this panel is similar to the previous method, with the distinction that an asset must be chosen via the search panel. In the tag panel, users can view properties grouped similarly to the form view. This can be achieved by opening the context menu and selecting ‘Open on a new Form.’
Configuring Content Graphs
Typically, you will use a Corpus as a content graph and you will either use a connector or enter/upload/import, documents. Corpora asset collections in EDG are based on a model that is called TopBraid Simple Corpus and Document Schema.
If you need to configure this model, you can create an ontology and, using Settings>Includes include TopBraid Simple Corpus and Document Schema. Then, you can extend it if needed. If you plan on using a Data Graph as your content graph, then you would need to create an ontology for it. This ontology may be, but not necessarily have to be, an extension of the TopBraid Simple Corpus and Document Schema.
If you are creating a file that will be used as a content graph (e.g., a file obtained from some third party), there are a few notes to keep in mind:
For the Content Types hierarchy to display properly in a Content Tag Set, the root classes must be subclasses of rdfs:Resource.
The Content Tag Set editor displays titles of resources in the content graph using the rdfs:label property, or any subproperty of rdfs:label. If the title (label) uses a property other than rdfs:label, such as dc:title, define dc:title as a subproperty of rdfs:label. The title will then display properly. Additional properties about each content resource will be displayed on the form when the resource is selected. The form (and AutoClassifier result reports) will display any
dc:sourceproperties of those graphs as hypertext links to the URLs provided as values, so these are useful for providing easy access to such a resource for the users tagging them.The documents should all be typed with some class (or one if its subclasses), and that class should then later be used as the Root Content Type when creating a Content Tag Set.
All properties that occur on any document resource (for example, date or author) should have an rdfs:label, or a subclass of rdfs:label, so that they can be displayed better. This can be achieved by importing an ontology that defines such labels into the content graph.
Content graphs and tag property graphs should have rdfs:labels for the graph URI so that they are displayed nicely in the dropdowns when creating new Content Tag Sets.
Ensuring these conditions may require slight customization of the graphs obtained from third parties. This is usually achieved most easily by creating a new graph, importing the the third party graph, adding customizations to this new one, and then selecting that one on this configuration screen.
For content graphs that will be used by Tagger’s AutoClassifier feature, also keep that the actual text content of the documents should be kept in the content graph, in a property of the document resource such as “fullText” or “content”. The text in this property, possibly along with other text-containing properties such as title or abstract, will be analyzed by the AutoClassifier, both in training and when generating tag recommendations for documents.
If you are planning to auto-create files, the TopBraid platform used to develop EDG provides tools such as SPARQLMotion for automating conversion of the documents. However, this can also be done using a programming language of the user’s choice. Typically, a conversion script runs on a scheduled basis (for example, nightly) or on demand. After the initial run, a conversion script can process only newly added or changed documents. Once the documents are tagged, information about tags can be provided to the content management and enterprise search systems through export or, in real time, through web services and queries.
Using AutoClassifier
Note
The AutoClassifier supports two implementations: Vector Index and Maui Server. The Vector Index based AutoClassifier is currently a SaaS only feature. Maui Server must be used for on-premise installations.
See Running the AutoClassifier .
Tagger’s AutoClassifier feature can tag a set of documents to a specified taxonomy. If the Maui Server implementation was selected, it’s require to run a training step with an appropriate set of tagged sample documents beforehand. The AutoClassifier stores the automatically added tags in a workflow of a tag set where you can review the tags before committing them to production.
This section assumes that the AutoClassifier is correctly configured. If the link Content Tag Set’s > Manage > Configure AutoClassifier is missing, then contact your EDG administrator regarding both (1) the licensing and installation of the Topbraid AI Services or the Maui Indexer server and (2) the EDG administrative configuration of the AutoClassifier parameters for the selected implementation.
See Auto Classifier Installation.
Setting up a Content Tag Set for Automated Tagging
The steps of creating a Content Tag Set for automated tagging are the same as for manual tagging: create a Content Tag Set, specify the content graph and tagging vocabulary, and then select a default tag property as described above. The default tag property is the one that AutoClassifier will use when tagging content items with vocabulary terms.
If instances in the content graph include dc:source values with URLs pointing to actual documents, Tagger will use these URLs to turn content titles in reports on AutoClassifier activity into hypertext links.
There are a few things to keep in mind about the vocabulary that you use for automated tagging:
When using the Vector Index implementation:
Smaller taxonomies may give better results.
Merging similar concepts whose distinction is not important for the tagging use case may improve results.
Taxonomies that have rich values in the properties configured in the Vector Index configuration work best.
The results can be improved by using description properties for the Vector Index and richer descriptions.
When using the Maui Server implementation:
Large taxonomies that cover the domain of interest in detail are good, as they give AutoClassifier more terms to choose from.
Smaller, shallow taxonomies with general concepts work less well, as the concepts are less likely to directly appear as keywords in the text.
Taxonomies that have rich skos:altLabel and skos:hiddenLabel values will work best.
Taxonomies can be improved to work better with AutoClassifier by adding more specific sub-concepts and by adding alternate labels to existing concepts. The goal is to have keywords or phrases that occur in the document corpus appear as labels in the taxonomy.
Some special considerations apply when using EDG-managed ontologies (as opposed to EDG-managed taxonomies) as concept vocabularies.
Training the AutoClassifier
Note
Training is only required for the Maui Server implementation. The Vector Index based AutoClassifier implementation doesn’t require the training step.
After either manually tagging some of the content with the configured default tag property, or after importing a set of tags from a file, the next step is to have the AutoClassifier analyze this set of tags to identify patterns that it can use when tagging additional content. To configure this, first ensure (per above) that Maui Server is installed and the AutoClassifier is configured accordingly, then select Configure AutoClassifier from the content tag set’s Manage tab.
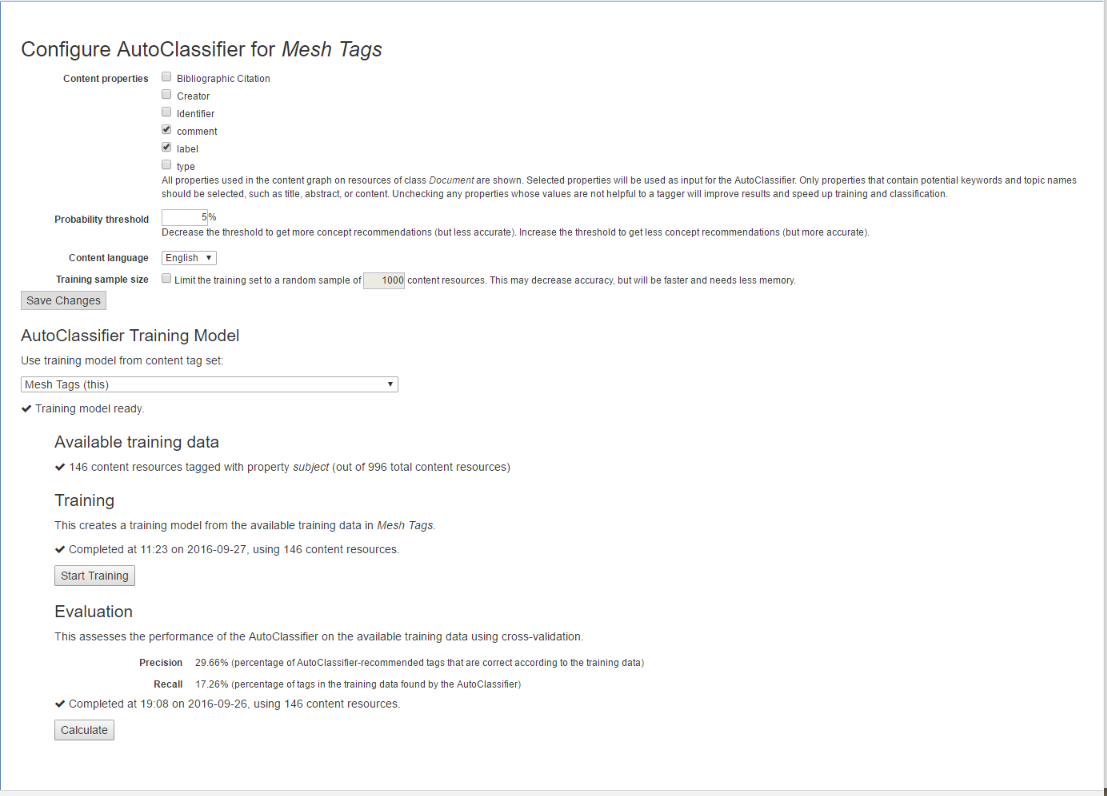
TopBraid EDG Configure AutoClassifier Example
As shown above, the configuration screen includes descriptions of the properties that you can set.
The Content language offers a choice of English, French, German, or Spanish parsing of the content. This setting also affects the handling of language-tagged literals in the content graph and concept vocabulary graph. If a language is chosen here, non-matching language-tagged literals will be ignored during auto-classification. Leaving the setting on (default) will use the system language (as configured in Maui Server) and is not recommended for multi-lingual content graphs.
Amount of training data: As a guideline, we recommend having at least 100 tagged content resources as training data. AutoClassifier will work with lower numbers, but the quality of recommended tags will be lower. Adding more training data is good, but there are diminishing returns. If 1000 tagged content resources are available as training data, adding more may make little difference to the quality of results, but will still increase the amount of computing resources required for training. If you wish to limit the training set to a random sample, you may specify a Training sample size and enter the desired number of content resources.
Only taggings that use the default tag property will be used as training data.
After choosing appropriate options, click Save Changes and then the Start Training button. Training may take a while. After training is complete, the AutoClassifier is ready to recommend tags, as described in the next chapter.
Re-training: The training process can be repeated at any time. Re-training is recommended in the following situations:
After the taxonomy has changed.
When the nature of the content resources changes significantly, e.g., many new content resources that differ in length or in used properties are being added since the last training.
If the amount of available training data has increased significantly since the last training, but is still below the numbers where we see diminishing returns.
Note
Re-training is not necessary when only a few content resources were added, or when incremental changes were made to content resources.
Evaluation: AutoClassifier works by using the training data to train a machine learning model. AutoClassifier analyses each document in the training data and its associated training tags. If the learning process works well, AutoClassifier is then able to predict similar tags for any other input document. AutoClassifier has an evaluation function that can be used to quantify how well this training process works, by computing precision and recall scores. These scores can be helpful to understand the effect of activities such as adding more training data, adding more skos:altLabels, or adding more concepts to the taxonomy.
Click Calculate to compute precision and recall. This calculation is done using 10-fold cross-validation, in other words, the collection of training documents is split into 10 parts, and then 9 parts are used for training, and AutoClassifier is run with the resulting training model on the documents in the 10th part (the test set). This is repeated ten times, with a different part as test set each time. The results are averaged. This process means that the training process never sees the documents that are used for calculating the scores.
Keeping training data separate from AutoClassifier results: The recommended workflow for AutoClassifier is to keep training data in one content tag set (the training tag set), and AutoClassifier results in a different content tag set (the target tag set). This ensures that manually created training tags are not mixed with lower-quality auto-generated tags. This setup also makes it possible to do training on one set of documents, and auto-classification on a different (larger) set of documents.
In this scenario, the AutoClassifier configuration and training described above would only be done within the training tag set. After this has been done, navigate to the AutoClassifier configuration screen of the target tag set, and select the training tag set from the AutoClassifier Training Model dropdown. This will enable AutoClassifier on the target tag set, using the training result from the training tag set.
It is recommended that training tag set and target tag set should share the same concept vocabulary. If they use different concept vocabularies, then only terms that are shared between the two vocabularies will be found by the AutoClassifier. If they don’t share any terms, AutoClassifier will be unable to generate any recommendations.
The Manage Tab also has the option to run AutoClassifier automatically when any content changes on the Content Tag Set. Check the box in the item as shown here:

TopBraid EDG Run AutoClassifier Automatically on Content Changes Option
Running the AutoClassifier
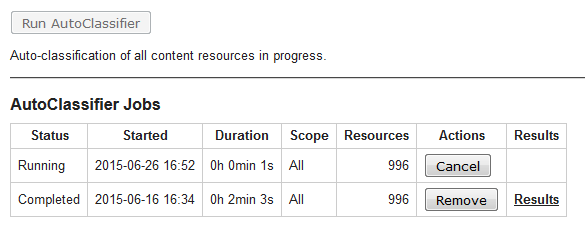
Once you’ve configured the Content Tag Set (and done your training if you are using Maui Server), you can return to the AutoClassifier tab and click the Run AutoClassifier button. You will see a new row added to the table on that page, showing that your job is running and giving you the opportunity to cancel the job if you wish, as shown in the “Running” row of the table below:
TopBraid EDG AutoClassifier Jobs
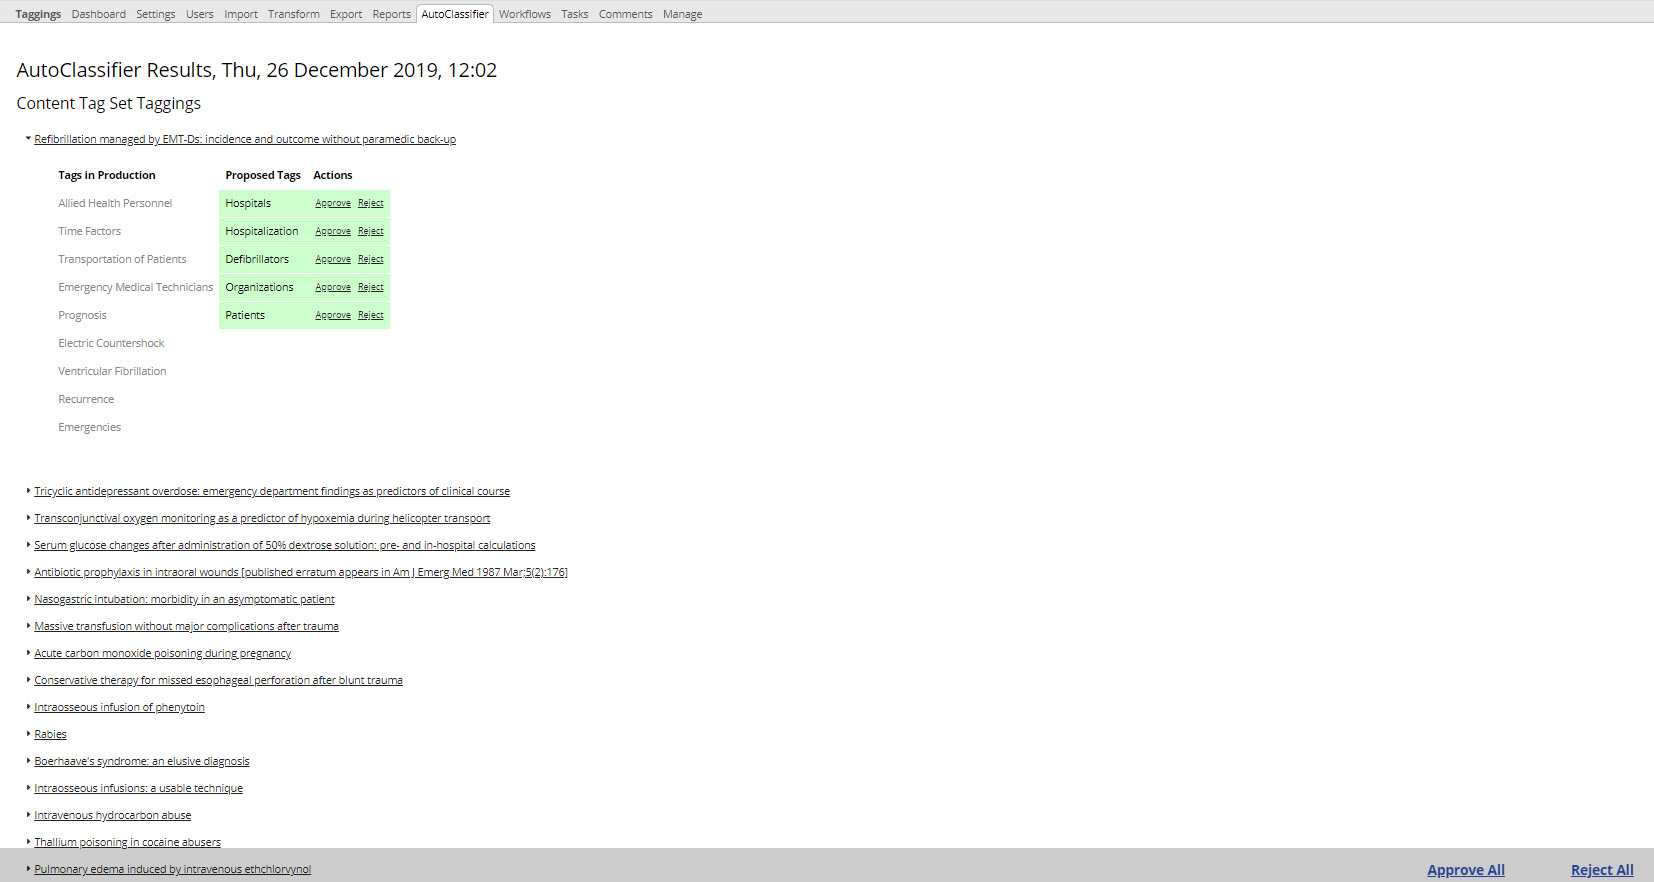
If you refresh your browser before the job is completed, you will see the Duration value for the running job updated in the table. The next time that you refresh your browser after the job is finished, you will see that the status has changed from “Running” to “Completed,” and a “Results” link will appear in the final column. This link leads to a report similar to the following:
TopBraid EDG AutoClassifier Results
Clicking the little triangle to the left of any Tag (as someone has done with the “Refibrillation managed by” one above) expands in the second column the list of tags proposed for assignment to those documents, along with tags already in the production copy (if this is the first time AutoClassifier runs on this Content Tag Set, it is likely that tags already in production copy are part of the training data).
Note
From the header of this report that the new tags have not been applied to the production tag set, but are instead stored in a workflow named “AutoClassifier Results” plus a date and time stamp.
In the last two columns of the report, each proposed tag can be approved, which commits it to the production tag set, or rejected, which removes it from the workflow. Links in the lower-right do these for all the generated tags.
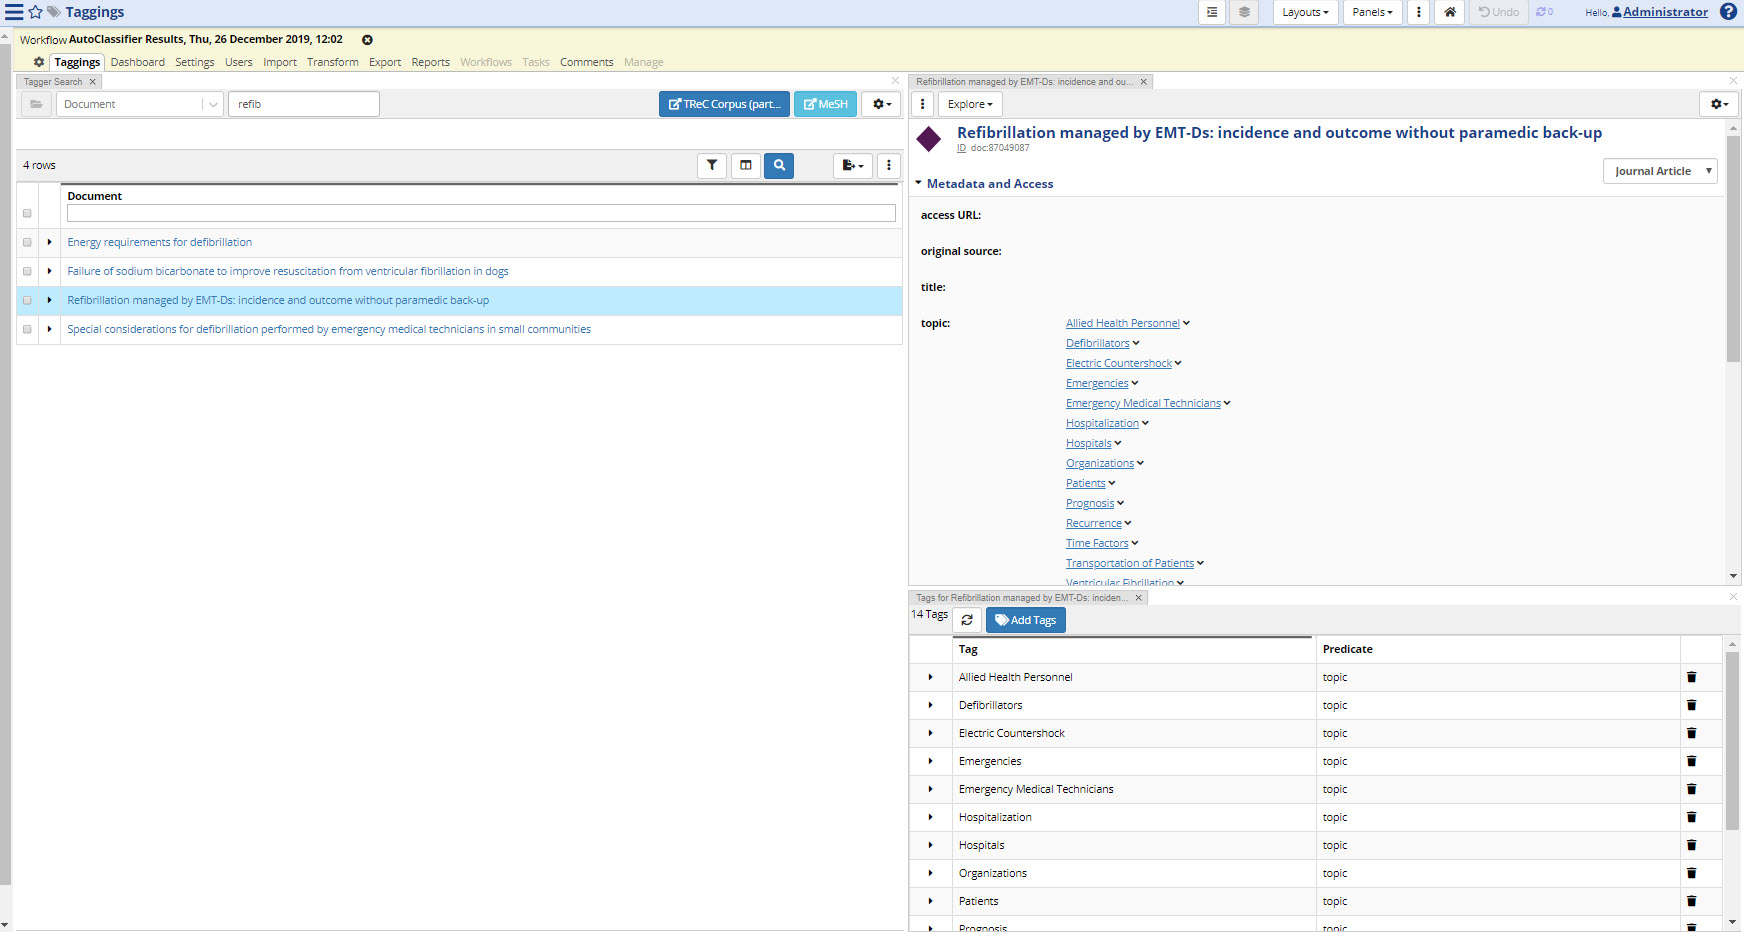
You can also edit the tags added by the AutoClassifier in the regular Tagger interface. You can delete, add, and otherwise edit these tags as you normally would in a tag set workflow.
TopBraid EDG Regular Tagger Interface
Recommended Concepts Panel
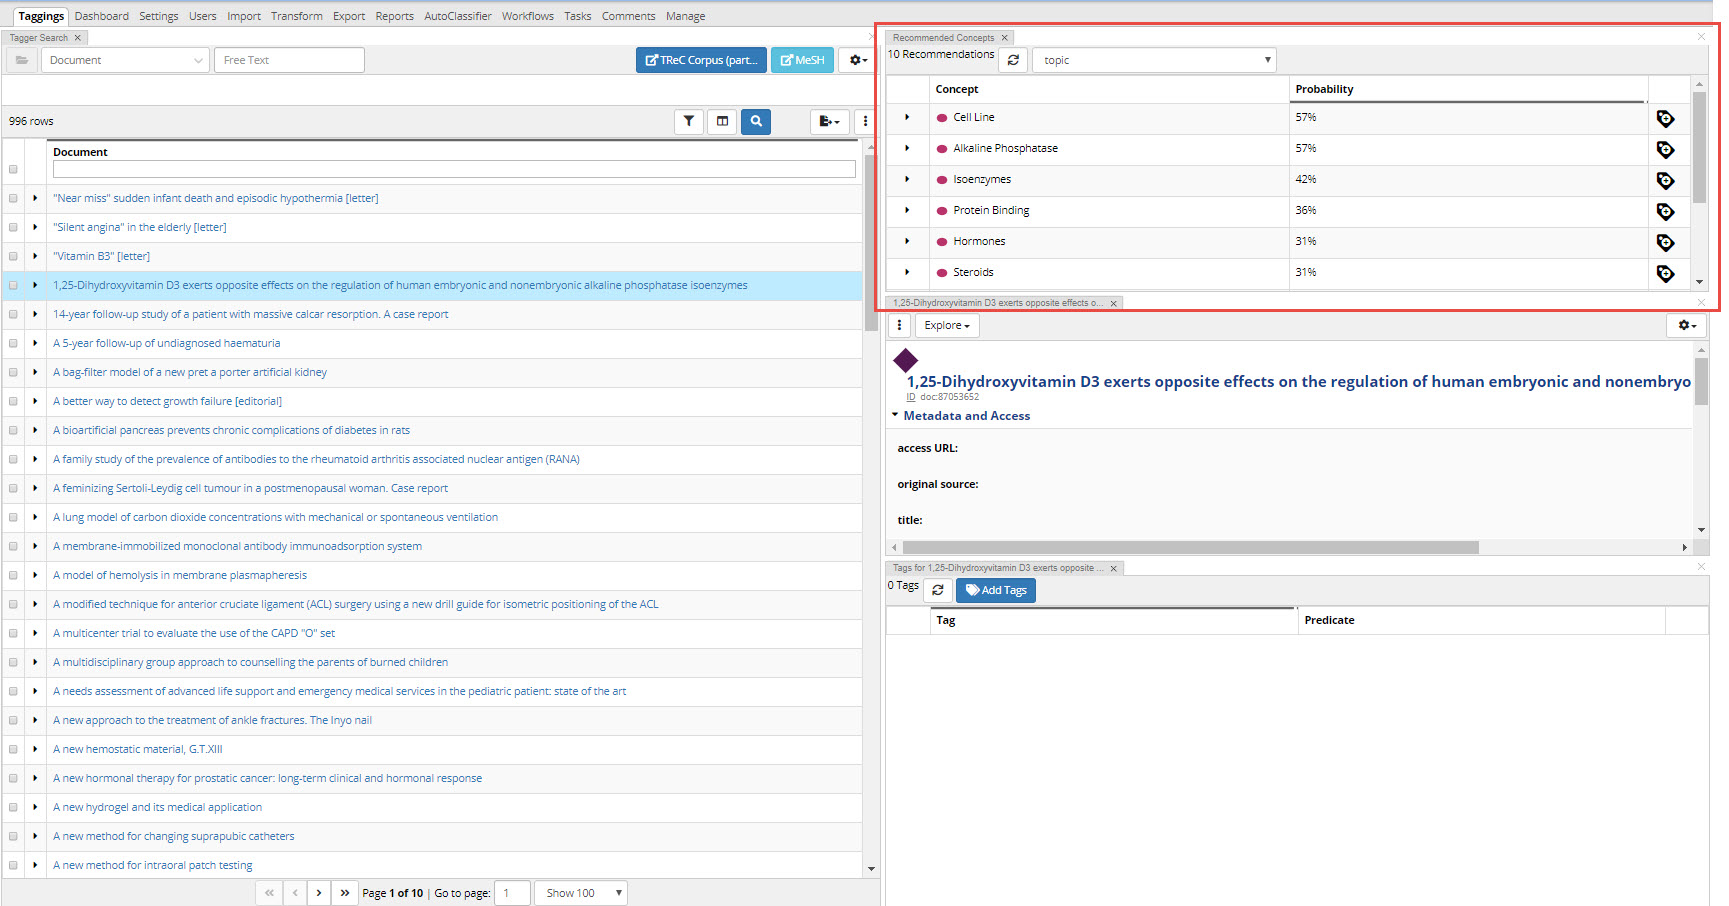
After AutoClassifier has been trained, editors can see the recommended concepts for each document on the “Recommended Concepts” panel. Here users can see a list of AC’s candidate tags, along with each candidate’s confidence score. Adding a tag here will be the same behavior as the Auto Classifier Results Report, it will immediately add the tag to the production copy. Users can also refresh the recommendations.
If you don’t see this panel in your view, pull it down from the Panels menu at the top.
TopBraid EDG Recommended Concepts Panel
AutoClassifier Integration Points
While several entry points are provided to make use of AutoClassifier with different scopes across Tagger, its further integration with external systems extending EDG is possible with two options: a web service and a SPARQL property function.
AutoClassifier Web Services
AutoClassifier can be controlled and invoked through a collection of web APIs.
This includes an API function that recommends tags for a submitted text snippet and returns JSON results.
See the file teamwork.topbraidlive.org/tagger/autoclassifier-services.ui.ttlx.
Autoclassifying SPARQL property function
Auto-classification can also be triggered from within a SPARQL query with the property function autotagger:autoClassify, which enables further customization of its behaviour. The example below does showcase it:
PREFIX autotagger: <http://evn.topbraidlive.org/autotagger#>
SELECT * WHERE {
    GRAPH ?contentGraph {
        ?cts autotagger:autoClassify (?doc ?concept ?probability)
    }
    GRAPH ?taxon {
        OPTIONAL { ?concept skos:prefLabel ?label }
    }
}
Values shall be bound (either hardcoded or in other parts of the query) to the following variables:
?contentGraphis the content graph where unstructured text resides in documents;?ctsis the EDG Content Tag Set project URI, e.g. <urn:x-evn-master:DocsSet>?docis an instance of document, e.g. <http://example.org/trec/doc/87049087>. These instances must have triples for properties configured as content properties in the Content Tag Set’s AutoClassifier configuration?taxonis the EDG Taxonomy project URI, e.g. <urn:x-evn-master:MyTaxonomy>
Preparing Ontologies and Taxonomies for use as Tagging Vocabularies with AutoClassifier
AutoClassifier automatically assigns tags to documents. The tags are chosen from the pool of concepts in a tagging vocabulary. The tagging vocabulary can be a taxonomy expressed in SKOS. In this case, instances of skos:Concept form the pool of possible concepts. A taxonomy can also be based on a model that extends SKOS with some subclasses of skos:Concept. Or alternatively, the tagging vocabulary can be some an ontology. In such cases, the modeler has some control over the pool of resources that are used as tags.
The rules used by AutoClassifier to determine the pool of resources to be used as tags are as follows:
If a tagging vocabulary contains any instances of skos:Concept or any of its subclasses, then these concept instances become the pool of potential tags.
If the ontology’s root class is owl:Thing (this is the default), then the classes defined in the ontology will become the pool of potential tags. Otherwise, any subclasses of the root class will become the pool of potential tags.
You may have a candidate for a tagging vocabulary that does not use either direct instances of skos:Concept nor a class hierarchy to capture the concepts to be used as tags by AutoClassifier. Instead, it may contain instances of some other class, such as Topic or Location. In this case, you should make this other class a subclass of skos:Concept. This will tell AutoClassifier to include the instances of that class in the pool of tags.
AutoClassifier makes use of preferred and alternate labels (only used by the Maui Server implementation) as well as concept relationships in the tagging vocabulary. It will consider the following properties:
Preferred label: skos:prefLabel and sub-properties, or if that property is not defined, rdfs:label and sub properties
Alternate label: skos:altLabel and skos:hiddenLabel
Hierarchy: skos:broader, skos:narrower, rdfs:subClassOf
General relationships: skos:related, skos:hasTopConcept, owl:sameAs, owl:equivalentClass
For more information on how to configure the labels for the Vector Index see Enabling the Vector Index for an Asset Collection.
Other properties in the ontology can be added to these lists of considered properties by declaring them as subproperties of skos:prefLabel, skos:altLabel, skos:broader and skos:related. For more information, see Working with Ontologies.
Additionally, follow the advice provided in the Setting up a Content Tag Set for Automated Tagging section of this document.
Providing Training Tag Set Data
To train AutoClassifier, you will need a set of sample tags. You can create them by using the Content Tag Set editor and manually adding tags. Alternatively, you may already have some tags established for a curated body of content. If so, you can prepare a file for import.
You can import and export tag set RDF data in standard serialization formats. When you use Tagger to tag content with a concept, it is stored in the tag set as actual triples, which are statements expressed using the W3C standard RDF. RDF uses URIs to represent resources such as content resources, tag properties, and the concepts.
For example, if the URI associated with the news story “‘Gangnam Style’ becomes most watched YouTube video ever” is http://en.wikinews.org/w/index.php?&oldid=1711859, and you use Tagger to tag it as having a Dublin Core subject of “dance” from the IPTC set of news codes, the triple created by Tagger is:
{ <http://en.wikinews.org/w/index.php?&oldid=1711859>
  <http://purl.org/dc/elements/1.1/subject>
  <http://cv.iptc.org/newscodes/subjectcode/01006000> }
The RDF file you prepare for import of tags, should follow this format.