EDG Reference Data Management
About This Guide
This guide provides a hands-on tutorial for working with the TopBraid EDG Reference Data Management package. It walks you through a series of day to day tasks you may perform using TopBraid EDG. Throughout this journey, the guide offers background information and instructions on each topic.
This document is organized by roles showing how:
Reference Data Stewards can create and modify enterprise reference datasets and and ontologies, import reference data and manage information about it.
Data Stewards can create reference datasets that reflect reference data in sources they are responsible for. They can then use crosswalks to align these with the enterprise reference datasets for the same entity.
Data Managers can export and provision reference data for use in their applications.
Business Analysts and other users can consult EDG to learn more about codes and code sets important to their work.
In addition to following this guide, you may also want to watch a set of complimentary videos. You can watch some of these videos before doing the hands-on exercises described in the tutorial and/or come back to them at any point.
We have assembled the following list of short videos for you, organizing them into topics. The duration of the videos varies depending on a topic, but, on average, it takes between 5 and 20 minutes to watch a video.
Working with Reference Data
Working with Ontologies
Workflows, Collaboration and Audit Trail
Search and Query
Searching in an Asset Collection (uses a Taxonomy, but Reference Datasets offer the same options)
Data Import
Setting up Information Governance Framework
About Reference Data
Reference data are standardized codes or data entities that are typically used by multiple applications as lists or tables. In fact, they are often called “code tables.” An individual code table may seem like a simple thing, but a well-managed collection of code tables and related reference data spread across an enterprise is a resource that can bring great value to that enterprise — or cause significant data quality problems if it is not well maintained.
EDG lets you control your reference data so that you can put it to work for your organization as efficiently as possible.
See also
For additional information on reference datasets see:
TopQuadrant white papers for perspectives and details on reference data management and related topics.
Access TopBraid EDG Application
To work through this guide, use a browser to access the EDG web-application running in your EDG evaluation, or your purchased EDG or EDG Studio instance for your organization.
To request an evaluation, submit an EDG evaluation request or contact TopQuadrant.
Note: Server licensing will determine the availability of the various asset collection types.
TopBraid EDG User Interface
See also
For a basic orientation to the user interface, see Introduction to EDG.
Reference Data Management
Getting Started for the Reference Data Steward
Reference Dataset vs Enumeration
TopBraid EDG offers two types of asset collections for storing reference data or codes – Reference Datasets and Enumerations.
Enumerations are suitable for storing multiple, relatively small and simple codesets in a single asset collection. An example may be gender codes or age group codes. For larger and richer sets of codes, use reference datasets.
With enumerations, you do not need to define an entity type in a separate ontology. You can simply:
Create an Enumeration asset collection
Define Code Sets as Enumeration classes e.g., Gender, Age Group, etc.
Create enumerated values or codes for each code set
The primarily advantage of using enumeration collection is that all the properties of codes are already predefined in EDG. You do not need to create and use a custom ontology as you would with a reference dataset. However, if you need to have custom properties for your code values that differ between enumerations, you should use reference datasets. An example, may be you want to have Location Codes that will have latitude and longitude values while Gender Codes will not have them. Further, all enumerations stored in a single collection share the same life cycle and stakeholder roles for updates, publishing and permissions. Thus, reference datasets provide more flexibility for definition and management of code sets.
This guide focuses on using Reference Datasets. Working with Enumerations provides you with information about using enumerations.
Defining the Structure for Reference Dataset
Each reference dataset designates some ontology class as the dataset’s main entity, which defines the type of the dataset’s reference instances, i.e., the individual code items.
Ontologies describe business entities, including entities for which you will govern reference data (codes). Ontologies can be thought of as a powerful and flexible way to describe data that you will need to capture. An ontology may contain a class (entity) such as country, product category, industry and so on. Each of these entities can have different fields (properties) making it easy to support different types of reference data. Reference datasets in TopBraid EDG are not limited to having only a handful of predefined fields such as a code and a description. They can have any property you may need. For example, a reference dataset for country codes may have properties such as the various ISO codes, capital, gross national product, and language. Some of these properties (called attributes) may have literal values – strings, integers, etc. Other properties may hold relationships or links between different entities. Relationships may connect entities within a reference dataset e.g., a country may be connected to a neighboring country where both countries are stored in the same dataset. Relationships may also link entities across reference datasets e.g., a country may be connect to a currency where currencies are stored in a reference dataset of their own.
In order to create reference data, we need to first define the corresponding entity and its properties in an ontology.
Select the Ontologies in the left hand side navigation menu to see the list of ontologies you have access to. EDG lets you create a single shared enterprise ontology or multiple ontologies (for example, per department or business area) which can, if desired, be combined with one another using the “includes” mechanism.
TopBraid EDG Samples project includes a number of sample ontologies and datasets.
This tutorial uses the ontology: Enterprise Ontology – Example. To obtain it please download the EDG samples.
In this tutorial, we will be extending Enterprise Ontology model with definitions necessary to support a new reference dataset. Alternatively, a new ontology can be created.
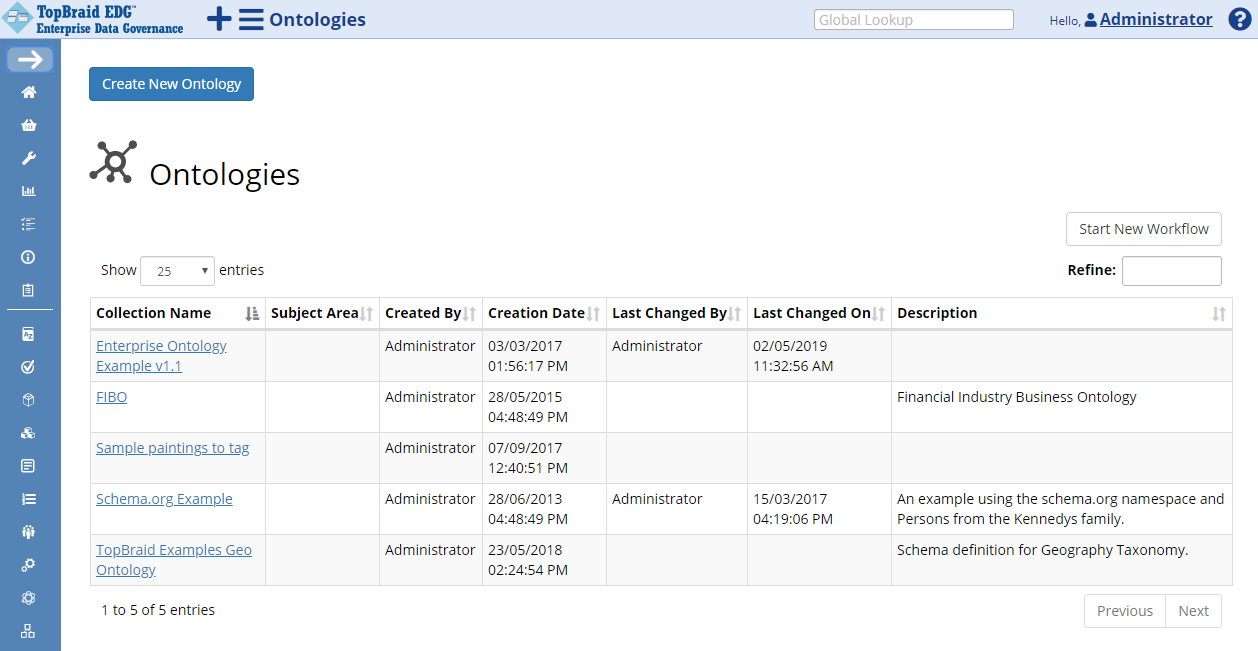
TopBraid EDG Ontologies Table
Select Enterprise Ontology from the table to go to an Editor page where you can perform various operations with it – make changes, import data into it, export it, etc.
Users that have edit privileges can make ad-hock changes to a given ontology or dataset. Otherwise, they must follow a more formal process of modifying an ontology by using Workflows which will sandbox all changes into an isolated workflow until they are reviewed and approved.
See also
See Understanding and Using Workflows for details.
In this tutorial we will make the change without using a workflow.
See also
For details on search of the settings and menu’s in EDG’s editor pages, read the Working with Asset Collections page.
Ontology Editor
You will see several panels presenting ontology content.
The Class Hierarchy Panel, on the top left below, shows the classes in a tree structure. The Property Groups Panel shows the selected class’s properties (both attribute/datatype and relationship/object properties) as nodes in a tree that organizes properties into groups.
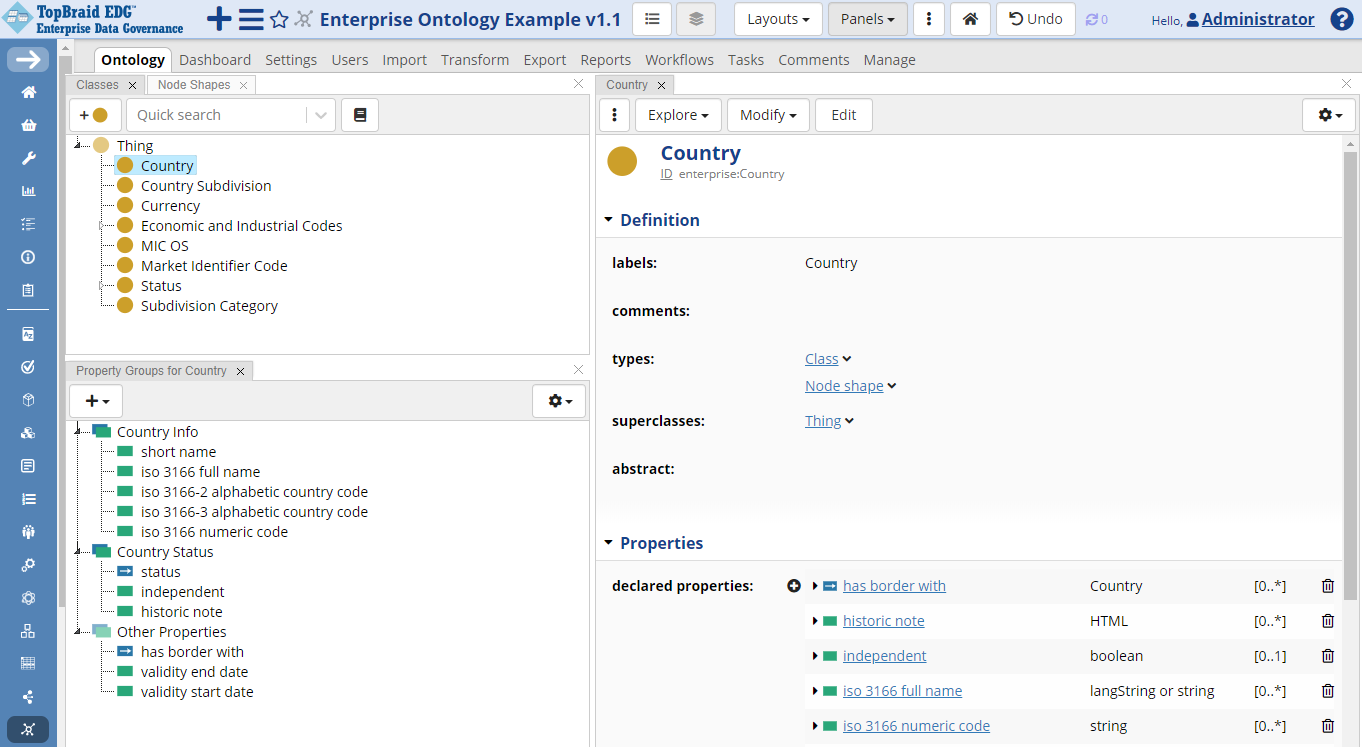
TopBraid EDG Ontology Country Example
The colored button at the top of the class hierarchy, next to the quick search field, will create a new class  .
.
As shown in the screenshot above, clicking on a node in the tree in the Class Hierarchy Panel (such as the class Country), displays information about it in the Form panel to the right of the tree. The Edit button at the top of the View/Edit form, switches the form into edit mode, making all fields on the form editable. It may also display and let you edit fields that currently have no data and, thus, you will not see them in the view mode. Alternatively, you can edit values for each field in-line by clicking on the pencil icon that will appear when you position your mouse to the right of the field’s name.
The Node Shape Panel, nested behind the Class Hierarchy Panel lets you view and create node shapes. These model elements support creating different role-specific views into reference data. We will not use this feature in this guide, but you can learn about it by looking at the user guide for Working with Ontologies
Once a class is created, you will have a few options for defining its properties:
Click on Modify>Add property shapes from Spreadsheet columns. This option relies on you having a spreadsheet with reference data. It will define a property for each column in a tabular spreadsheet you provide.
Click on Modify>Derive property shapes from instances. This option relies on you having RDF file with reference data e.g., countries. It will define a property for each data value.
You may also create a new property or associate pre-existing property with a class by clicking on the plus icon in the Property Groups panel or on the plus icon next to the declared properties field on the class form. The guide will walk you through this approach.
Creating a New Class
Later in this tutorial a reference dataset of airport codes will be created and populated with data from a spreadsheet. The following fragment shows data in this spreadsheet:
Airport Name |
City |
Country |
Country Code |
IATA Code |
Latitude |
Longitude |
|---|---|---|---|---|---|---|
Keflavik International Airport |
Keflavik |
Iceland |
IS |
KEF |
63.985 |
-22.605556 |
Patreksfjordur |
Patreksfjordur |
Iceland |
IS |
PFJ |
65.55583 |
-23.965 |
Reykjavik |
Reykjavik |
Iceland |
IS |
RKV |
64.13 |
-21.940556 |
Siglufjordur |
Siglufjordur |
Iceland |
IS |
SIJ |
66.13333 |
-18.916667 |
Vestmannaeyjar |
Vestmannaeyjar |
Iceland |
IS |
VEY |
63.4243 |
-20.278875 |
Sault Ste Marie |
Sault Sainte Marie |
Canada |
CA |
YAM |
46.485 |
-84.509445 |
Winnipeg St Andrews |
Winnipeg |
Canada |
CA |
YAV |
50.05639 |
-97.0325 |
Shearwater |
Halifax |
Canada |
CA |
YAW |
44.63972 |
-63.499444 |
St Anthony |
St. Anthony |
Canada |
CA |
YAY |
51.39194 |
-56.083056 |
To add model support for this information, create a class named Airport that will be used as the main entity in the reference dataset.
To do this, select the top-level class named Thing in the class hierarchy, click the yellow button in the header of the Class Hierarchy pane, enter the name “Airport” and click OK.
You will see the newly created class displayed in the Edit/View pane.
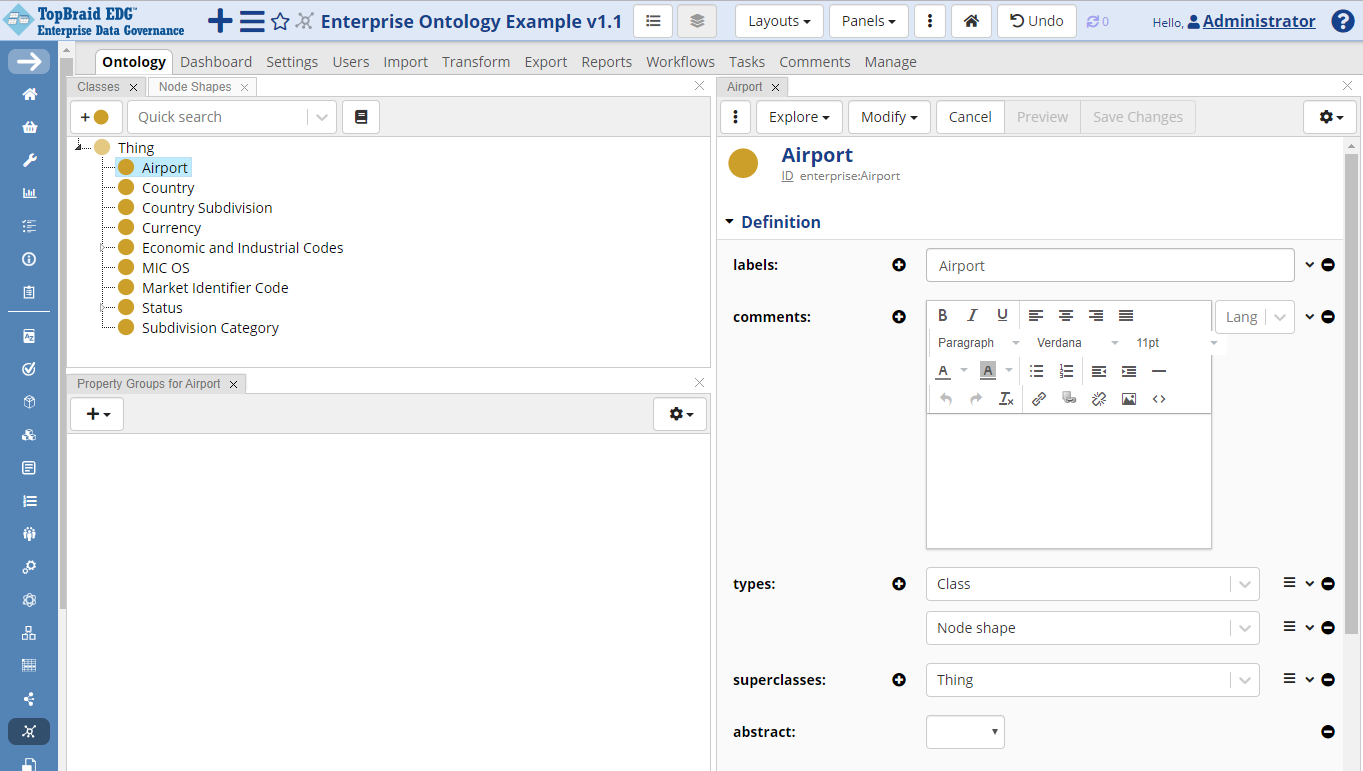
TopBraid EDG Ontology Airport Example
If desired, provide a description of your new class in the comment field.
Creating Attributes
We will now create the following attributes for airports.
Attribute Name (Label) |
Description (Comment) |
Datatype |
|---|---|---|
airport city |
Main city served by airport. May be spelled differently from the airport’s name. |
string |
IATA airport code |
An IATA airport code, also known an IATA location identifier, IATA station code or simply a location identifier, is a three-letter code designating many airports around the world, defined by the International Air Transport Association (IATA). |
string |
latitude |
A horizontal position of a location on the Earth according to a geographical coordinate system in decimal degrees, usually to six significant digits. Positive latitude is above the equator (North), and negative latitude is below the equator (South). |
decimal |
longitude |
A vertical position of a location on the Earth according to a geographical coordinate system in decimal degrees, usually to six significant digits. Positive longitude is East of the prime meridian, and negative latitude is West of the prime meridian. |
decimal |
Create attributes by selecting the Airport class and clicking on the plus icon in the Property Groups panel. Select the green icon labeled Create Attribute. Alternatively, you could use the plus icon next to the declared properties field on the class form.
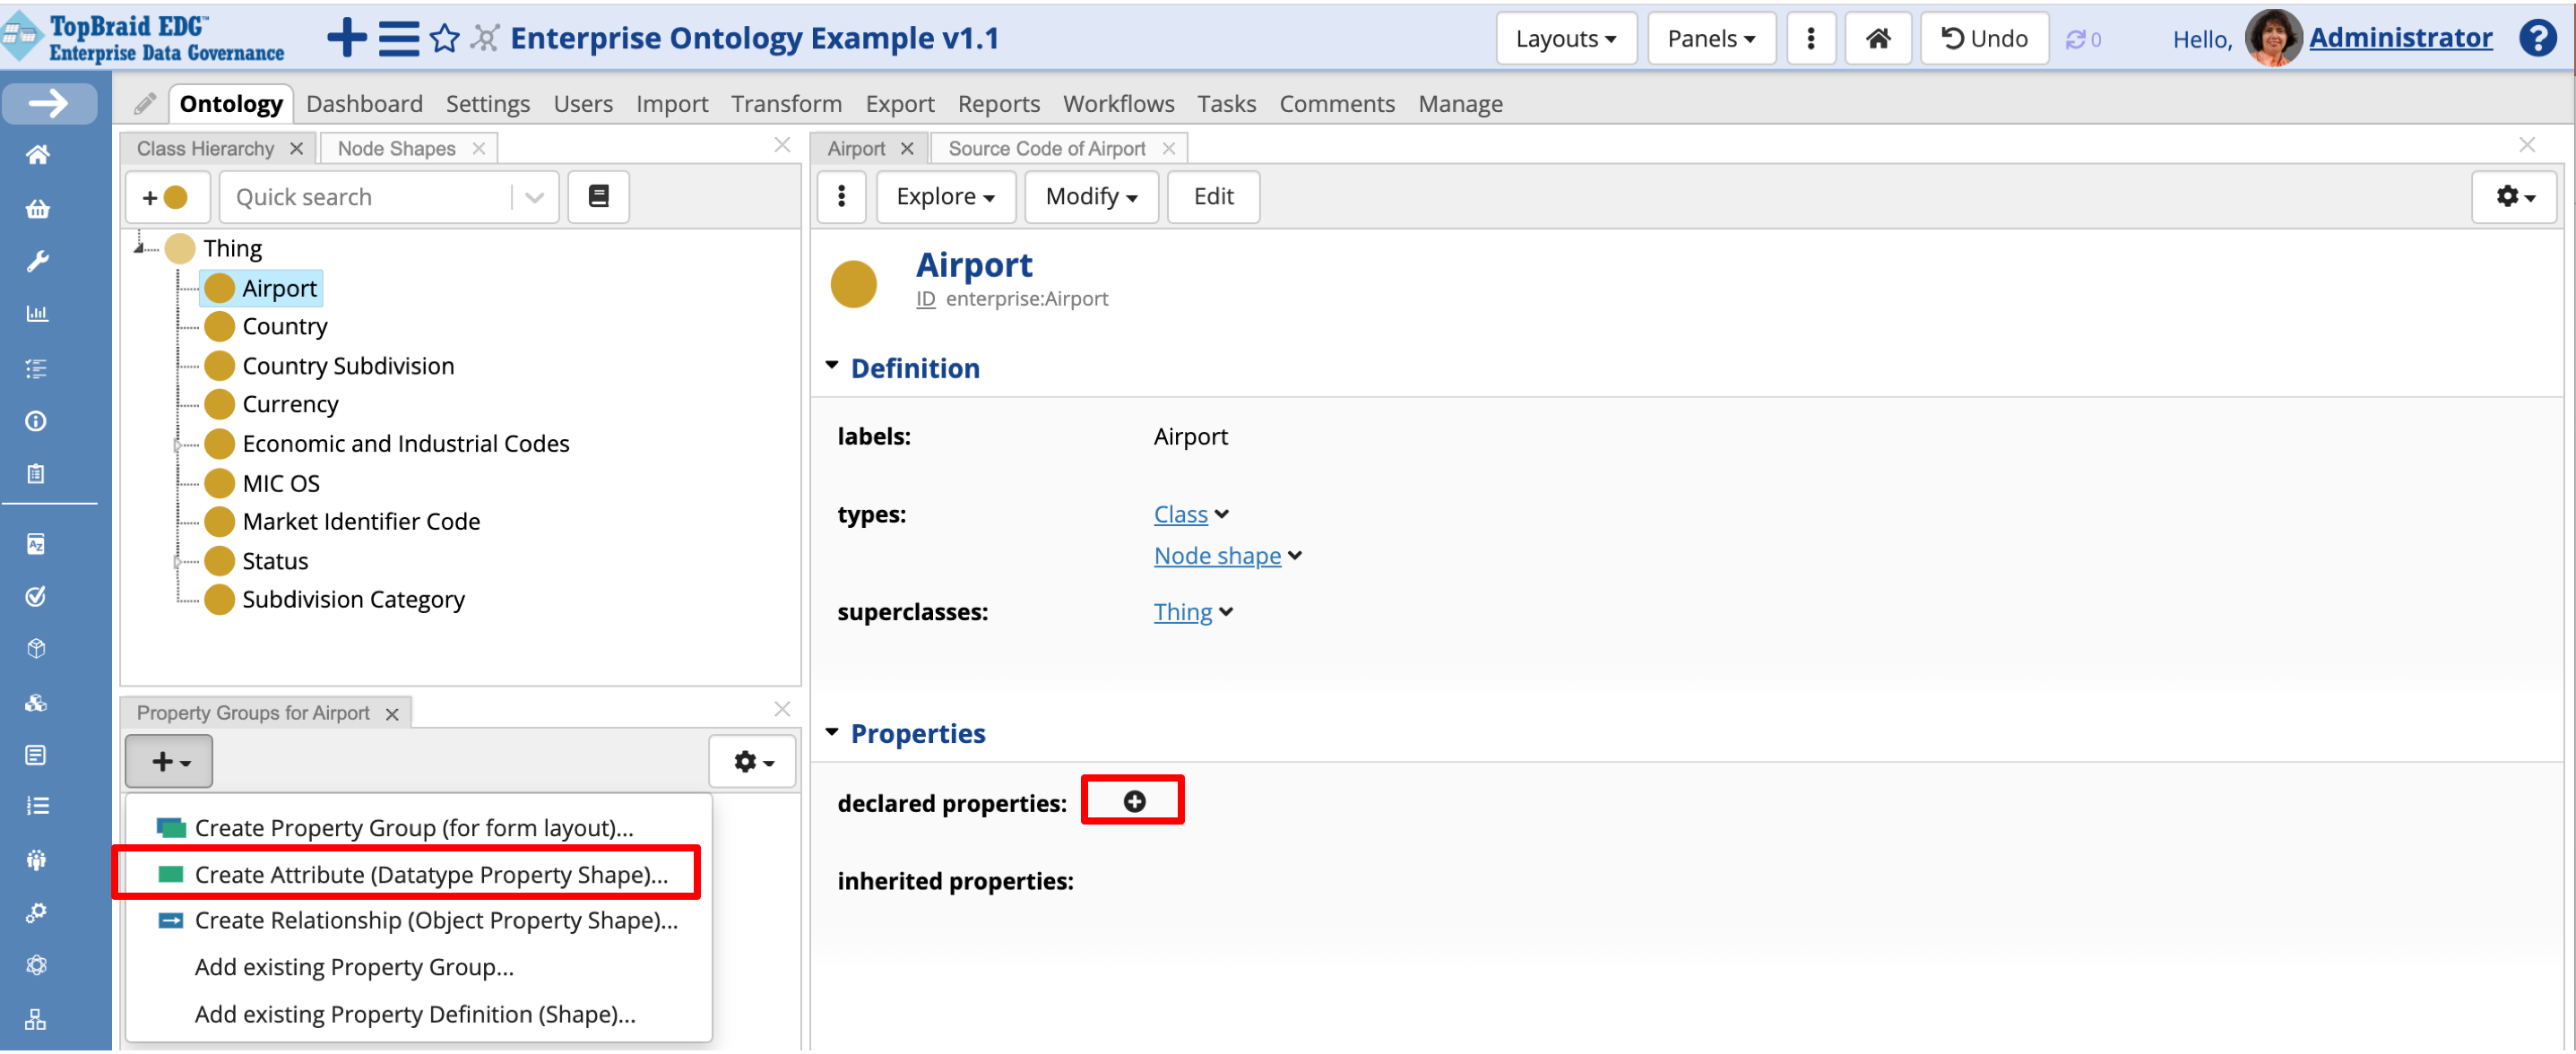
TopBraid EDG Ontology - Create Attritube
After entering the name of the attribute, add a description, select its datatype e.g., string or decimal and click OK. Repeat the steps above to add more attributes. After adding four attributes, you will see the data entry form shown below.
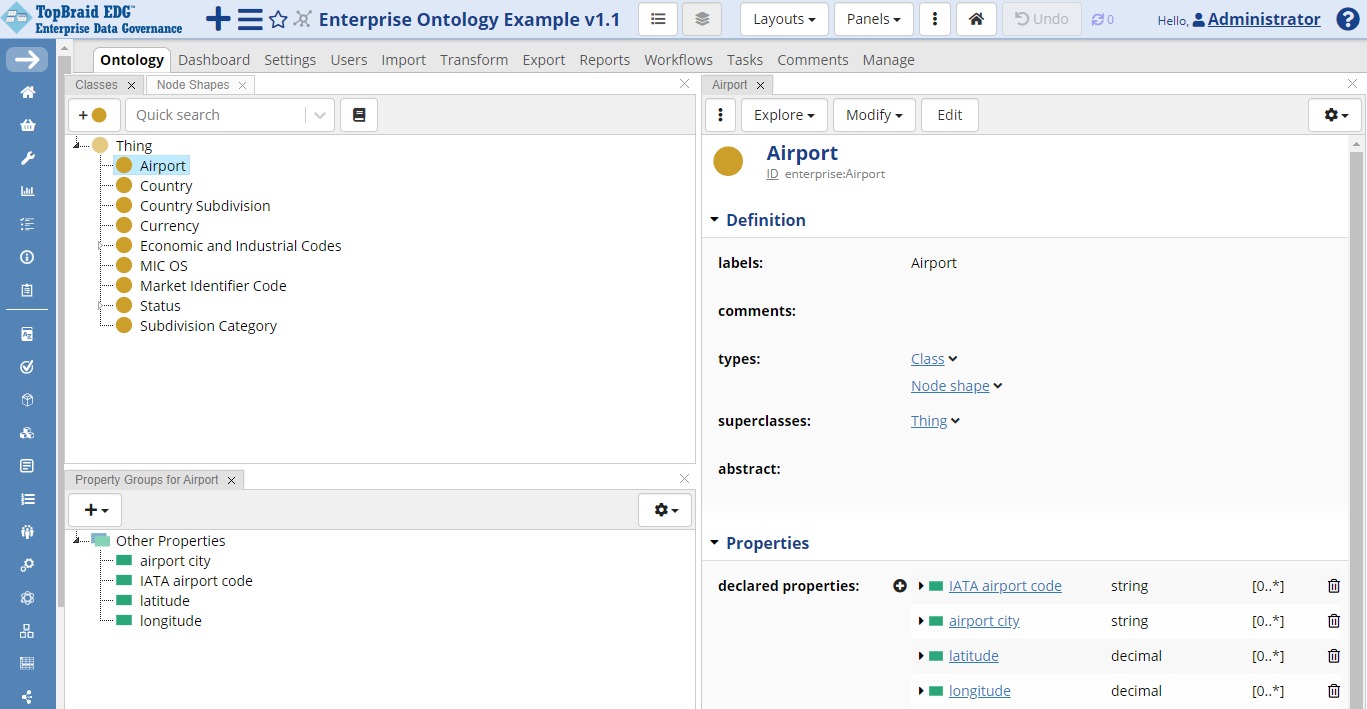
TopBraid EDG Ontology Airport Attritubes
Alternatively to manually entering classes and properties, you can use Modify>Add property shapes from Spreadsheet columns to automatically generate them from the first row of a tabular spreadsheet with reference data.
Note
You could also create Property Groups if want to organize fields into sections. Otherwise, they will all appear under the default Other Properties group.
Creating the Label Attribute
Note
We have not created an attribute for the airport name. This is because there is a built-in attribute “label” which is intended to hold names. Label is always asked for in the Create New dialog for reference data codes.
Since this is a special built-in field, EDG offers one-click approach for creating it. Click on the Airport class. On the Form panel, click Modify, then Add Label Property Declaration.

TopBraid EDG Ontology - Add Label Property Declaration
Defining an Attribute to be used as a Primary Key
TopBraid EDG will always generate a globally unique resource identifier, a URI, for each resource you create. There are different options for how the URI may be constructed. These options are described in details in the User Guide and they apply to asset collections other than reference datasets.
For reference datasets, each entry in a dataset gets a URI derived from the reference data code. You will need to identify the field which will contain code values. This field is declared a primary key for the entity.
Note
The field used as a primary key must always have unique values for a given class of codes.
We will use IATA airport code as the primary key. Click on this property and click on Edit button. Scroll down to the String Constraints section and type in a namespace to prepend when creating the unique identifiers. For example, http://example.org/Airport-.
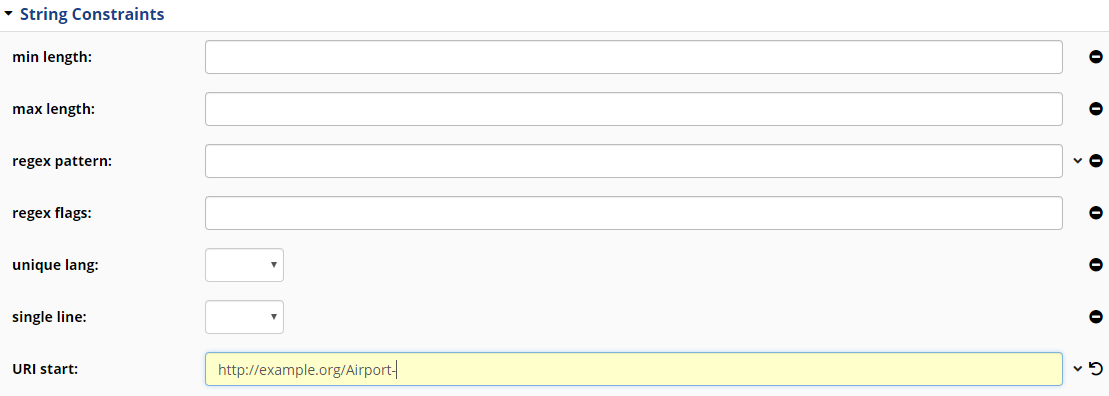
TopBraid EDG String Constraints Form
Click on Save Changes.
As previously noted, if you do not see some of the edit fields, click on the gear icon to the right of the Save Changes button and check Also show properties that have no values. This option lets you toggle on and of display of the fields that have no values.
Creating Relationships
Next, click Create Relationship option, similarly to how you created attributes, and name the new relationship “airport country”.
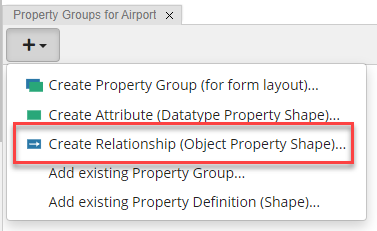
TopBraid EDG Create Relationship Dropdown
In the Description field, describe it as “A country where an airport is located”. Set its Type/Class of Values to the Country class.
Warning
Failing to do this can cause problems when it’s time to import data into the new reference dataset.
To do so, start typing “Count” in the class field in the Type/Class of Values section and pick “Country” as it appears in the autocomplete.
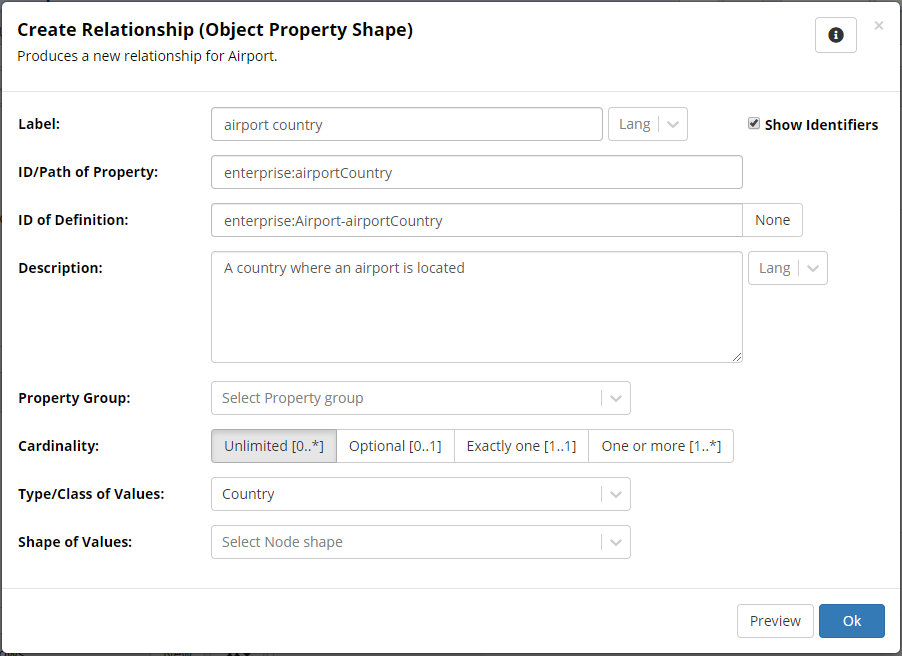
TopBraid EDG Create Relationship Form
Since the primary key for ISO Country is its two-character ISO country code and the spreadsheet contains this information, EDG will be able to create a relationship between airports and countries as we import spreadsheet data.
Note
While our spreadsheet data included country names, we have not created a field for the country name. Names and other information about countries is already maintained as part of the country codes reference dataset, and therefore including country names as part of the information about airports will redundant.
In the next step we will create a reference dataset to store reference data for the airports.
See also
For more information on working with ontologies, and especially creating property shapes that will let you validate reference data, see Working with Ontologies.
Note
Instead of creating each airport property one by one, we could have used Modify>Add property shapes from Spreadsheet columns. This function is used to automatically create a property for each column in a spreadsheet.
We have elected not to use it and, instead, walk you through the process of creating each property one by one.
Declaring a New Class to be Public
Next, we need to add Airport as a public class of this ontology. Some ontologies contain classes for which users will never store instance data. This happens for different reasons specific to ontology design. There are various ways in EDG to “hide” such classes from view. Classes that you want to use for reference data need to be declared “public”.
Note
If a parent class is already made public, you do not need to do this for subclasses. They will be public as well.
First, click Enterprise Ontology Example v1.1 at the top of the page and then Edit.

TopBraid EDG Enterprise Ontology Example v1.1 - Edit
Use the dropdown in the upper right of the form to select GraphQL Schema. Edit the “public class” field in the Shapes in GraphQL Schema section, click the plus sign and start typing Airport in the field. After selecting Airport, click Save Changes.
Note
If Merged View setting is on, you will not need to switch the dropdown.
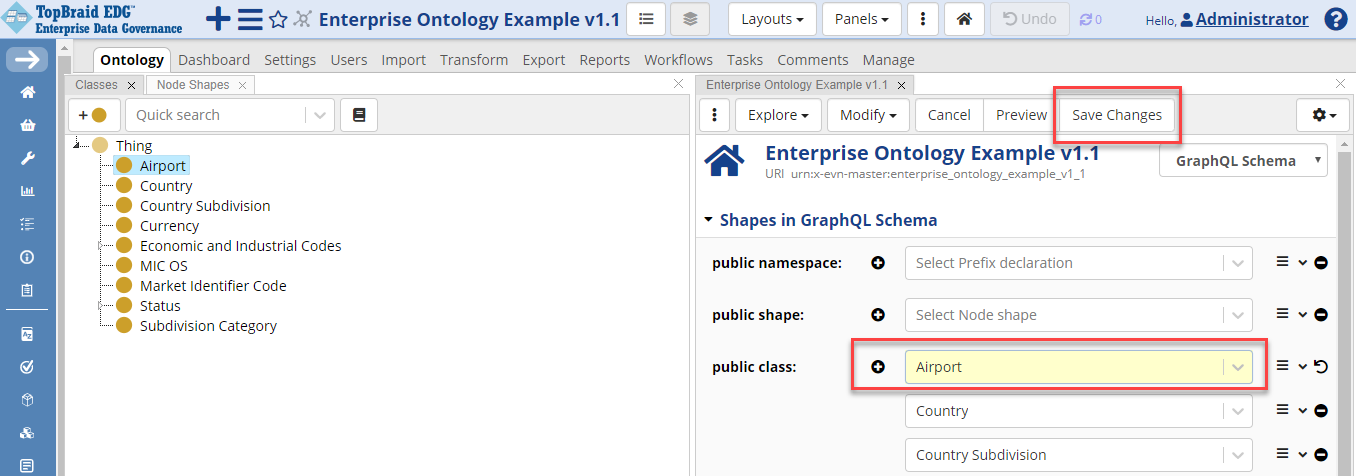
TopBraid EDG Enterprise Ontology Example v1.1 - Save Changes
If you do not see some of the edit fields, click on the gear icon to the right of the Save Changes button and check Also show properties that have no values.
Creating Reference Datasets
You can click on the + icon and select Reference Datasets in the dropdown to create a new reference dataset.
However, we want to automatically associate our reference dataset with a particular “governance area”. We can do this by creating the dataset directly from the Governance Areas page.
Governance areas group asset collections according to organization’s business or data subject concerns. Governance areas define a meaningful context for associated assets and help organize communities of use. They partition and delegate ownership and other stakeholder roles.
See also
For more information on the use of Governance areas to organize asset collections, enable stakeholder communities and assign governance roles, see Operationalizing Data Governance guide.
Select the Governance Areas link located in the left menu under Governance Model section.
First, create a new governance area.
Click the Create Data Subject Area button, add a data subject area with the label Logistics.
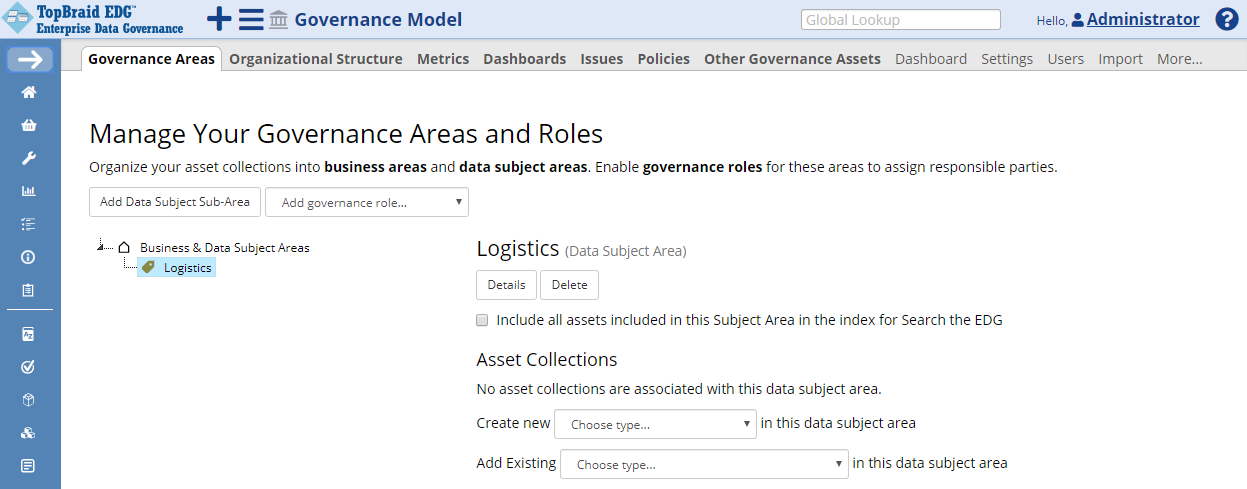
TopBraid EDG Governance Areas - Logistics
Not every user will have permissions necessary to modify governance areas. If you can’t create a new governance area, contact your TopBraid EDG Administrator.
Now you’re ready to create the dataset. Choose Reference Dataset in the Choose type dropdown for Create new.
You will see the following page:
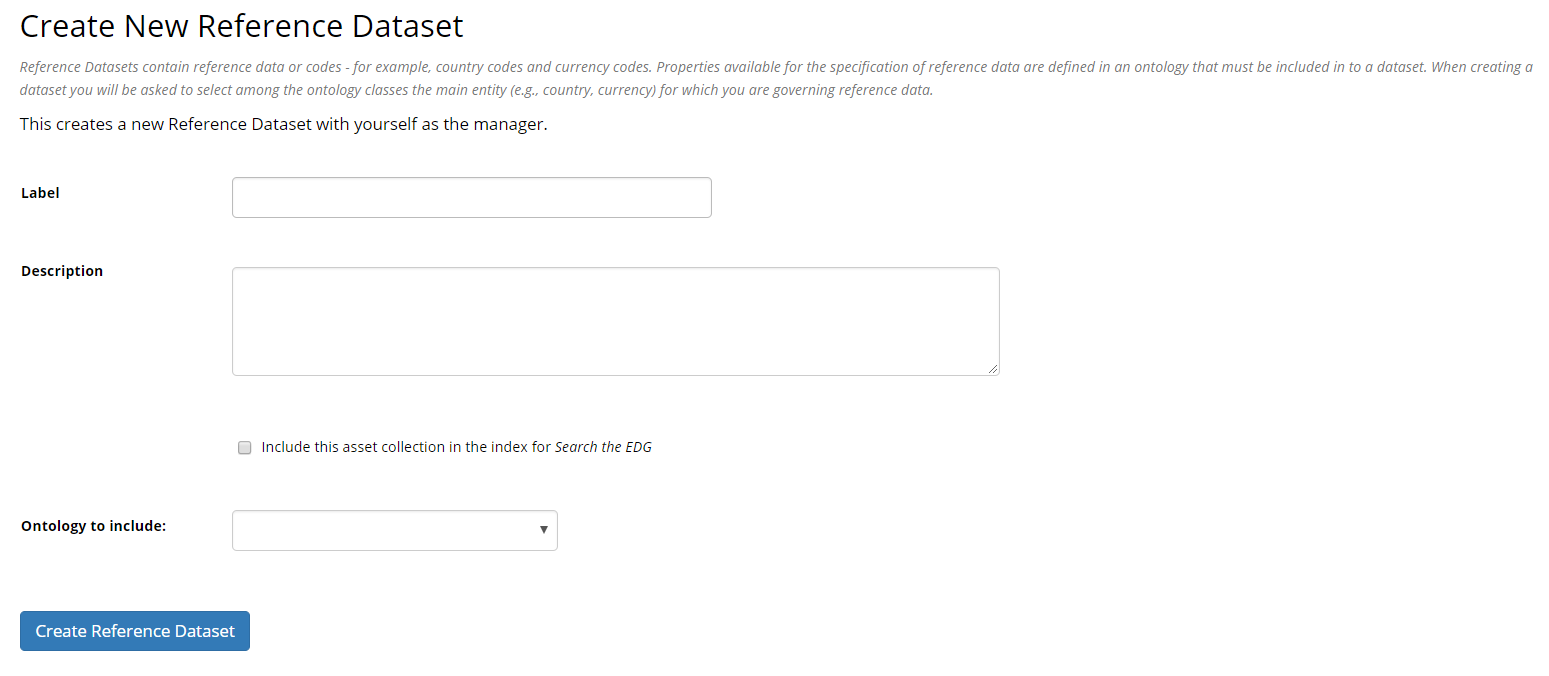
TopBraid EDG Create New Reference Dataset Form
Enter Airports as the label (or name) of the dataset and for its description enter: Reference dataset of airports with IATA codes.
The Ontology to Include option lists ontologies that are available to base your reference dataset on.
In this case, select the Enterprise Ontology Example v1.1 as the ontology to use.
It contains Airport class that we have defined for our airports data.
Click Create Reference Dataset.
You will see a message that the dataset was created and you will be forwarded to the Import page where you can load data.
However, before we can do this, we must finish setting up the new dataset by identifying its main entity.
Setting the Main Entity
Ontology used for creating a reference dataset will typically contain several classes (entity types).
After creating a reference dataset and before starting to work with data, you need to tell TopBraid EDG what type of reference data will be in the dataset.
This is done by identifying the “main entity” for a dataset.
In our example, it is Airport class.
There are two ways to set the main entity initially.
If the main entity is unset, clicking on Codes tab to access to edit application will trigger TopBraid EDG to ask you for the main entity class.
A reference dataset’s main entity class can also be set or changed by clicking on: Manage > Main Entity (Class).
We will use the first method.
Click on Codes tab, and select Airport, from the provided dropdown that lists classes available in the included ontology.
You will now use the Import tab to import reference data from the spreadsheet you downloaded earlier.
Importing Reference Data
Select Import > Import Spreadsheet using Pattern.
Then click Choose File to select the spreadsheet.
* airports.xlsx
This page has two more fields:
Sheet index: By default this is 1. This spreadsheet has only has one worksheet and therefore there is no need to edit it.
Entity type: A list of classes from the included ontology (the enterprise ontology) to indicate which one is being populated by the airport. Ensure that
Airportis selected.
Clicking Next shows several potential patterns for spreadsheet data. Select No Hierarchy.
Note
Reference data supports managing hierarchies as well as flat lists. However, the spreadsheet we are importing does not contain any hierarchical structures.
The next step is to map the spreadsheet columns to the properties of the Airport class as shown below, which maps the columns to the properties defined above and to the built-in “label” property.
Note
In the image below, Altitude column was not mapped by choice – to demonstrate that only mapped columns will be imported. The Country column was also not mapped because it contains country names that are already managed as part of the ISO Country Codes reference dataset – also included in the samples project.
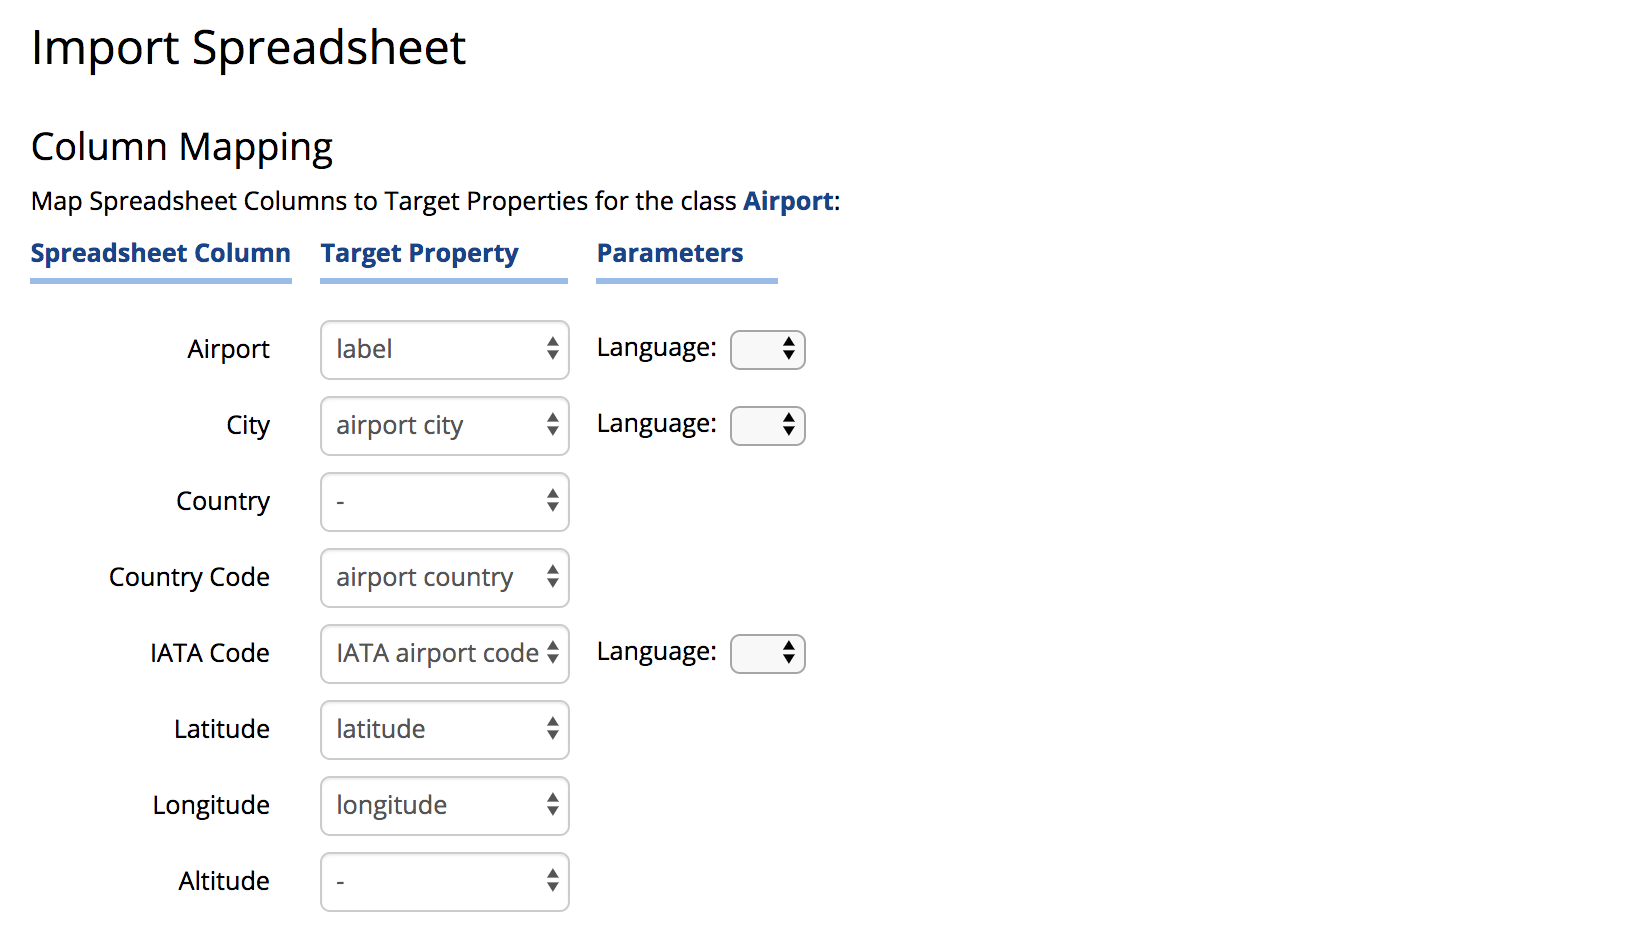
TopBraid EDG Import Spreadsheet
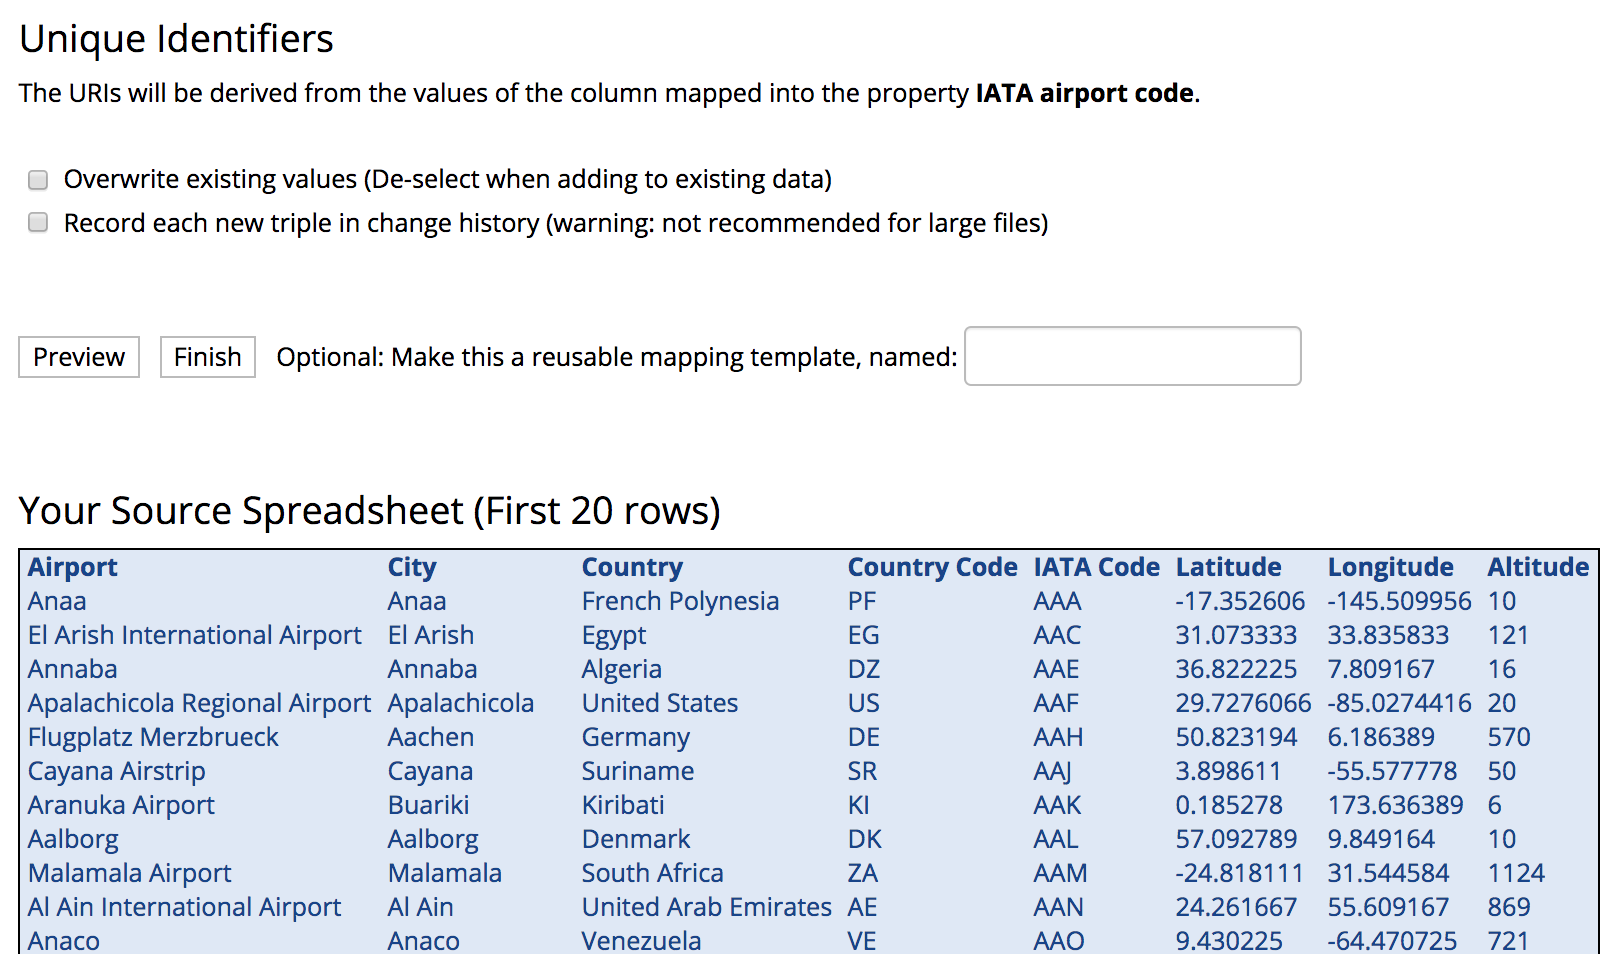
TopBraid EDG Unique Identifiers
Click the Finish button. After data is imported, click on Codes tab to view the reference dataset.
You will now be directed to the Editor page with the default layout for Reference datasets.
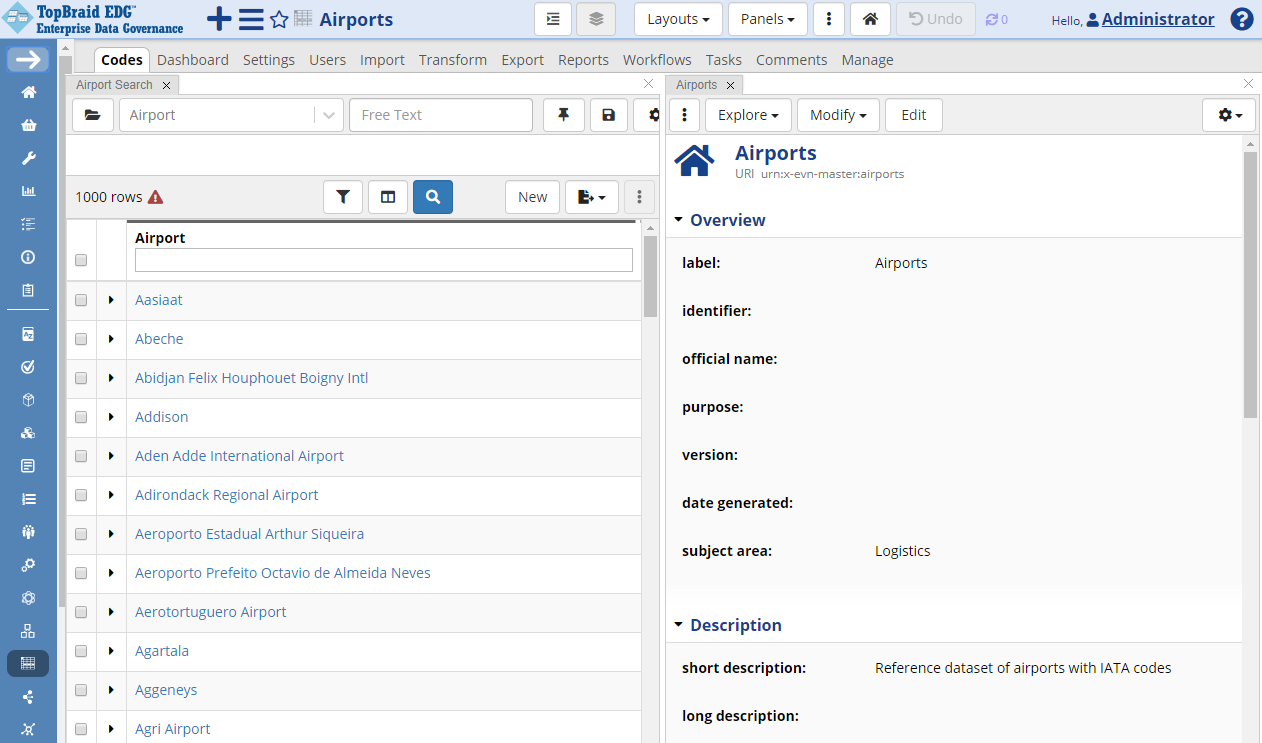
TopBraid EDG Reference Datasets - Airports
In the Search Panel, click on Columns icon to add more columns to the table. Available properties will be shown in the dropdown organized into sections. In our case, we only have a single section – Other Properties. To select a property to be added as a column, simply click on it. It will show under Selected. If you decide to remove it from the view later on, follow the same approach and click to unselect.
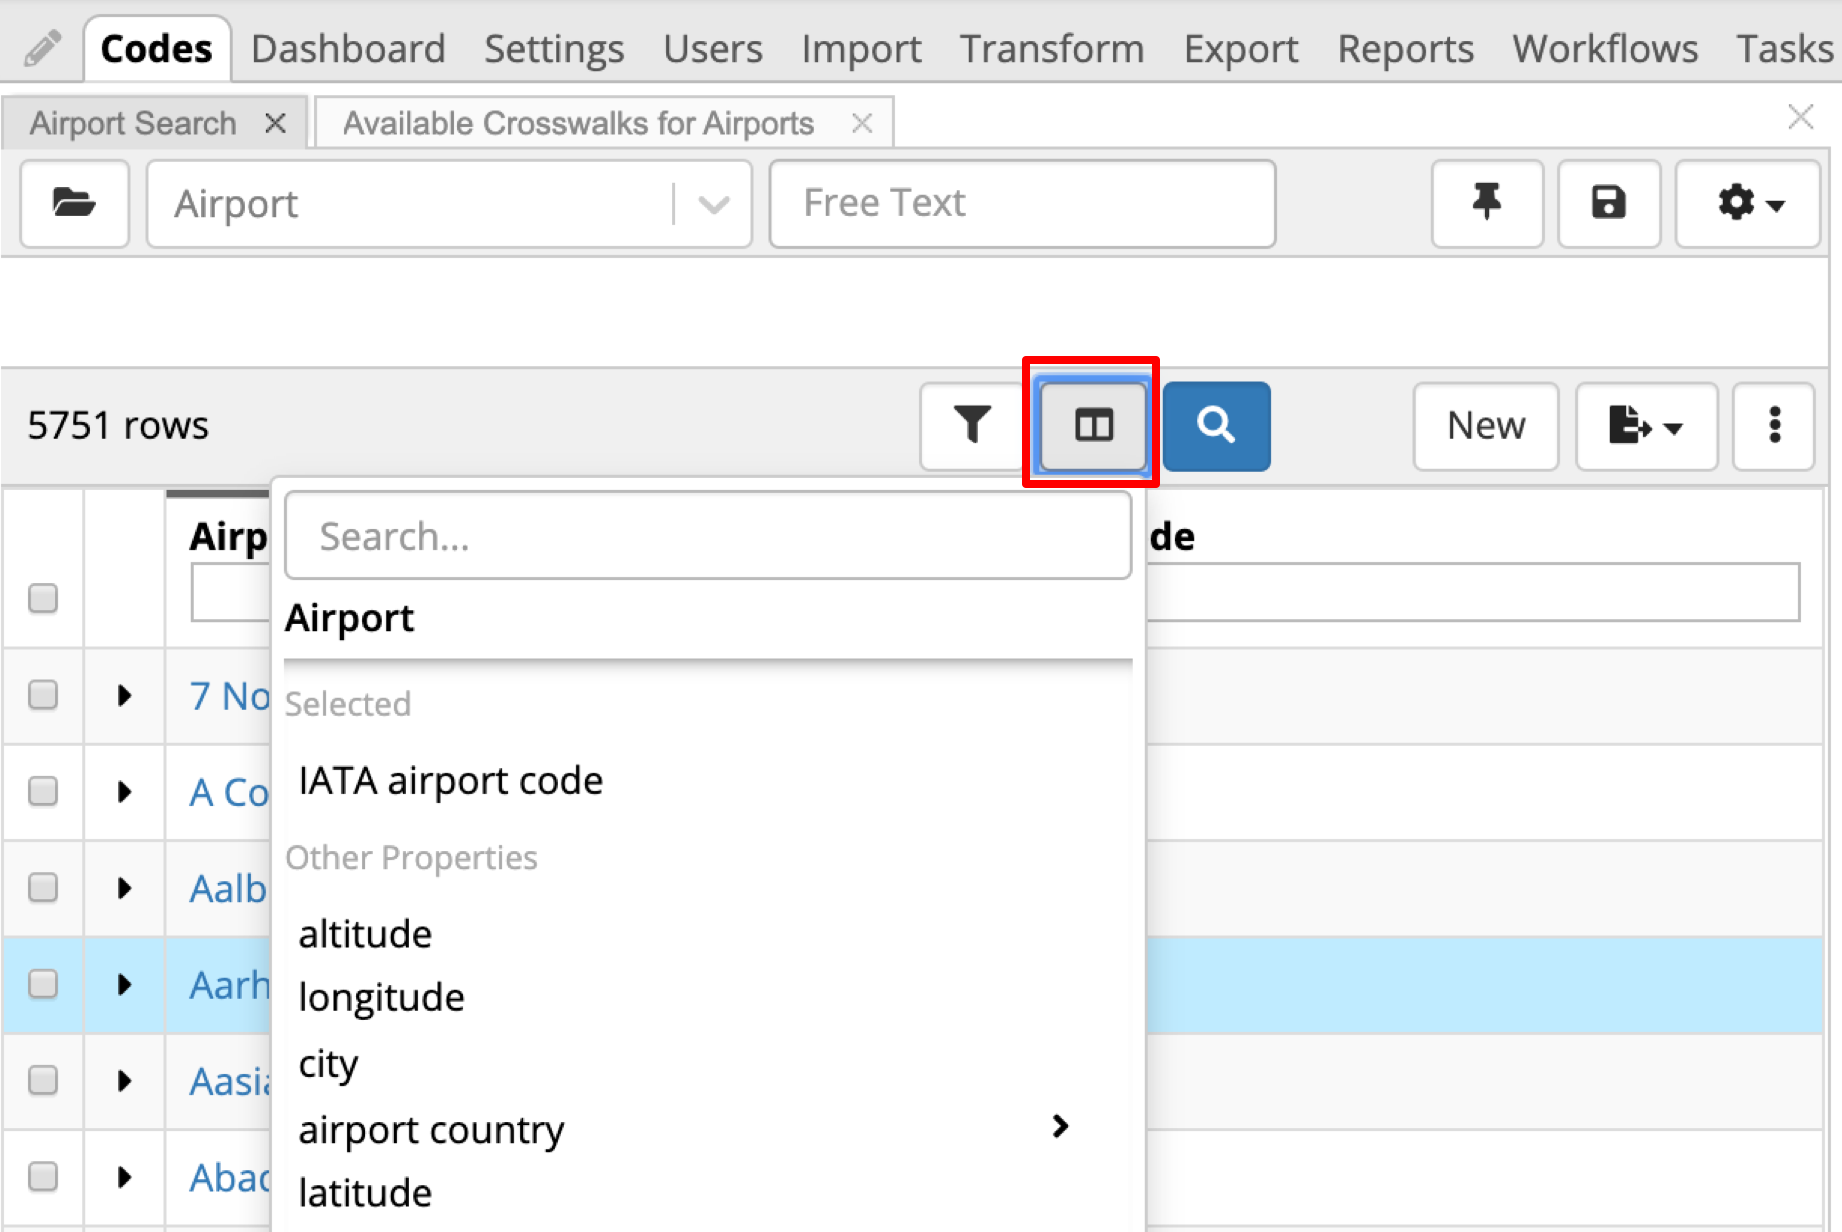
TopBraid EDG Reference Datasets - Add Column
You will now see a column with IATA codes added to the table.
Click on any of the table rows to display information in the Form panel which is, by default, located to the right of the table.
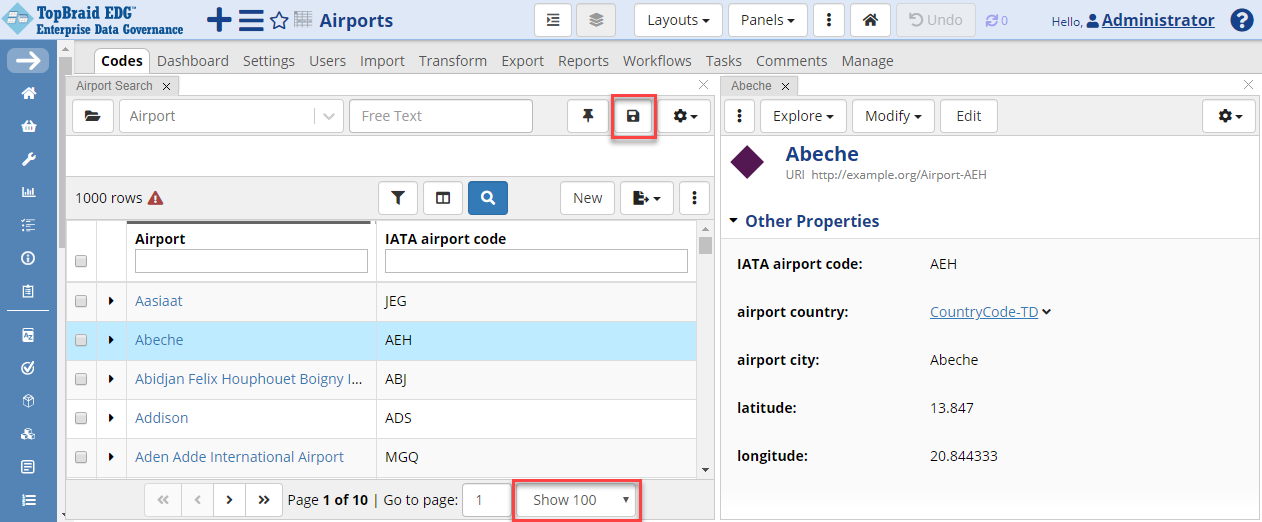
TopBraid EDG Reference Datasets - View Airport
The table displays 100 rows at a time by default. This default can be changed by selecting a different value in the Show dropdown located in the bottom of the table as shown above.
To save the current configuration of columns as a default for all users, click the Save icon ensuring Default is set to true.

TopBraid EDG Save Query
Including other Reference Datasets
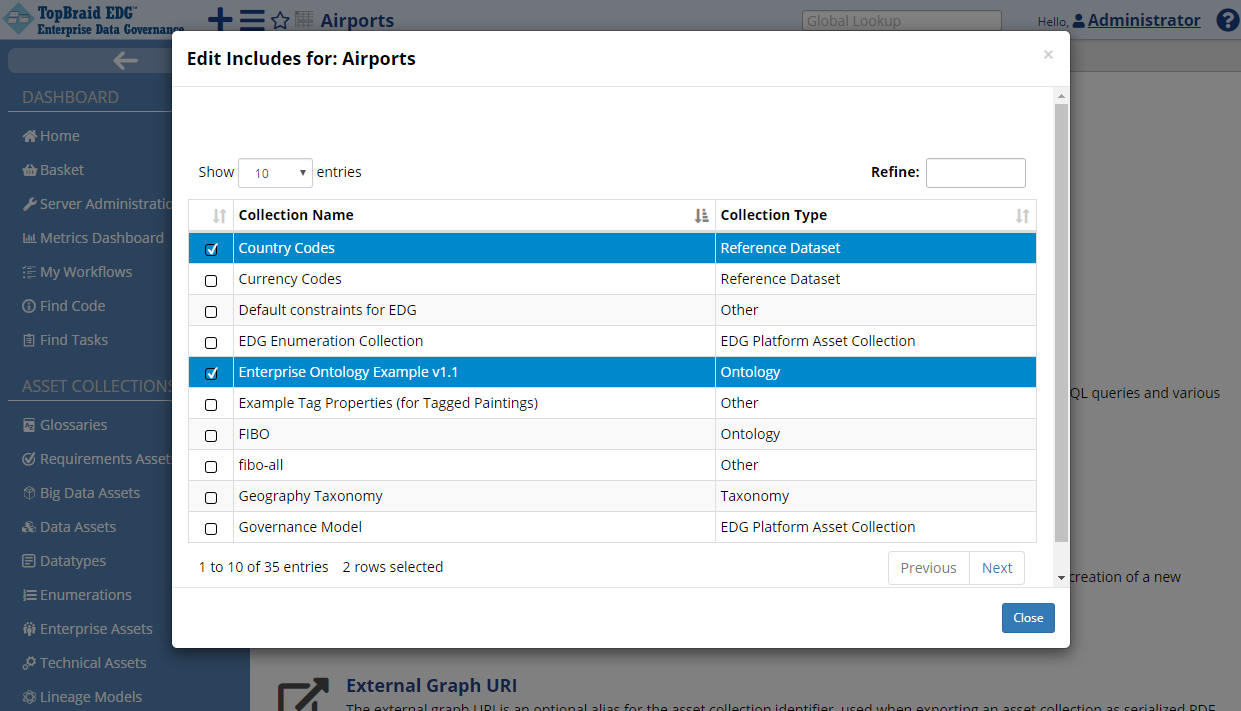
As shown in the first screen shot of the reference data, the Airport Country column contains URIs of the countries and not their names or the code values. It happens, because the reference dataset describing the country codes was not added to the Airports dataset (or not included in it). We can fix it by clicking on Settings tab and including the appropriate reference dataset. Click on Includes.
TopBraid EDG Reference Datasets - Edit Includes
In a pop-up window, select Country Codes to include it in the Airports. After selecting, click on Close. Instances of the Country class will now be included in the Airports dataset by reference, meaning the data is not copied, but included.
Referencing other dataset in this manner ensures that reference data for countries is maintained in one place. If a country is renamed, for example, Cape Verde, an island country in West Africa, is renamed to the Republic of Cabo Verde, the update needs to occur in only one place, the ISO Country datasets. All datasets that include ISO Country will see this change immediately. At the same time, you will have access to country names and all other information from any reference dataset that includes country codes. The names and other reference data for countries is stored in the Country Codes dataset.
Once the reference dataset for countries is included, EDG will automatically match countries to the values of the “airport country” property. Click on the Codes tab.
Note
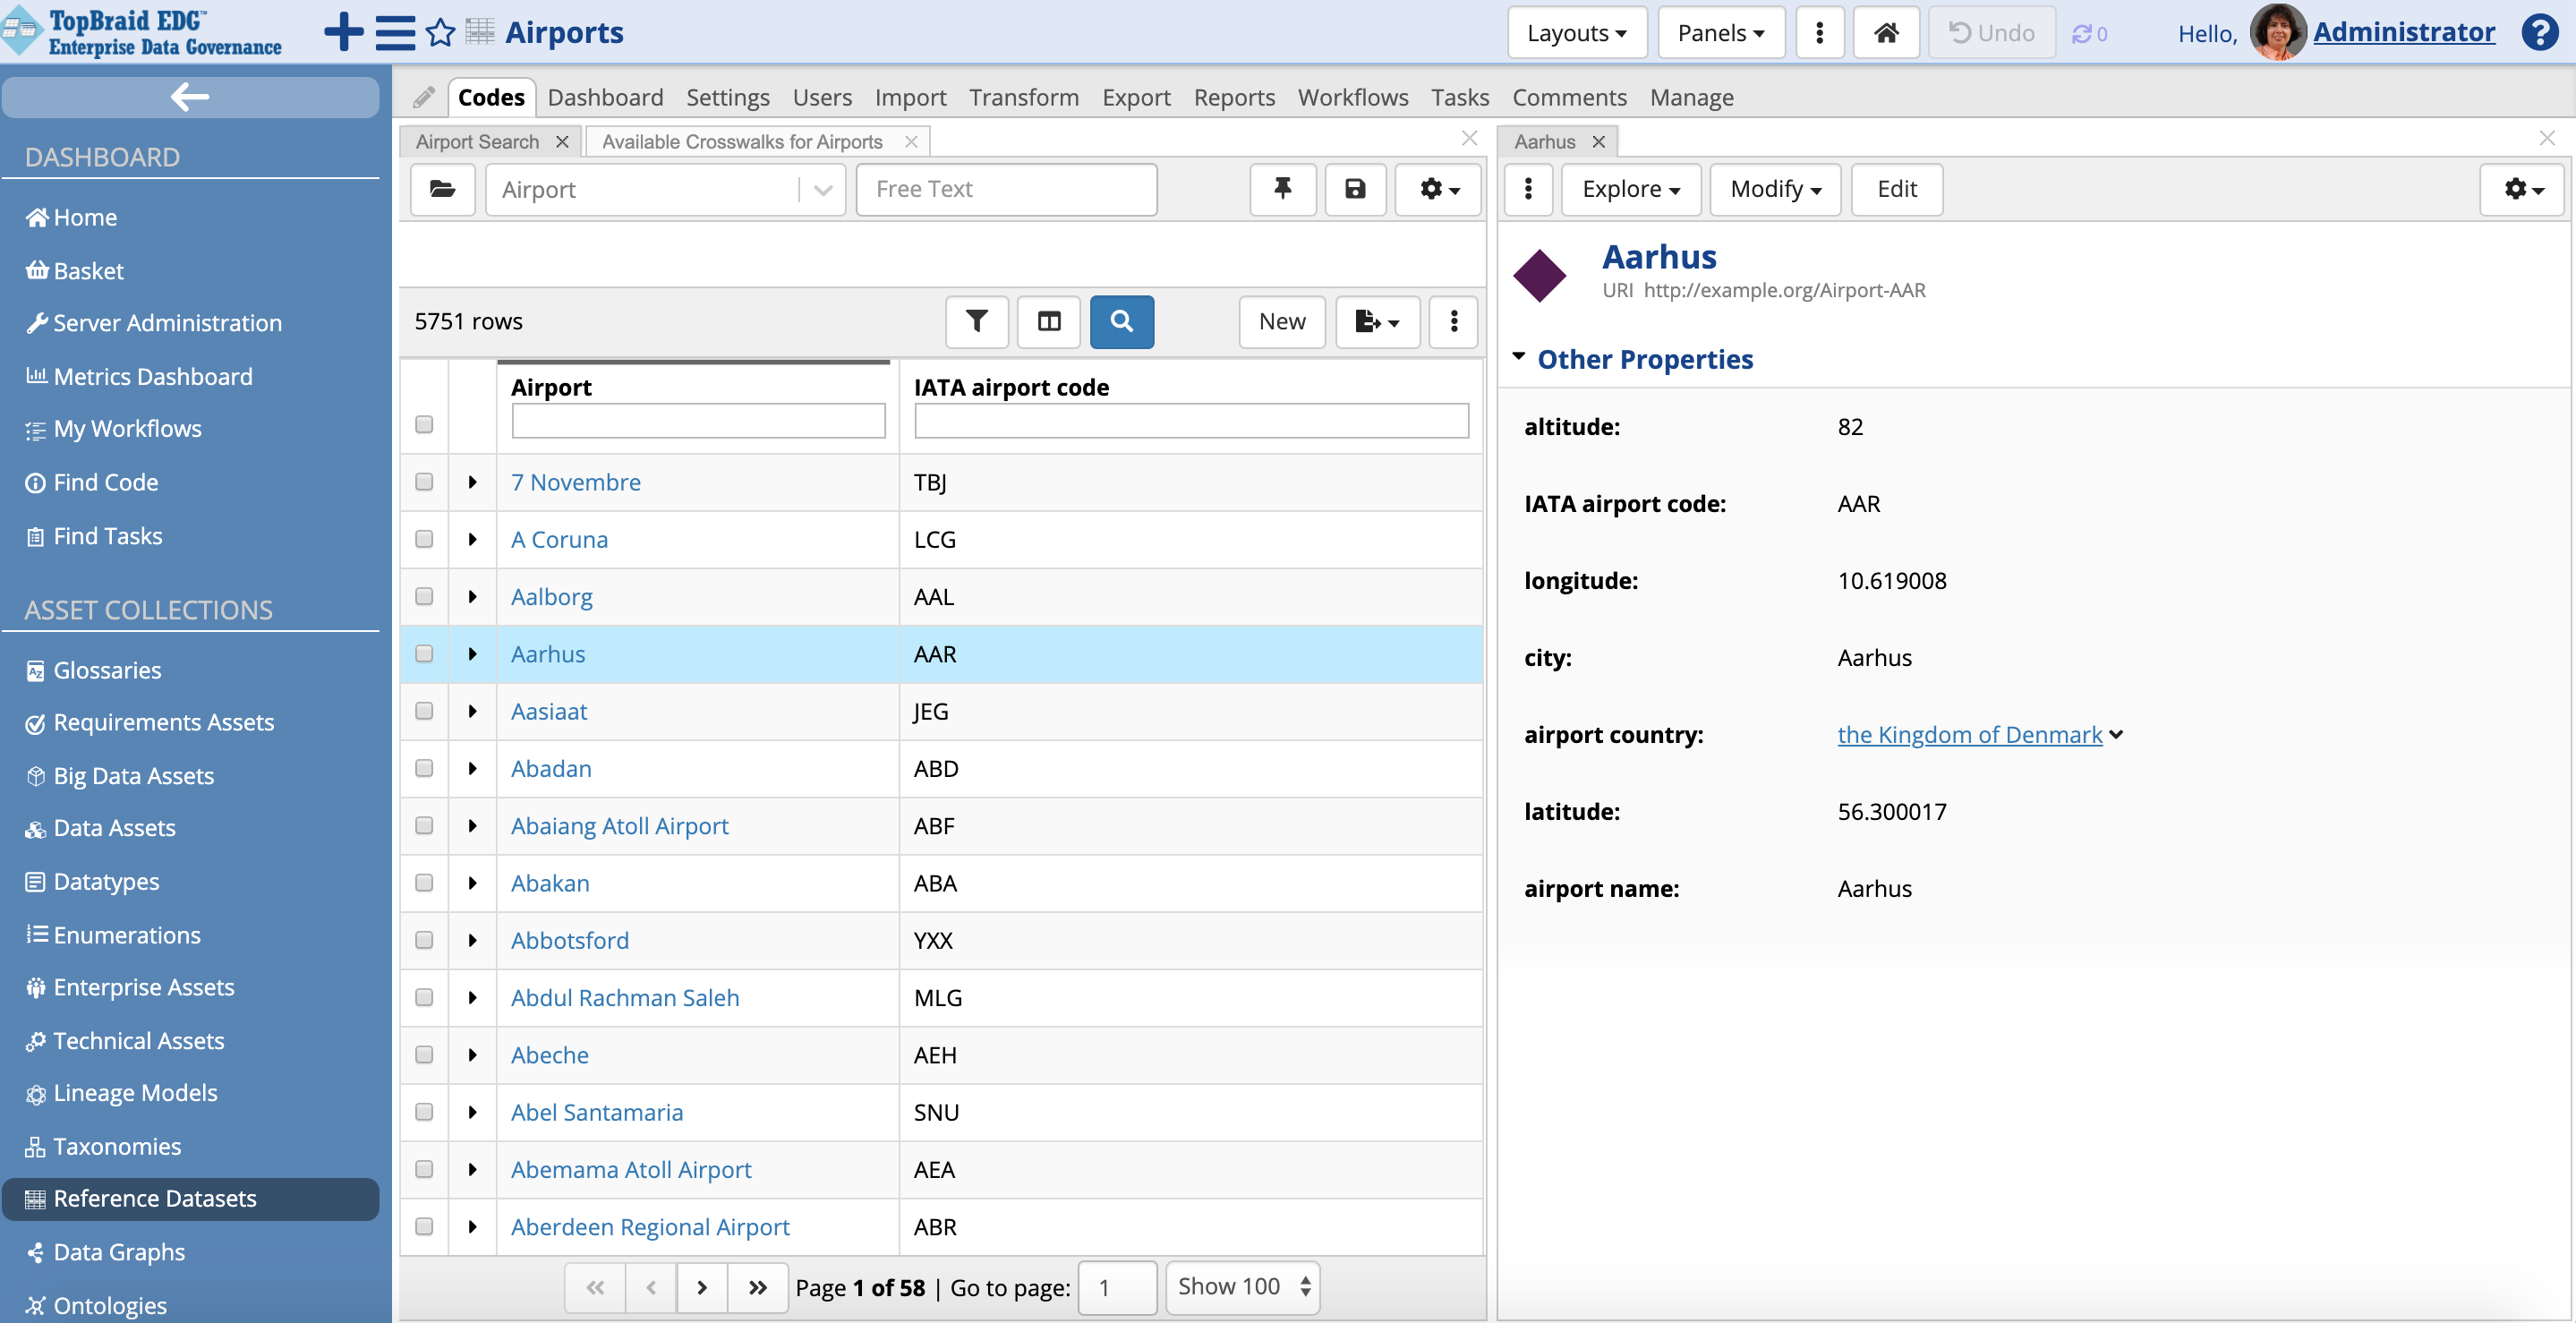
Country codes appear in the Airport Country column instead of URIs as before. These codes come directly from the ISO Country dataset.
Click on any of the rows to see a View/Edit form for the selected airport.
TopBraid EDG Reference Datasets - View Airport with Country
The “airport country” property is now populated with a country code from the ISO Country dataset. Clicking on a country code link will open up a form that will show you other information about the country directly from the ISO Country dataset.
You can change the “focus” of the table from Airports to other data by using the dropdown field at the top of the table.
Currently, Airport is chosen.
You can switch the focus to any other class related to the Airport.
In our case, the only related class is Country.
Included data, such as the Country Codes data referenced by the Airports dataset, can be viewed and searched, but modifications to included data is not permitted. Included data can only be modified by editing the included referenced dataset directly. You will only be able to edit only codes for the main entity – or one of its subclasses.
Managing Metadata for a Reference Dataset
Reference datasets (and, in general, any asset collection in EDG) can have metadata such as name, description, status, etc. The metadata associated with an asset collection can be viewed and modified on the Form panel. When you click on the Codes tab, EDG will always display information about the dataset on a form. Once you navigate away from it by, for example, clicking on various assets contained in a dataset, you can come back to this view by either clicking on the home button or by clicking on the name of a reference dataset in the header bar.
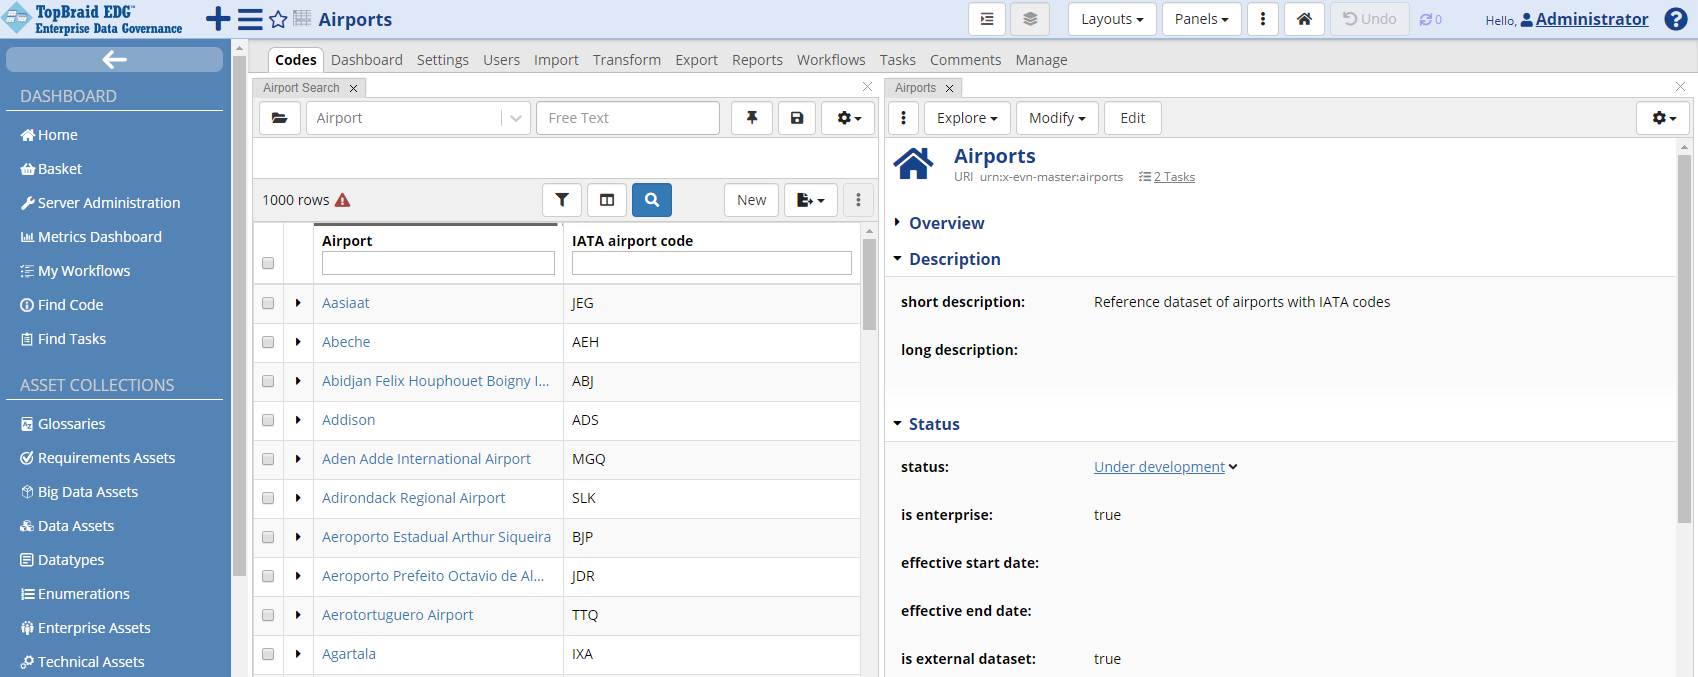
Use one of these options. Scroll down and expand the Status sub-section to see available information about Airports dataset.
TopBraid EDG Reference Datasets - Expanded Status Section
When a dataset is first created, the status is automatically set to “Under development”. It can be updated to reflect the current status of a dataset.
TopBraid EDG is shipped with some predefined status values. They are configurable if your organization needs a different set of values.
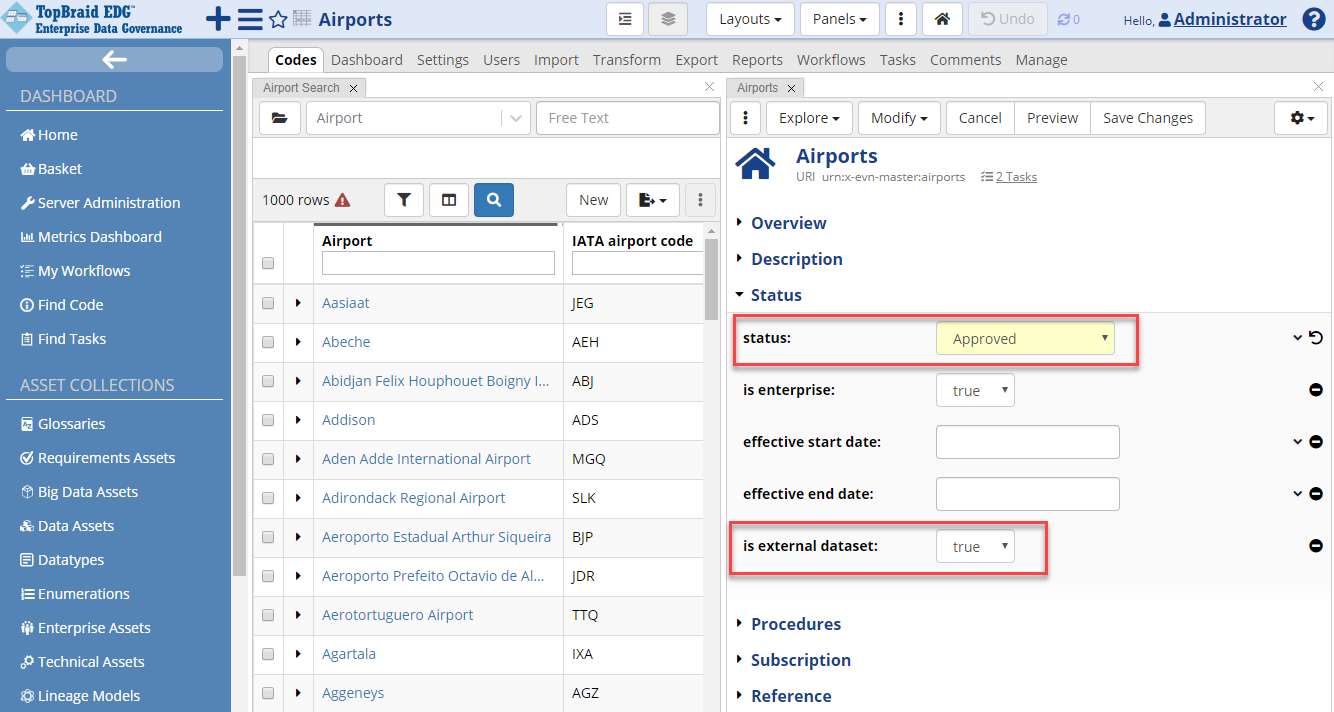
Click the Edit button to see more available fields. You may want to differentiate private (internal) reference data from public (external) such as ISO country codes. Set is external dataset to “true” in the Status section of the form. IATA codes are maintained by the IATA Association, which publishes updates bi-annually. Change the status code to Approved. Click Save Changes at the top of the form.
TopBraid EDG Reference Datasets - Is External Dataset
Once the status of a reference dataset is approved for use, you will no longer be able to delete codes from the dataset, but you will be able to change information about them.
Documenting a Reference Dataset as an Enterprise Reference Dataset
Your organization may have several reference datasets in EDG that contain codes for a given entity. For example, you may have different existing applications and corresponding sources that already store and use airport codes. The goal of standing up a system for managing reference data is to achieve alignment across your existing reference data and to streamline its management. This alignment takes time. At least initially, you may have in addition to a “master” reference dataset that you want to be a definitive source of reference data for a given entity across all system, reference datasets that capture what each of your systems is using.
To differentiate between your master reference dataset for airport codes and others “in situ” reference datasets, in the Status section of the form, click on Edit and find is enterprise dataset field. Set this flag to true and click Save Changes.
Note
As previously noted, if you do not see this field, this may happen because it current has no values and your form settings disable empty fields. Click on the gear (Settings) icon to the right of the Save Changes button and check Also show properties that have no values. This option lets you toggle on and of display of the fields that have no values.
If another reference dataset is created for the same entity, it could be mapped to the enterprise dataset using Working with Crosswalks. TopBraid EDG can auto-create crosswalks between two datasets. It also offers crosswalk web services to translate between codes.
Creating Reference Data Facts
You may want to record some additional information about this reference dataset. This can go into the description field. You can also add new metadata fields. And you can use a pre-build property called fact. To enable this property, click on Settings tab and, in the Includes dialog look for Reference Data Fact properties. This is a small pre-built ontology that defines a property called fact. Include it.
Click on Codes to go back to the editor. Click on the dropdown in the upper right conner of the Airports form and switch your view to Facts. Enter the following “fact”:
IATA codes should not be confused with the FAA identifiers of US airports. Most FAA identifiers agree with the corresponding IATA codes, but some do not, such as Saipan whose FAA identifier is GSN and its IATA code SPN, and some coincide with IATA codes of non-US airports.
Note
The text area displayed allows rich text, including hyperlinks. The links above can be replaced by choosing the text to be hyperlinked, such as “Saipan”, and click the chain link in the icon box. Add the hyperlink to the text box that appears.
Click on the plus + icon to the left of the fact field to add an additional entry and enter this additional fact there:
Since “Q” is used for international communications, IATA airport codes never begin with “Q”.
Save your changes. The facts are now part of the metadata for the dataset and can be referenced, searched, etc.
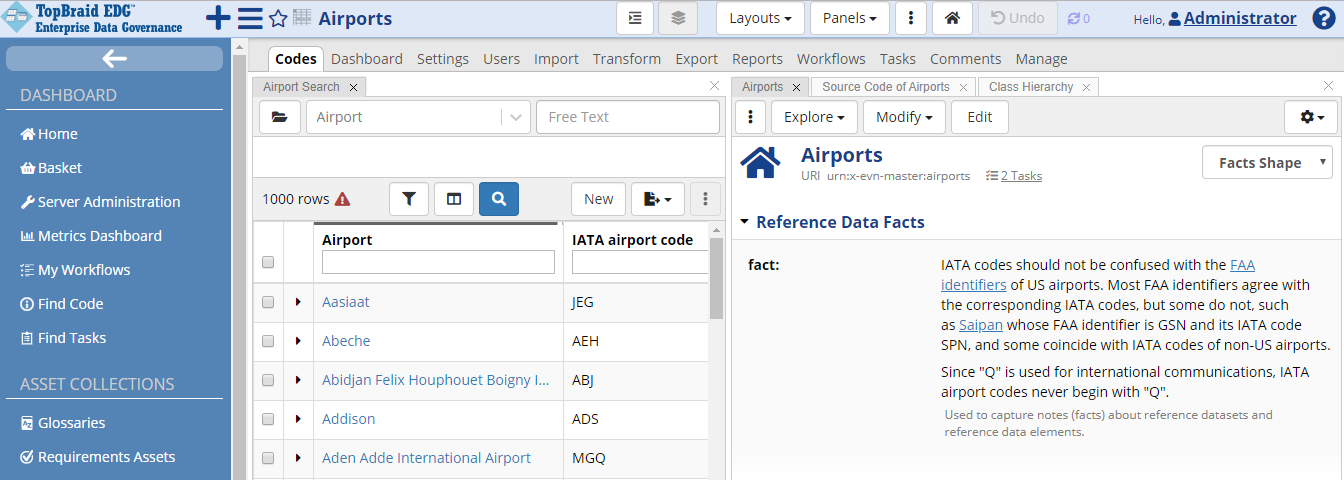
TopBraid EDG Reference Data Facts
You can define facts at a dataset level and you could also specify them for a given code in the reference dataset. If you want to do the latter, you need to include in the ontology defining your main entity class the pre-built Reference Data Facts ontology and associate facts property with that class.
Entering Subscription Information for External (public) Reference Data
In the editor Form, click the Edit button again. Set “is external dataset” to true and save. Edit again and you will see a new sub-section on the form called Subscription; this is used to capture subscription-related information for external reference datasets. Add “IATA Association” to the “sourced from” field. You will only need to type the first few letters of its name, because the reference data knows that only one defined organization begins with those letters. Click the Save Changes button.
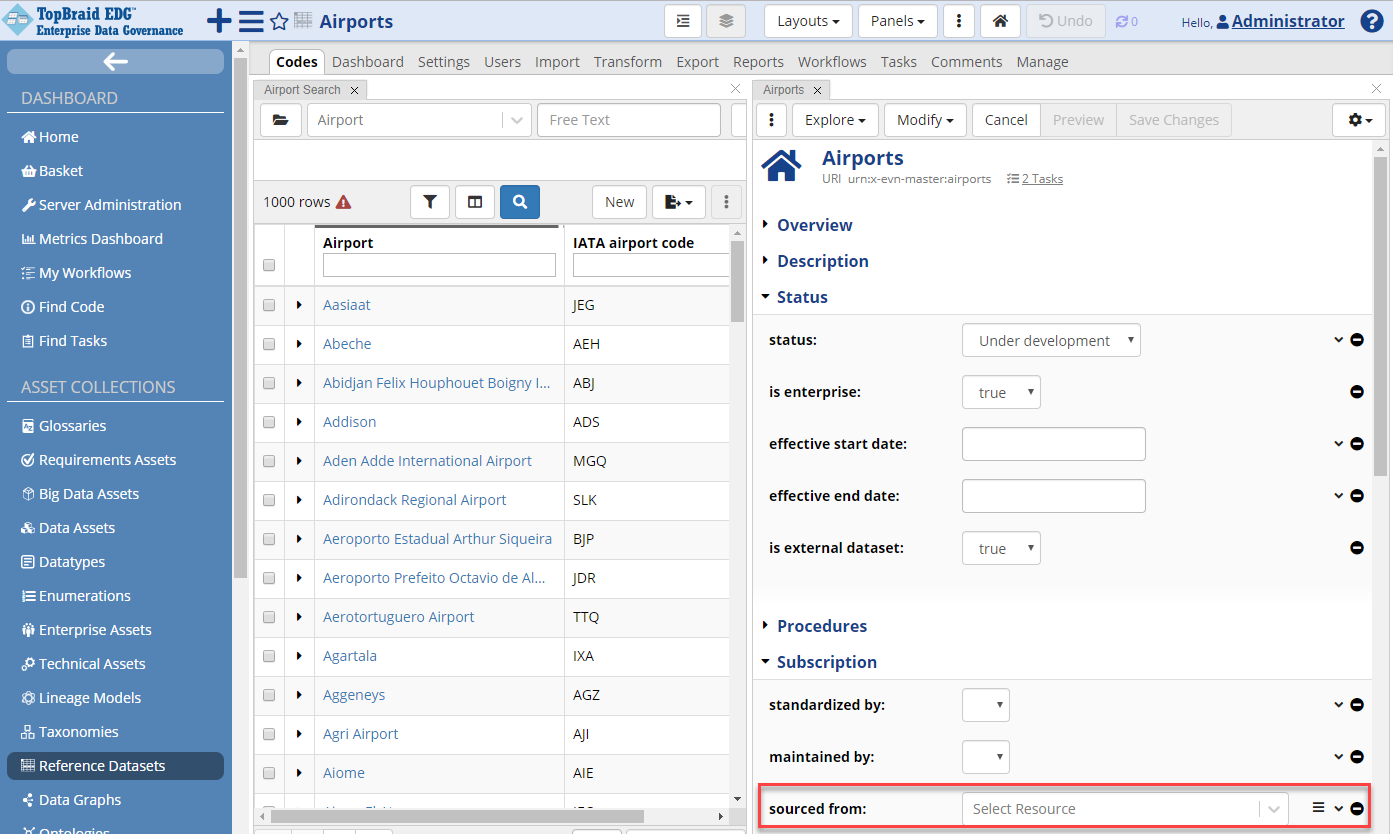
TopBraid EDG Reference Datasets - Sourced From
TopBraid EDG is shipped with predefined metadata fields for reference datasets. They are configurable if your organization needs different metadata. EDG is a semantic, model-based solution. Configuration is done using steps similar to those used to modify ontology models to accommodate new reference data.
Assigning Access Privileges to other Users
For any asset collection in EDG, including reference datasets, a user can have one of the following permission roles:
Viewer A Viewer can browse a dataset, viewing all the reference data (as well as any change history associated with that data) and the metadata associated with a dataset. A Viewer can create saved searches and export data. They can create and view tasks, add comments and change status of a task assigned to them. A viewer can also start a workflow. The Viewer then becomes the Manager of the workflow that is associated with the workflow. However, these changes will not affect the reference dataset until they are approved and committed by a user that has Editor permission for the dataset.
Editor In addition to being able to perform all activities that a Viewer can perform, an Editor can make changes to the dataset’s metadata and to the reference data itself.
Manager A Manager has the most capabilities. In addition to all the activities that an Editor can perform, a Manager can delete an entire dataset, they can change the default columnar view for all users and they control the access privileges that other users have over a particular dataset by assigning Manager, Editor, or Viewer permission roles to them. They can also reassign and change the status of all tasks, even those that are not assigned to them. A person who creates a reference dataset automatically becomes its Manager.
To give others access to the dataset, go to the Users tab on the dataset’s home page.
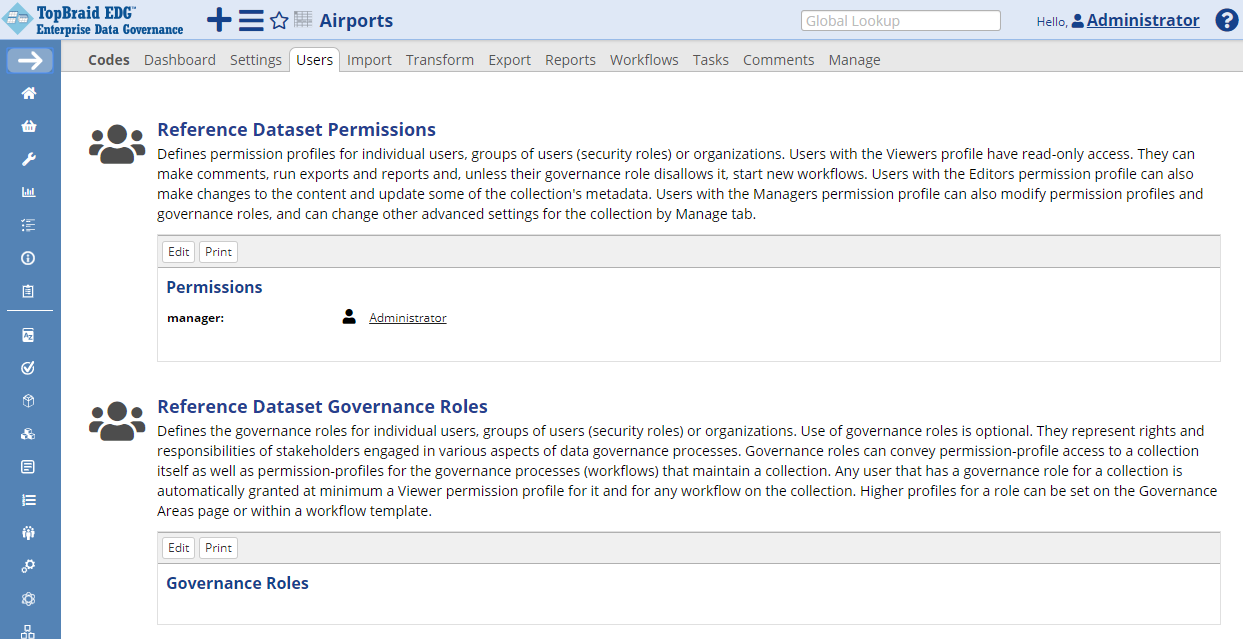
TopBraid EDG Users Tab - Airport
Permission levels can be set for (1) individual users, (2) user security roles (e.g., from Tomcat or LDAP). The list of users you will see on this tab can include individual users and LDAP roles. A Manager can assign Manager, Editor and Viewer privileges to each user or user group. Users page is also used to set up Operationalizing Data Governance (as defined in the Governance model) for individual reference datasets. Governance roles can also be defined at business area or data subject area a reference dataset is associated with.
Governance roles provide an alternative approach to assigning permissions. A user has any governance role for a reference dataset (or any other asset collection), specified either directly for a dataset or in directly for a subject area the dataset belongs to, will automatically get Viewer permission. And you can also assign Editor and Manager permissions to governance roles.
Modifying Reference Data
Dominica’s main airport, the Melville Hall Airport, was just renamed to the Douglas-Charles Airport in tribute to its late prime ministers, Rosie Douglas and Pierre Charles. While your next bi-annual update from the IATA Association will reflect this change, you need to make it ahead of receiving the update.
Click on Codes tab. Search for airports in Dominica by clicking on Filters icon, then selecting “airport country” field. Start typing “Domi..” to get the match on the official country name – “Dominica”.

TopBraid EDG Codes Tab - Edit Melville Hall
To get back the unfiltered list of all airports, click the X next to the filter.
You can now change the airport name by clicking on Melville Hall, then clicking on the Edit button.
When you make the change to rename its label value to “Douglas-Charles Airport”, you can check the Enter log message when submitting edits before clicking the Save Changes button if you want to include a log message about your change.
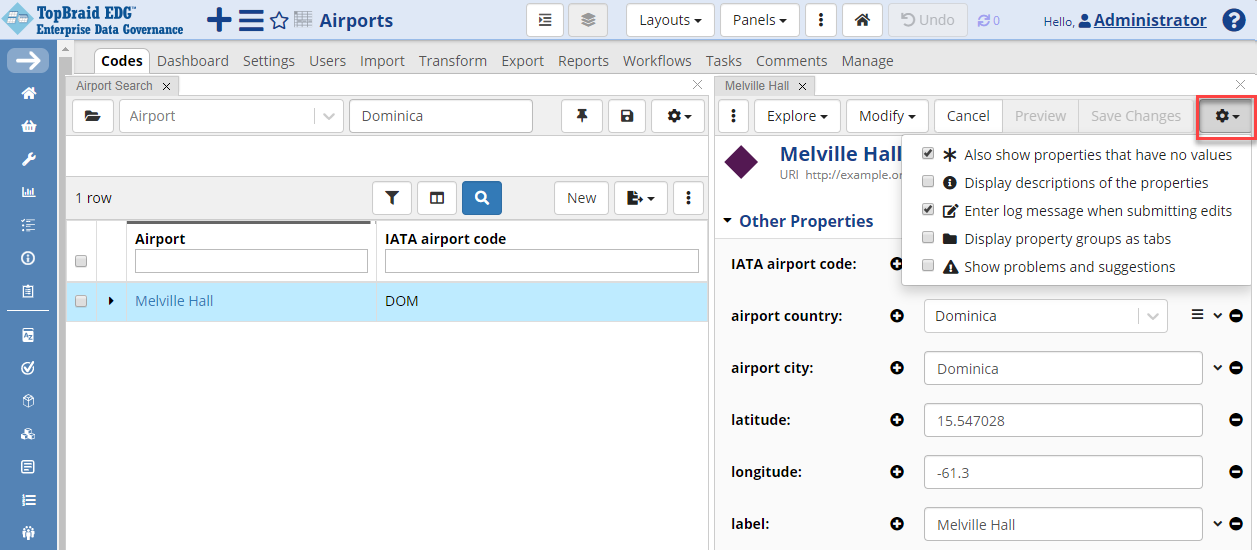
TopBraid EDG Codes Tab - Save Changes to Melville Hall
Alternatively to clicking on the Edit button, you can inline edit one field at a time. Mouse over the field’s value and click on a pencil icon that will appear to the left of the value. This will open just that field for inline editing.
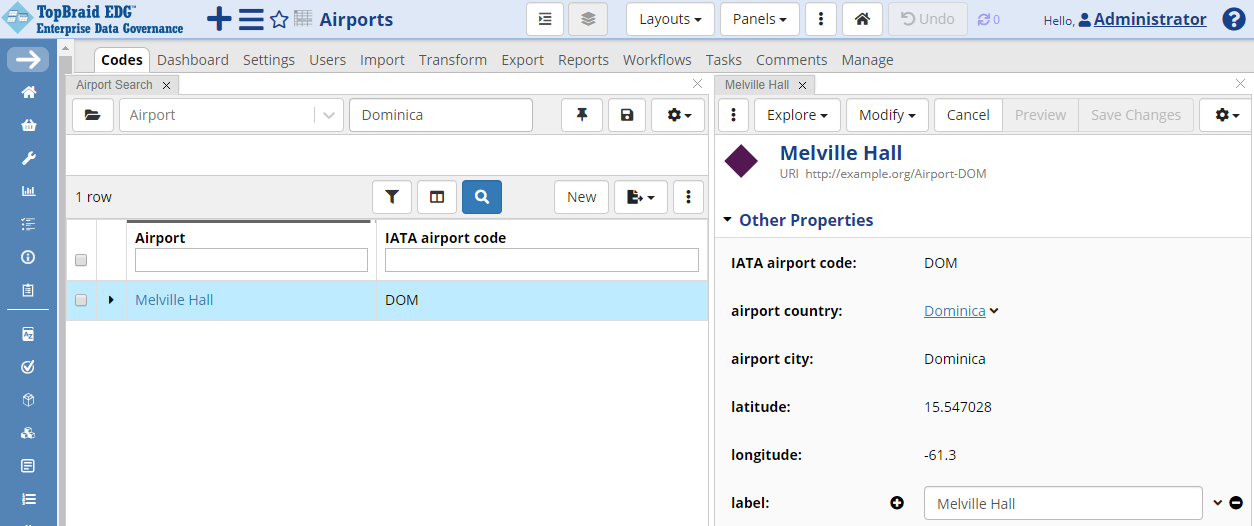
TopBraid EDG Codes Tab - Inline Edit Melville Hall
TopBraid EDG keeps a complete audit trail of all changes.
Click the  dropdown located on the right upper corner of the page and drag Change History somewhere on to the page.
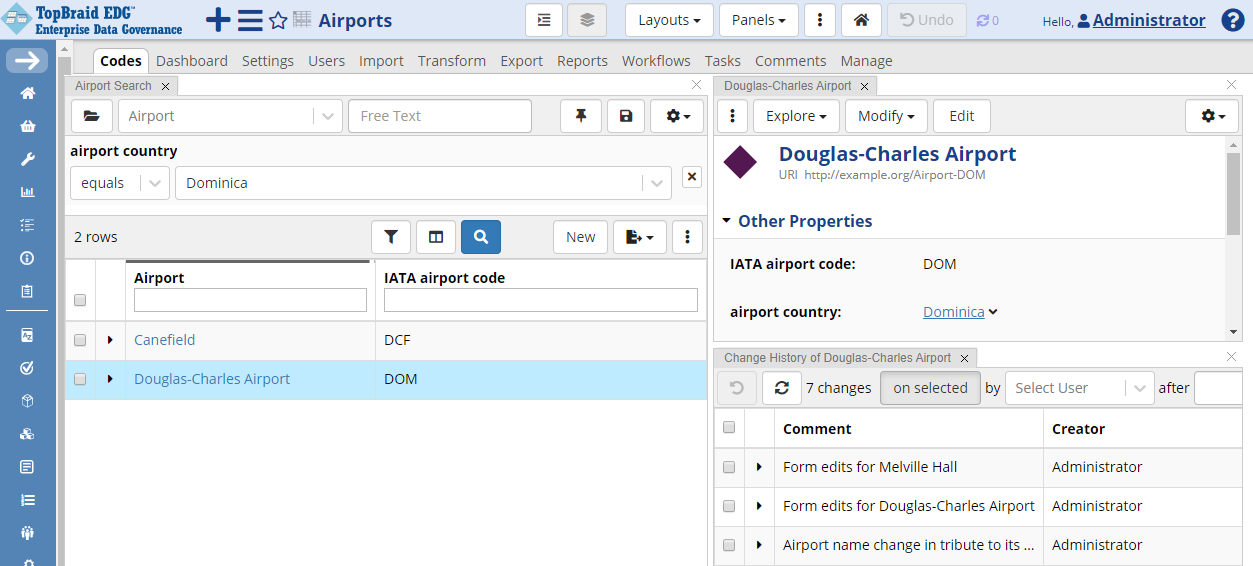
TopBraid EDG Codes Tab - View History
Instead of using Filters, you could have also clicked on Columns icon, added the “airport country” column to the table and typed Dominica in the Search field.
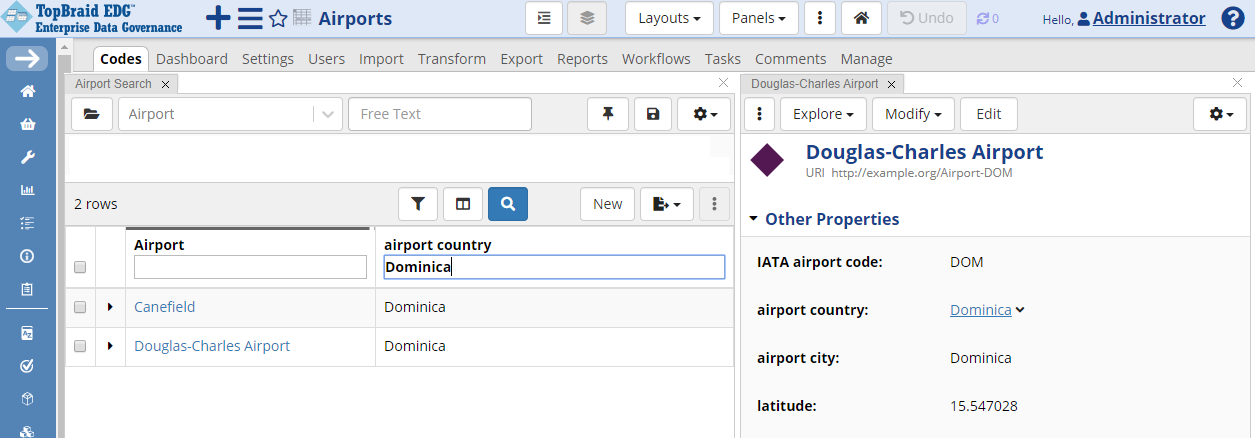
TopBraid EDG Codes Tab - Search by Column
This approach, however, may not search across all reference data. It will only filter within the data that has been loaded into the table. Data loaded into the table could be be a subset of the codes in a reference dataset. By default, TopBraid EDG will load 1,000 rows. Our airports dataset has over 5,000 entries. Thus, using this approach, you may not find the result you are looking for even if data exists. Your EDG administrator can increase the default setting to make sure that all airport data is always loaded. However, if you are regularly working with very large datasets that have tens or hundreds of thousands entries, making this setting too high in order to force all data to always load into the table may impact performance for large datasets. Using search filters is always the most reliable approach for large datasets.
Creating New Codes
To create a new airport, click on the New button in the button-row on the Search Panel.
Export, Collaboration, and other Activities
Some of the data stewards’ tasks overlap with the tasks of other users. For example, stewards may build exports of reference data, but so do data managers. These overlapping activities, including assignment of tasks and exchange of comments between users working with reference data, are covered in the Data Manager and Business Analyst sections of this Getting Started guide.
In this section, we want to introduce you to creating asset lists. Asset Lists panel lets you create ad hoc lists. This may be a list of codes you want to return to later. It could also be a convenient way to assemble a group of codes you want to batch edit together – as a group. And you can also share asset lists with other colleagues. For example, to ask them to review some items. To work with asset lists, drag and drop into the page Asset List panel. Then, drag and drop into it items you want to add to the list.
For example, let’s select some London area airports and drag and drop them into the Asset List panel. Click on the pencil icon to name the asset list. Now click on the cloud icon to the right of the pencil to share the asset list. Shared lists are saved to the server. Other users can then download the list you created and shared.
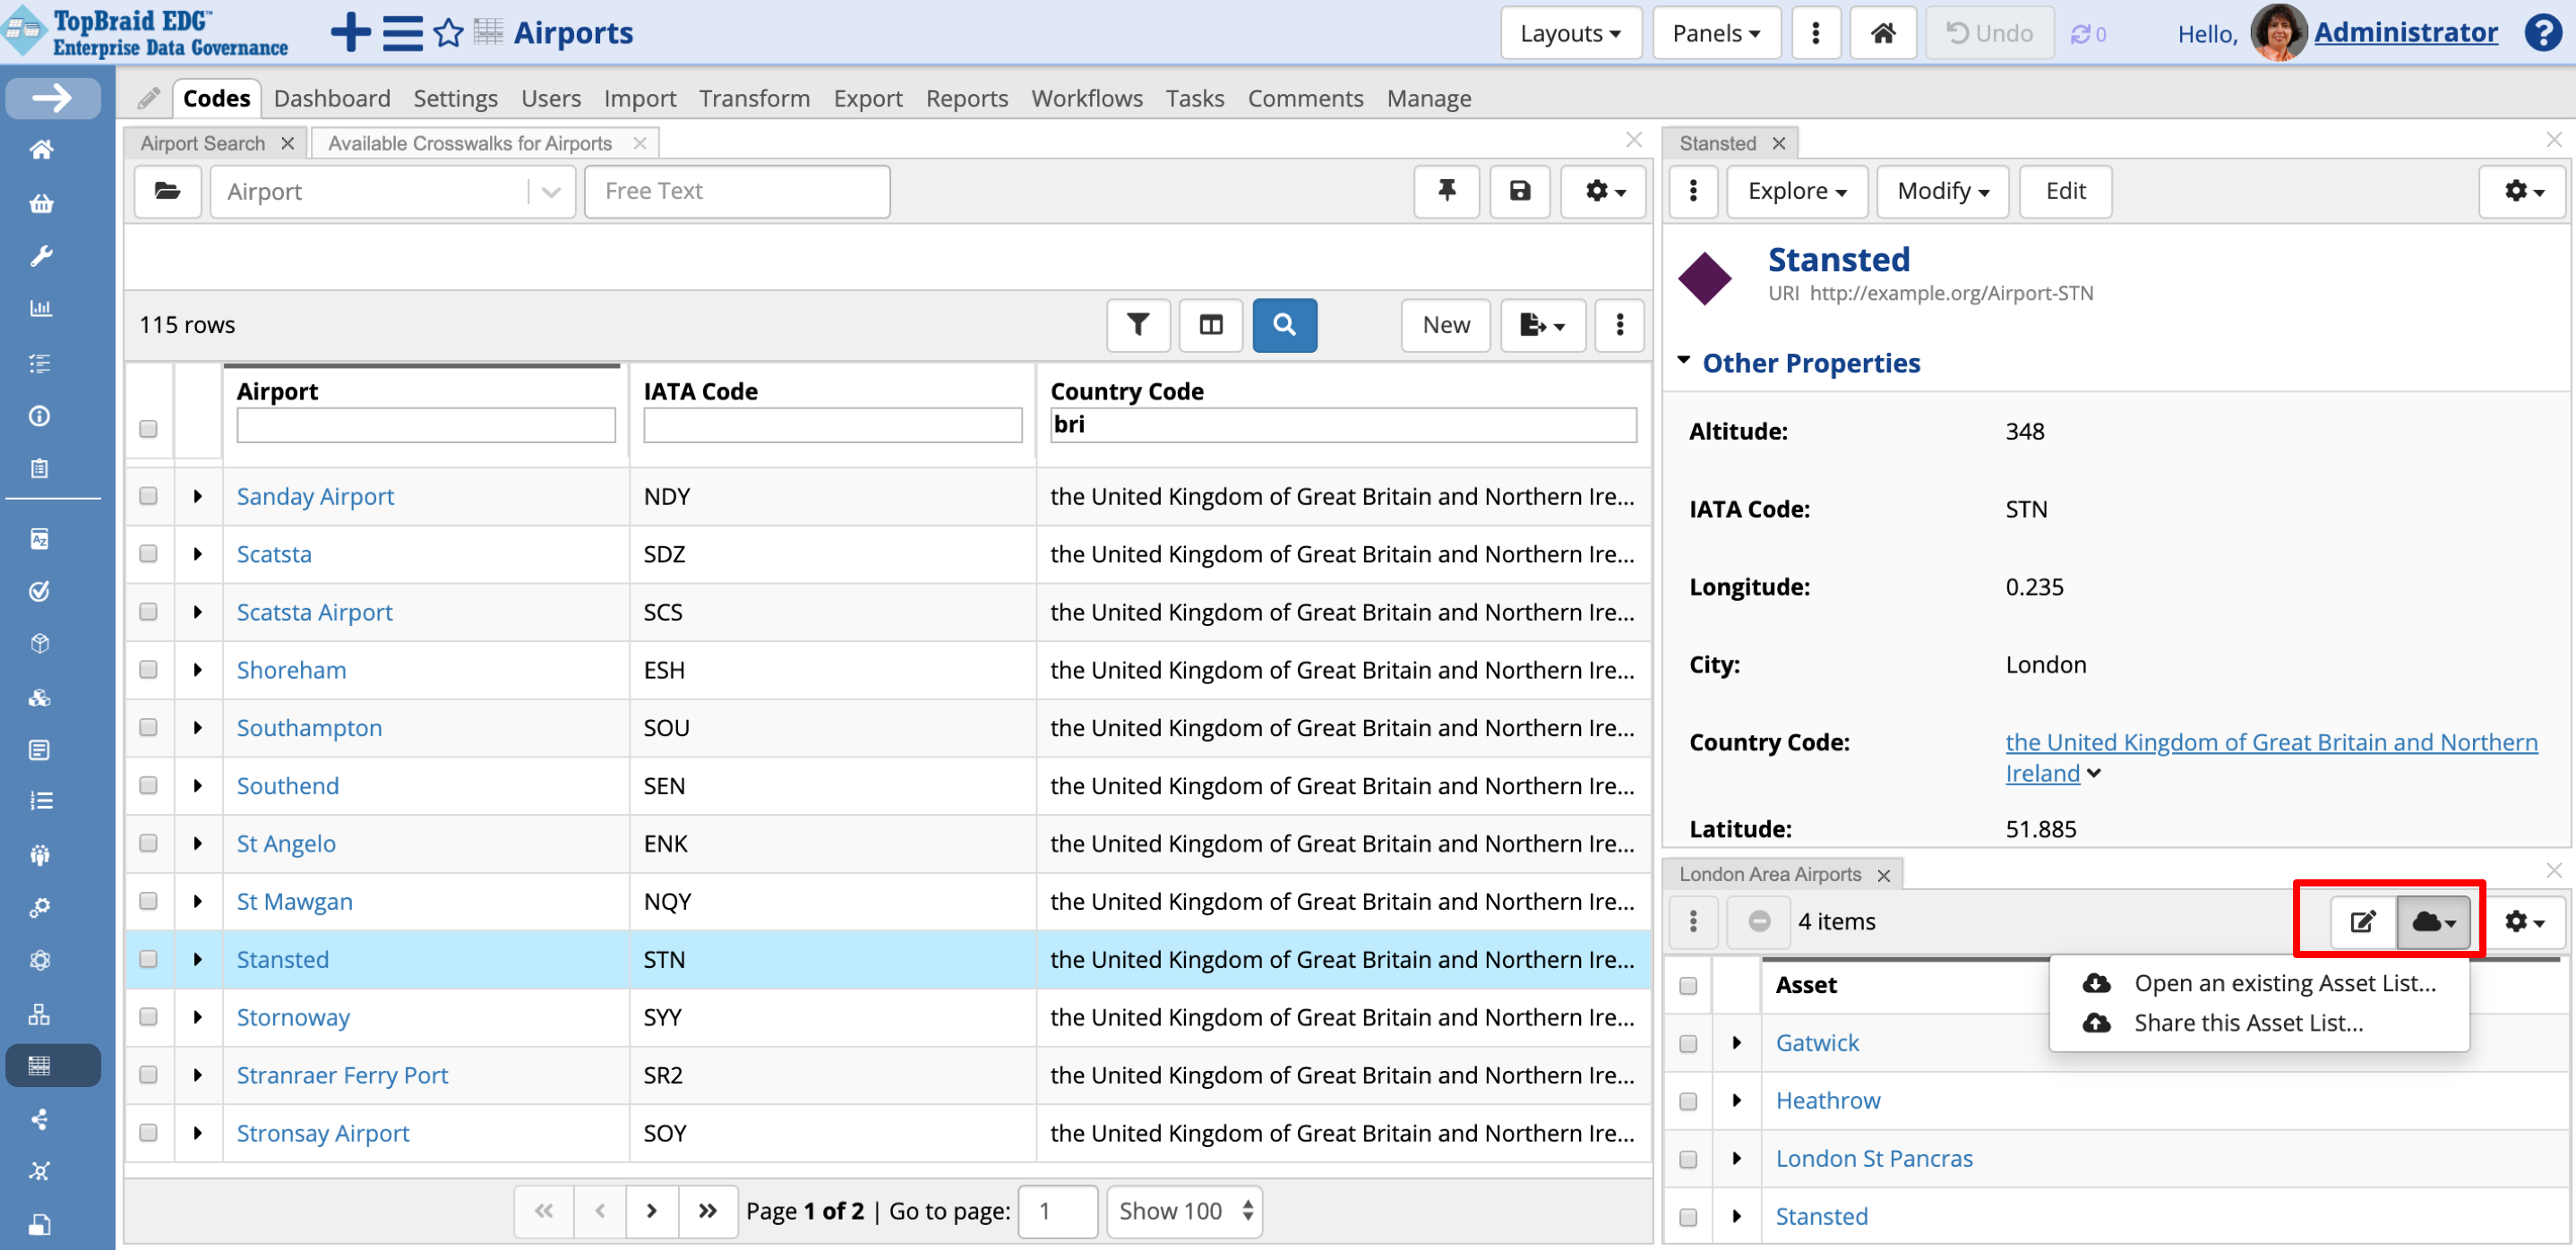
TopBraid EDG Codes Tab - Asset List
Creating a Crosswalk
Some systems may use a different local set of codes for the same entity – in our case, Airport. In these cases, you will want to map local, in-situ codes to the enterprise reference dataset for airports.
First, let’s extend the ontology by creating a new class “Local Airport”. Define for it an attribute “local airport code” with the string datatype. Make it a primary key for the class. Specify start of the URI pattern of your choice.
Now, create a new reference dataset. Let’s assume that it is a dataset used by a hypothetical Flight Tracker application and call it Flight Tracker Airport Codes.
You can create a new reference dataset from the Governance Areas page as described previously. Or, alternatively, click on the + New button in the header or click on the Reference Datasets in the Collections menu in the header bar. In the latter case, you will see a page listing all Reference Datasets you have access to. This page offers a Create New Reference Dataset link. When dataset is created this way, it will not be associated with any governance area. As shown below, you can add association to a governance area later by updating dataset’s subject area in the editor Form.
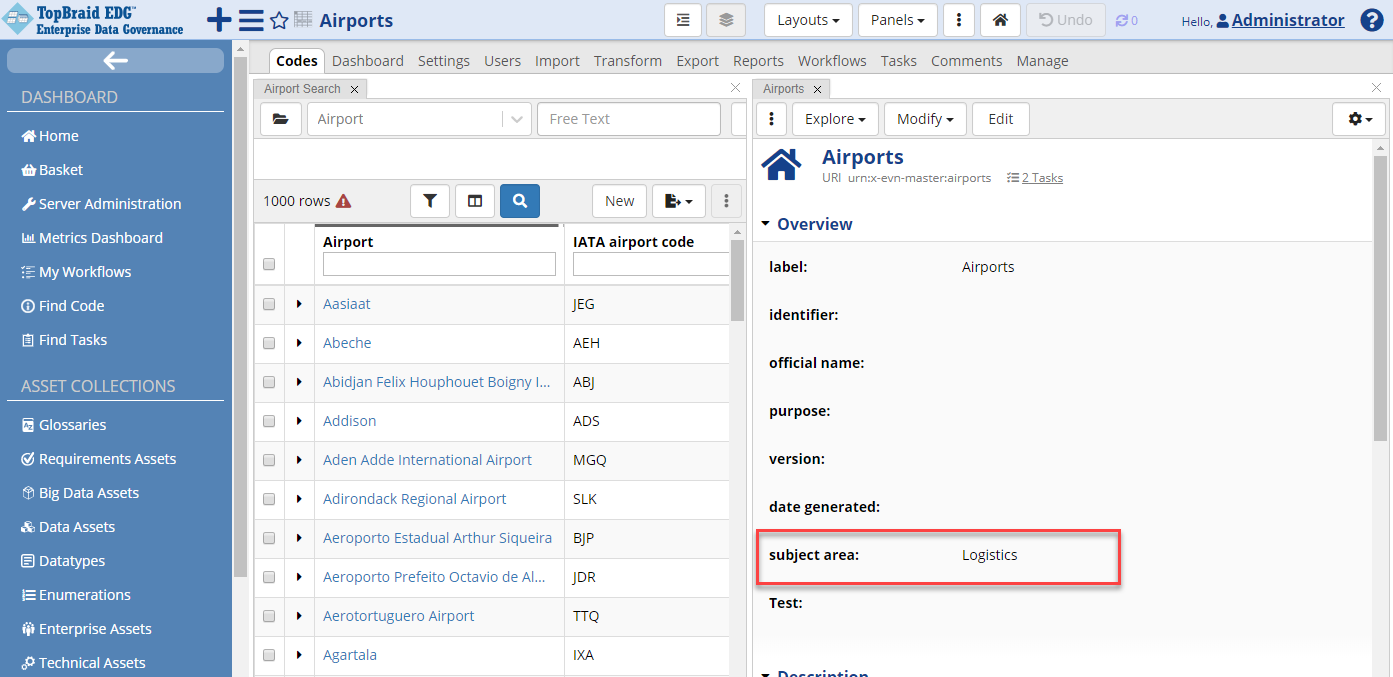
TopBraid EDG Codes Tab - Subject Area
After creating the dataset, click on Codes tab. When asked, set main entity to Local Airport and click on Continue. Create a few New York area airports using data from the table below.
Local Airport |
Local Code |
|---|---|
La Guardia |
1 |
JFK |
2 |
Westchester County |
3 |
Newark |
4 |
Islip |
5 |
Create a new Crosswalk from the Flight Tracker Airports to the enterprise reference dataset Airports. As with any asset collection creation, you have the option of using the + icon in the header or clicking on the Crosswalks in the left side Navigator panel and then using Create New Crosswalk link.
There is also create option that is specific to crosswalks. Click on Available Crosswalks panel. If you do not see it, click on the Panels button and drag and drop it on the page.
Now click on Create New Crosswalk.

TopBraid EDG Available Crosswalks
Define the crosswalk as shown in the image below. Click Finish.
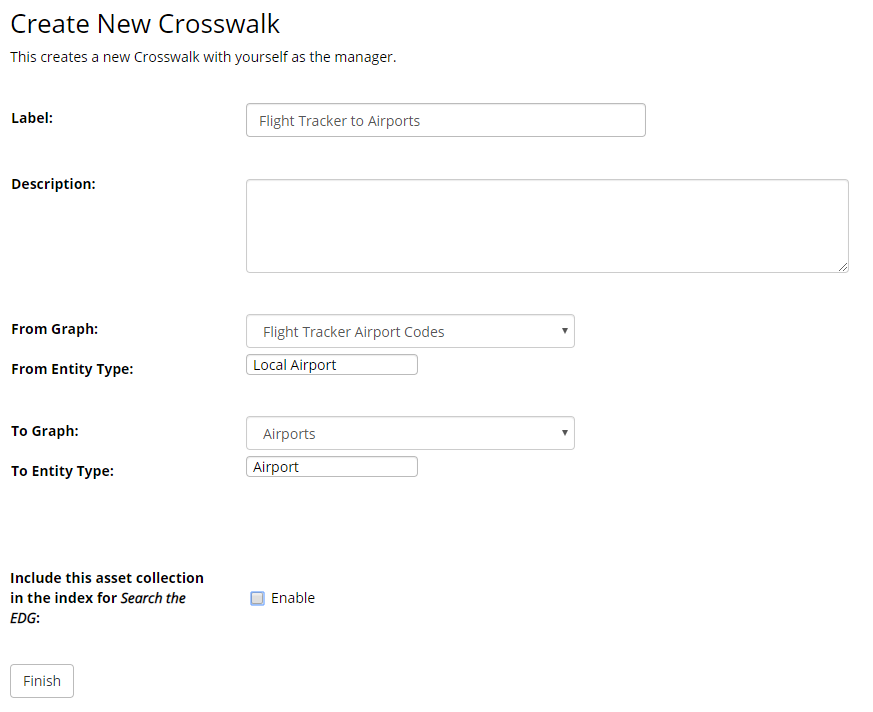
TopBraid EDG Create New Crosswalk Form
You can now map two sets of airport codes manually or automatically. TopBraid EDG supports many to many mappings. Click on Mappings to view the crosswalk. Initially, it has no mappings. To map manually, click on a row and start typing in the Match column in the form.
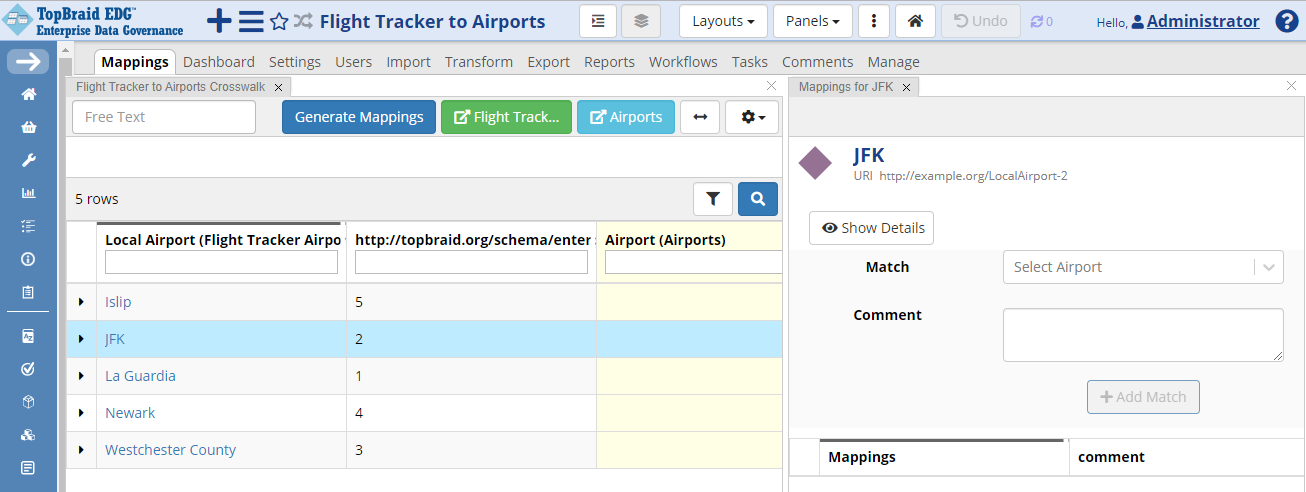
TopBraid EDG Flight Tracker Mappings
Autocomplete list will appear. Select your choice from the dropdown and click on Add Match.
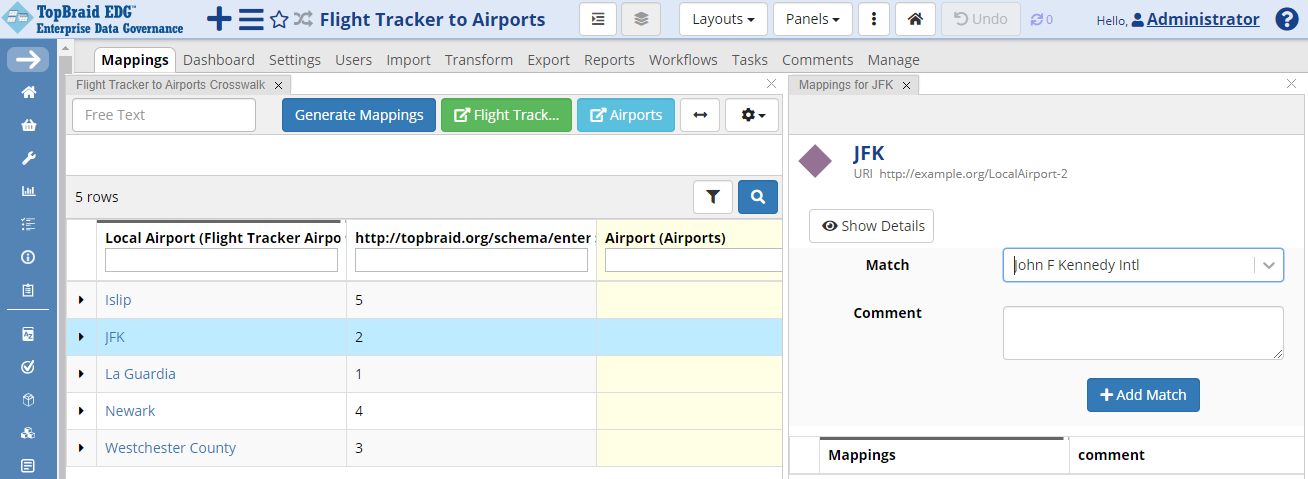
TopBraid EDG Flight Tracker Mappings - JFK
To auto-map select Generate Mappings button.
TopBraid EDG will generate some suggested mappings for you based on the airport names. Move the confidence level to 50% in the slider to filter out unlikely suggestions.
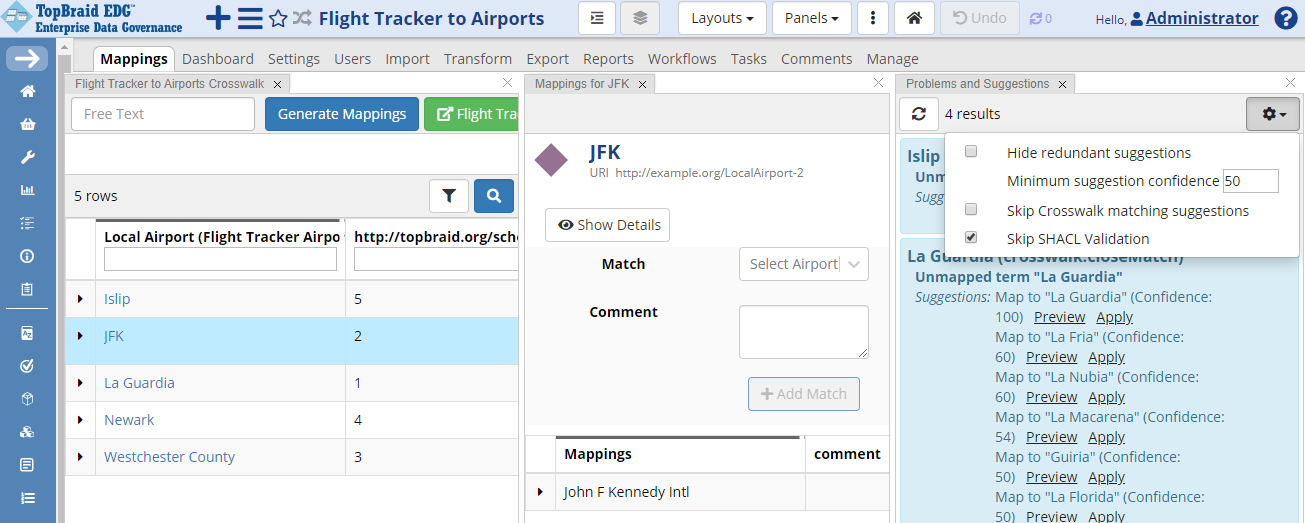
TopBraid EDG Flight Tracker Generate Mappings
You can now accept suggestions one by one or move the confidence level even higher to let’s say 70%, accept all top suggestions and then individually pick any lower confidence suggestions you want to apply. From the generated list, we want to accept La Guardia mapping, Newark Liberty mapping and Westchester Co mapping. The official name of the Islip airport on Long Island is Long Island MacArthur, so it was not found. Add this mapping manually. Your crosswalk should now look as follows:
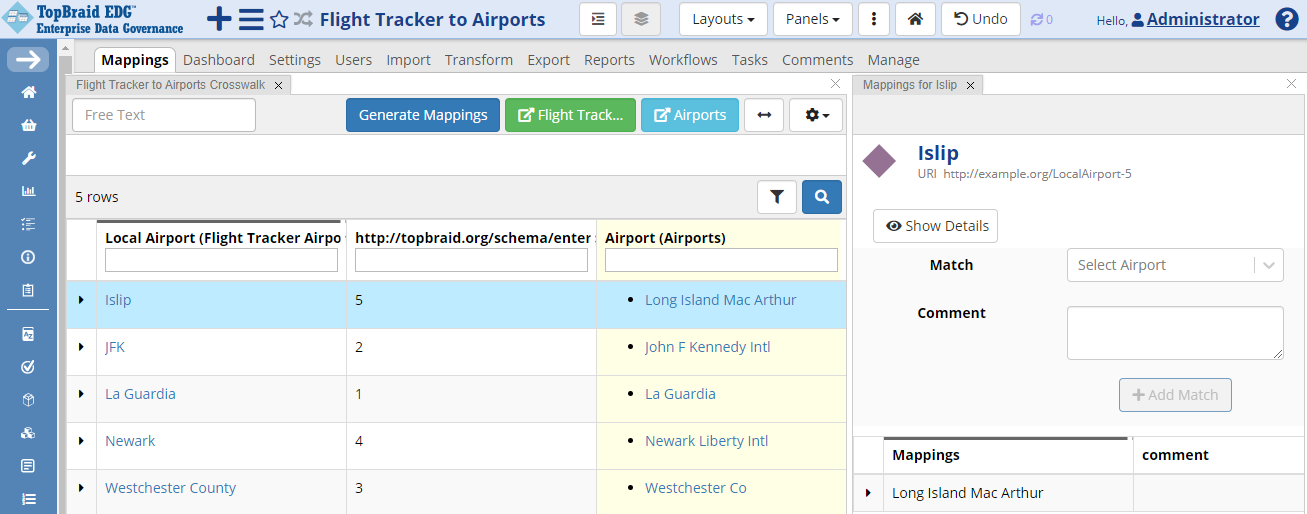
TopBraid EDG Flight Tracker Mapped
To see more information about the mapped airports including their IATA codes, you can click on a row. The form will open in the Form panel. Click on the arrow next to the airport.
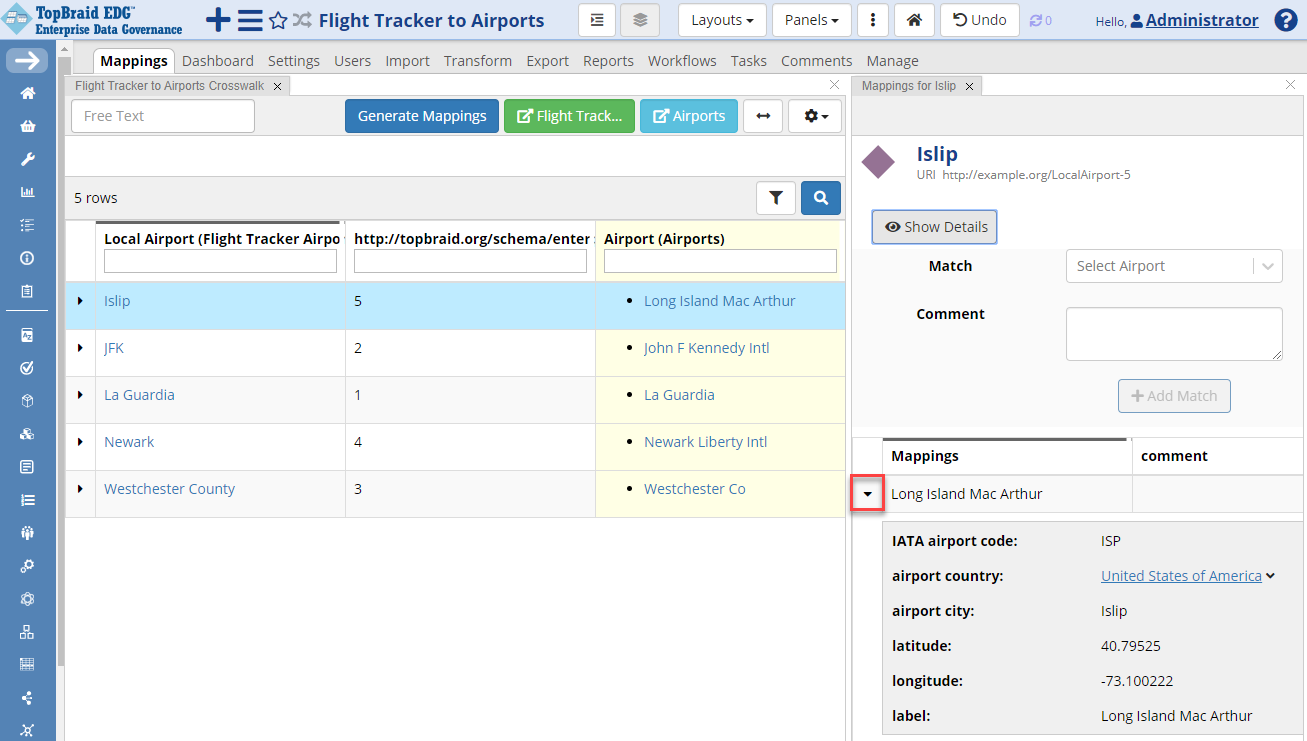
TopBraid EDG Flight Tracker Mapped - Airport Info
See also
For more on working with crosswalks, see Working with Crosswalks pages.
Documenting the Use of a Reference Dataset
If you are using TopBraid EDG for Metadata Management together with TopBraid EDG-RDM, you can document the use of a reference dataset in your applications catalog, data assets catalog and/or business glossary. See relevant User Guides for more details.
Getting Started for the Data Manager
While this section can serve as a standalone tutorial, it assumes that all steps described in the Getting Started for the Data Steward section has already been completed. The Airports reference dataset has been created and populated with data and you have access to it.
Defining Reference Data Export
As a data manager, you may need to distribute reference data for use in your data source. Export is one way of doing this. Reference data can be exported in full or as subsets of data. After finding the reference dataset you need, click the dataset’s Export tab to view the available export options:
RDF export of the entire dataset – with a choice of serializations. Select a format and note the URL in the browser – this is the URL you will be able to use in a service call for executing this export programmatically
GraphQL exports – users can specify GraphQL queries to get exactly the data they need. TopBraid EDG offers extended implementation of GraphQL to enable filtering of results. See TopQuadrant’s GraphQL web page for links to detailed documentation.
Click on the Codes tab. You will also see Export options in the Search panel. Different export formats can be chosen by clicking on the Export icon. Available formats include Excel, CSV, TSV, and JSON.
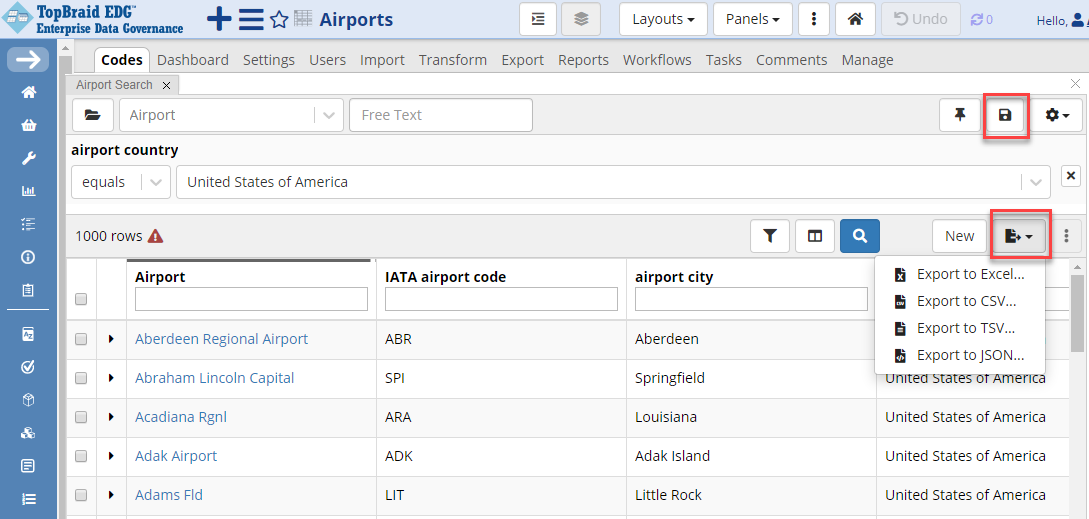
TopBraid EDG Export Saved Search Results
Add columns the following columns to the search results table: IATA code, airport city and country. Click on the Filter icon and select airport country column. Start typing “United” in the airport country field and pick “United States of America” from the autocomplete. Results will appear in the grid after the entry is picked.
See also
See Searching in EDG for more information on specifying search criteria.
Save the search by clicking the Save icon above the filter and give your search a name such as “US airports”.
Open the Search Library panel by clicking the  dropdown located on the right upper corner of the page and drag Search Library somewhere to the page.
Selecting a saved search from the library populates your search criteria (filters) as specified by the selected search, and you can then click the Run button to re-run the saved search.
Saved searches are web services that you can use to automate distribution of reference data.
Note
Each saved search in the library has a Service URL column that can be used as a RESTful web service call to invoke the search.
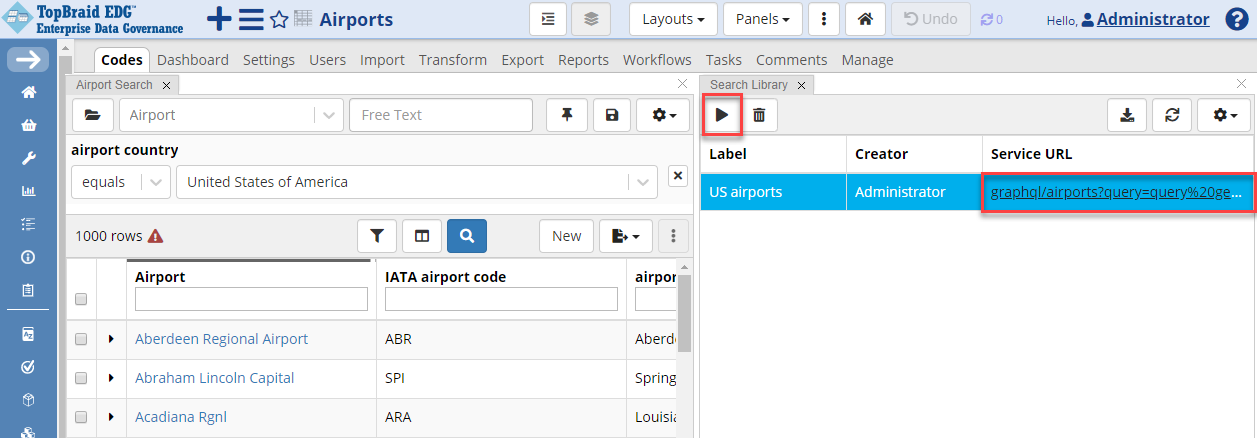
TopBraid EDG Load Saved Search
Another option for defining exports is by using SPARQL. From the Layouts menu chose SPARQL layout. This will display a view that shows the SPARQL Query, SPARQL Library and SPARQL Results panels along with the Form panel.
Creating SPARQL queries requires knowledge of the SPARQL query language. If you are new to SPARQL, you may also want to check out this tutorial. You can use the SPARQL panel to define, test and save your queries. Export formats for these queries include CSV, TSV, JSON and XML.
Queries can be saved by giving them a name. Just as with the saved searches, saved queries have a service URL. In addition to the regular queries, you can also create parametrized queries by using “$” instead of “?” in front of the parameter name.
Using Pre-built TopBraid EDG-RDM Web Services
TopBraid EDG includes pre-built services for validating your locally stored reference data against the datasets managed by EDG. It also includes crosswalk services for translating from one set of codes to another set of mapped (cross-walked codes).
See also
See the Extension Development for more details on how to use these services.
Relevant services will be listed on the Server Administration -> Available Web Services page. Select Compliance Services, Reference Datasets and/or Crosswalk Modules to see pre-built services that are likely to be useful for working with reference datasets.
Getting Started for the Business Analyst
While this section can serve as a standalone tutorial, it assumes that all steps described in the Getting Started for the Data Steward section has already been completed. The Airports reference dataset has been created and populated with data and you have access to it.
Finding a Reference Dataset
When you click on the Reference Datasets link in the left hand side navigator, you will see a table listing reference datasets you have access to. This list can be long, especially in large organizations with lots of different reference data.
Table displaying datasets is sortable. Click on any of the columns to sort by the subject area a dataset belongs to, creator, date of creation, user that last updated it, update date, and main entity.
Further, you can filter the table by typing in the Refine field. The text string entered will be matched against the information in all columns.
If you know of the reference datasets in your TopBraid EDG system that do not appear, you might not have the appropriate viewing or editing privileges for them. Each asset collection in EDG requires a manager to provide access by setting you (or your security role) as a viewer, at least.
See also
See the Operationalizing Data Governance documentation for details.
Finding a Code
To find a specific code, use the Search in the header of EDG and select “find code”.
Viewing Dataset’s Metadata
The editor form contains descriptive and contextual information about the dataset, grouped into sub-sections.
Note
The empty sub-sections might not be displayed until the form is placed into Edit mode.
Also, some “dependent” (variant) sections might not appear unless certain conditions apply, e.g., setting Status > is external dataset > true, identifies a reference dataset as external/public which makes available the Subscription section with associated fields describing the source of public reference data and how and when it gets updated. The Property Definition (Semantic Analysis) section has a field-by-field description of each field in the dataset’s main entity class.
Using Reference Dataset and Data Facts
As a Business Analyst you may have a report that needs to include a data feed that uses FAA airport identifiers. Reviewing the data, the FAA identifiers in the data seem to match the IATA codes, but you want to double-check that this would correctly integrate with the rest of your data which uses IATA codes.
Expand Reference Dataset Facts sub-section of the Facts Shape section of the form. You will learn that while many FAA identifiers are identical with IATA codes, there are also differences. Assuming that these are the same codes would have let to errors in the integrated reports. To correctly integrate data, you should request a steward to build the crosswalk between the two sets of codes.
Creating Tasks and asking Questions about a Code
You may want to ask the reference data governance team to add FAA identifiers to the reference dataset because you believe this information will be useful not only for your immediate task, but for other applications and, should therefore be managed with the rest of the reference data.
Reference datasets let you log requests and questions in a form of Tasks. Tasks can be associated with an individual code or with the entire dataset. To create a task for the entire dataset, go to the Tasks tab for a dataset, click the Create new task button and enter:
“Most of my data is coded with IATA codes, but I am starting to integrate new data feeds that use FAA identifiers. Please expand the dataset to include FAA identifiers.”
You can select which user to assign the task to. By default it will be assigned to the dataset’s manager. Click the Create Task button.
The task is now displayed in the tab. Tasks can be filtered by assignee and by status. There is a Comments section below Summary that lets users post responses or ask for additional information.
To create a task for a specific airport, click Codes, select the code you want to associate a task with and click on the Explore icon at the top of the form.
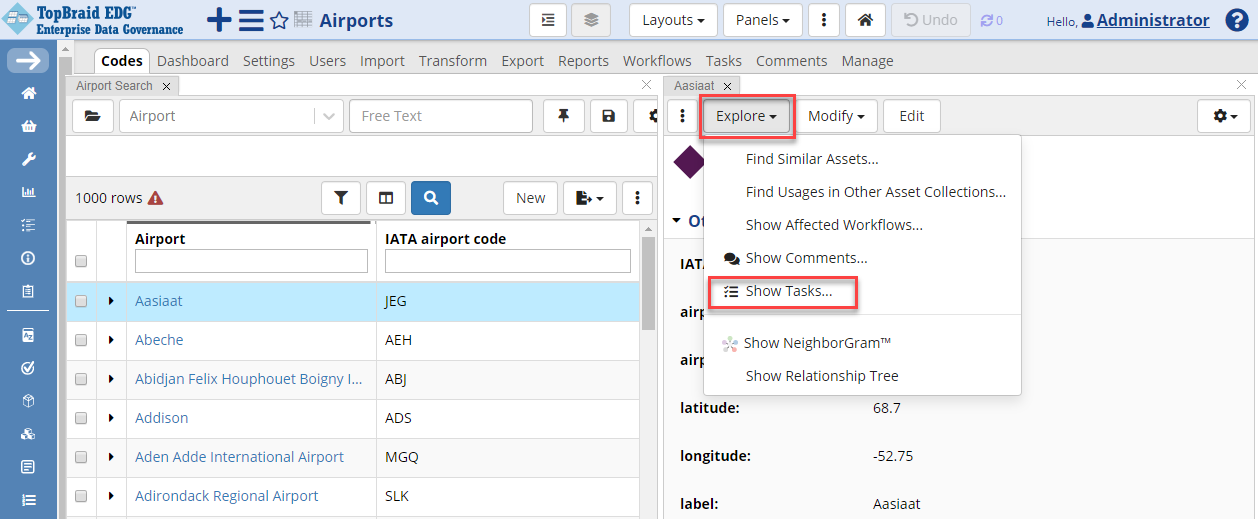
TopBraid EDG Explore - Show Tasks
Next Steps
You are now ready to explore the User Guide to learn more about the many capabilities of TopBraid EDG, including workflows for team collaboration, importing more complex spreadsheets, and more.