Selected Extension Points
The following sub-sections describe how to use selected extension points. The topics listed here do not cover all possible scenarios but are meant as a starting point for the most frequently needed extensions. If you have specific needs for modifying TopBraid EDG in your organization that are not covered here, please ask us and we may update this documentation.
The sections below include links to sample files for most extension points. You may put those samples into your TopBraid EDG Studio workspace where you can explore their implementation, try them out and even modify the samples.
Hint
Don’t just put all samples into your workspace at once. Each of the samples makes changes to the system, so you would see things like unexpected new menu items and background scripts that will be hard to understand without studying them individually.
Script-based Functions
This extension point can be used to install new SPARQL functions and JavaScript functions in the generated ADS APIs.
Samples:

An example Script-based function in TopBraid EDG (Studio)
Instructions:
Instances of dash:ScriptFunction define functions that may be used from SPARQL or ADS scripts.
Such functions encapsulate almost any business logic that can be expressed in JavaScript/ADS, as value of dash:js.
The examples and the screenshot illustrate the mechanics.
Functions may take parameters, which must be declared using sh:parameter and can declare a return type using sh:returnType.
All this is very similar to SHACL-SPARQL Functions from the SHACL Advanced Features specification.
The main difference is that here we use dash:js to store the executable body of the function.
That body needs to use the return keyword to specify the result value (if any).
There are two kinds of Script-based functions:
read-only functions have no value or false for
dash:canWrite. These functions execute with a read-only API and are not permitted to make modifications or have side effects. These functions will be turned into SPARQL functions - all SPARQL functions are strictly read-only to avoid deadlocks and other SPARQL execution issues.read/write functions have
dash:canWrite true. These functions are only exposed through the ADS APIs and may make changes to the data and have other side effects.
Multi-Functions
This extension point can be used to install new ADS functions and SPARQL magic properties that return multiple rows of (potentially) multiple values each.
Samples:
See DASH Multi-Functions for technical background and further examples.
Note
Multi-functions should be stored in files ending with .api.ttl so that they are globally registered as SPARQL magic properties.
Constructors
This extension point can be used to override the Create New dialogs for instances of certain classes, for example to initialize new instances from values entered by the user.
Samples:
In this example the class Person has two properties (first name and last name).
However, when a new instance is created, we want users to only enter the full name and then split that input string into the two name components.
To do that, the class Person declares a dash:constructor:
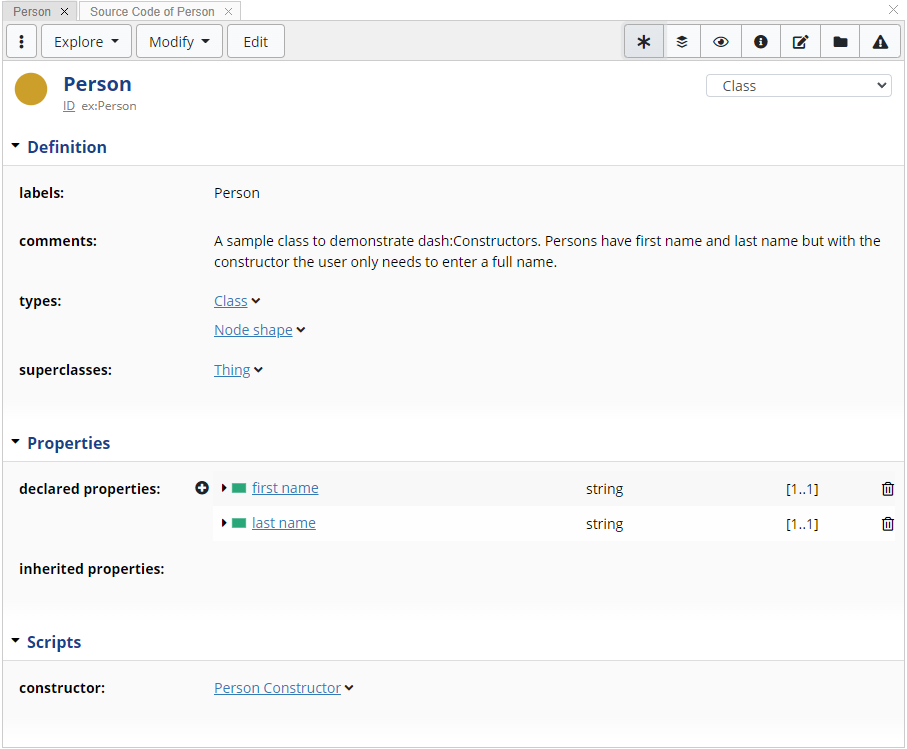
Classes can define a Constructor
Here is how the constructor itself is defined:

Constructors define input parameters and an ADS script to perform the actual construction
When the New button is pressed, the following dialog will appear:

The Create dialog only asks for the parameters defined in the constructor
The new instance is then derived from the entered parameter value:
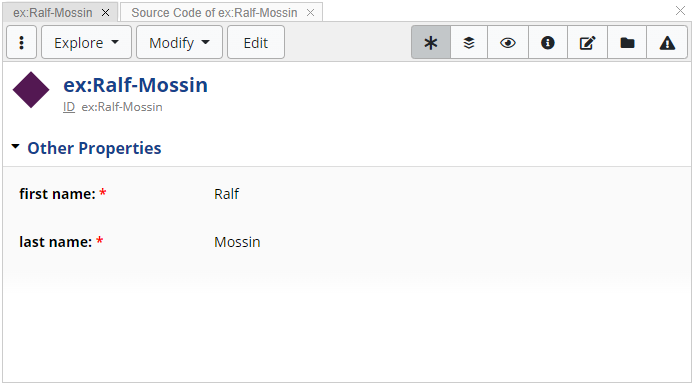
The actual instance is created using the script of the constructor using the parameters as input
Note
Constructor scripts get the variable focusNode as input from the outside, pointing at the selected class.
All other parameters are mapped to namesake variables based on the entered values, such as fullName here.
The result value of the script (i.e. the last line) must be the newly created instance - this is needed to instruct the surrounding tool to highlight the new instance.
Hint
Constructors are using class inheritance. To keep things simple, there should only ever be one reachable constructor in the parent class hierarchy. Constructors of subclasses may however override the constructors of superclasses.
Change and Commit Scripts
This extension point can be used to install scripts that are triggered whenever a user makes changes to an asset collection, e.g. by pressing the Save Changes button on a form.
Samples:
These scripts can be split in two categories:
pre-commit scripts (
dash:ChangeScript) are triggered anytime after a change is done in a graph, and executed within the edit itself. In practice, this means that if there is some validation problem, the rule is triggered twice - once when the initial save button was clicked, and the second time when the save is confirmed. These rules are also executed in preview mode. Therefore, pre-commit rules (dash:ChangeScript) must not have side effects, as this might cause further constraint violations.post-commit scripts (
dash:CommitScript) are only executed once the edits to the data graph are persisted. Unlike their counterpart, these scripts are not triggered in preview mode, or if a constraint violation is blocking an edit. These scripts may have side-effects, meaning that updates to other graphs or sending notifications to external systems can be done.
Multiple scripts of the same category can be ordered using the sh:order, with the lower the value, the highest the execution priority.
In these scripts, the current changes from the active graph can be accessed via dataset.addedGraphURI for resource values that have been added and dataset.deletedGraphURI for resource values that have been deleted, in that particular edit.
These graphs can be queried by using graph.withDataGraph(dataset.addedGraphURI, ...) or via SPARQL’s GRAPH keyword.
Resource Actions
This extension point can be used to install new items for the Explore and Modify menus of selected resources.
Samples:
More information on this extension point can be found at Resource Actions.
Web Services
This extension point can be used to install new web services that can be called from the outside but execute within the TopBraid server.
Samples:
More information on this extension point can be found at ADS-based Web Services.
Generators for the Problems and Suggestions Reports
This extension point can be used to have the Problems and Suggestions panel produce new kinds of results.
Samples:
Instructions:
Create an instance of tosh:ResultsGenerator in a .ui.ttlx file.
In that instance, store the JavaScript code that shall be executed under dash:js.
In that script, the variable resultsGraph.uri is the URI of the target graph that the script can add new results to.
For example, use the script to generate new instances of dash:SuggestionResult, along with
one or more values for
sh:resultMessagefor human-readable messagesa value for
sh:focusNodeto link to the main resource that the result is abouta value for
sh:resultSeverity(such assh:Warningorsh:Info)a value for
sh:resultPathif the result is about a certain property path from the focus node
Finally, the result instance needs to be linked to the sh:ValidationReport instance using the pre-defined variable report using report.add(sh.result, result).
Note
See the SHACL Results Vocabulary for technical background on the results vocabulary.
See the DASH Suggestions Vocabulary for details on the suggestions framework.
Suggestion Generators
This extension point can be used to generate new Suggestions for the Problems and Suggestions panel and the Form panel.
Samples:

The suggestion generator in Action
Note
See the DASH Suggestions Vocabulary for background on the suggestions framework.
Instructions:
Instances of dash:ScriptSuggestionGenerator implement suggestion generators that are backed by an Active Data Shapes script.
The script needs to return a JSON object or an array of JSON objects if it shall generate multiple suggestions.
It may also return null to indicate that nothing was suggested.
Note that the whole script is evaluated as a (JavaScript) expression, and those will use the last value as result. So simply putting an object at the end of your script should do. Alternatively, define the bulk of the operation as a function and simply call that function in the script.
Each response object can have the following fields:
message: a human readable message, defaults to the rdfs:label(s) of the suggestion generatoradd: an array of triples to add, each triple as an array with three nodes forsubject,predicateandobjectdelete: likeadd, for the triples to delete
Suggestions with neither added nor deleted triples will be discarded.
At execution time, the script operates on the data graph as the active graph, with the following pre-bound variables:
focusNode: theNamedNodethat is thesh:focusNodeof the validation resultpredicate: theNamedNoderepresenting the predicate of the validation result, assumingsh:resultPathis a URIvalue: the value node from the validation result’ssh:value, cast into the most suitable JavaScript objectthe other pre-bound variables for the parameters of the constraint, e.g. in a
sh:maxCountconstraint it would bemaxCount
The script will be executed in read-only mode, i.e. it cannot modify the graph.
Landing Page Gadgets
This extension point can be used to install new gadgets on the Home page of TopBraid EDG itself.
Samples:
Instructions:
In a .ui.ttlx file, make sure that teamwork.ui.ttlx is included so that you can create a subclass of teamwork:LandingPageGadgetHooks.
In the dash:js of that subclass, use graph.html() in the last line to produce the HTML output that you would like to have inserted into the home page.
Use the properties teamwork:landingPageColumn and teamwork:landingPageOrder as shown in the sample.
Make sure the component has a suitable rdfs:label so that individual users can select to see or hide that gadget from their user-specific settings.
Injecting CSS Styles and Logo
This extension point can be used to override the appearance and, to a limited extend, the behavior of TopBraid user interface components (outside of the main editor).
Samples:
Instructions:
In a .ui.ttlx file, make sure that teamwork.ui.ttlx is included with the definitions of all commonly used UI components.
In the example, we subclass teamwork:Logo and use ui:override to instruct the system that our own subclass should be used instead of the original teamwork:Logo.
For typical user interface customizations, use dash:js with graph.html() to produce alternative HTML.
Warning
Using this extension point requires a fair bit of understanding of how TopBraid uses SWP. Check with TopQuadrant staff if the SWP component that you want to replace is considered “stable”. We will attempt to keep them stable if we know that customers actually rely on them.
Scheduled Jobs
This extension point can be used to define scripts that shall be executed in the background on a TopBraid EDG server, triggered in recurring intervals.
Samples:
Instructions:
In a .ui.ttlx file, make sure that teamwork.ui.ttlx is included so that you can create a subclass of scheduler:ScheduledJobs.
In that subclass, define what should happen in your script under dash:js.
Set scheduler:cronSchedule to something like 0 * * * * ? to have your script execute in regular intervals.
You may need to edit this triple from the Source Code panel if you don’t see a widget on the form.
Hint
Use Administration > Scheduled Jobs to see if your scheduled job has been recognized, and to trigger it manually.
Custom Notifications
This extension point can be used to install new types of Notifications that can be triggered as side effects of various events in TopBraid EDG.
Samples:
Instructions:
In a .ui.ttlx file, make sure that teamwork.ui.ttlx is included so that you can create a subclass of one of the specific notification types.
For example subclass teamwork:RegularEditNotification to add a notification after normal edits (on forms) have happened.
Each notification needs to produce some text, ideally as an HTML snippet.
Use dash:js to produce that text, e.g. using graph.html().
Then use the property arg:expression to specify under which condition the notification should be sent out.
In the provided example, a notification is sent when a change has happened that involved the predicate skos:prefLabel.
The syntax of those expressions is SPIN RDF notation, and the example is making a SPARQL function call.
You could theoretically just set it to true to always send out notifications.
Use the Source Code panel if you don’t see an input widget for arg:expression on the form.
Once you have defined your notification type and refreshed the workspace for the .ui.ttlx file to be recognized, you may need to activate the notification for some user roles in your asset collection.
Asset Collection Constructors
This extension point can be used to install scripts that are triggered whenever a new asset collection (of certain types) is created, for example to initialize the state of the new asset collection.
Samples:
Instructions:
In a .ui.ttlx file, make sure that teamwork.ui.ttlx is included so that the property teamwork:projectConstructor is defined.
These constructors need to be linked to specific asset collection types using that property.
The following table lists the supported asset collection types and the files in which they are defined.
For example, in order to add a constructor for Taxonomies, add an owl:import of the file teamwork.topbraidlive.org/taxonomy/taxonomyprojects.ui.ttlx and then add a triple taxonomies:ProjectType teamwork:projectConstructor [ ex:ExampleProjectConstructor ] using the Source Code panel.
Collection Type Name |
Collection Type Resource |
File Path of Defining Graph |
|---|---|---|
Content Tag Set |
taggerprojects:ProjectType |
teamwork.topbraidlive.org/tagger/taggerprojects.ui.ttlx |
Crosswalk |
taxonomies:ProjectType |
teamwork.topbraidlive.org/taxonomy/taxonomyprojects.ui.ttlx |
Data Graph |
datagraphprojects:ProjectType |
teamwork.topbraidlive.org/datagraph/datagraphprojects.ui.ttlx |
Datatypes Collection |
edg:DatatypesProjectType |
edg.topbraidlive.org/1.0/controller/CONTROLLER_EDG-datatypes-v1.0.ui.ttlx |
Enterprise Assets Collection |
edg:EnterpriseModelsProjectType |
edg.topbraidlive.org/1.0/controller/CONTROLLER_EDG-enterprise-assets-v1.0.ui.ttlx |
Enumeration Collection |
edg:EnumerationsProjectType |
edg.topbraidlive.org/1.0/controller/CONTROLLER_EDG-ENUMERATIONS-v1.0.ui.ttlx |
File |
teamwork:FileProjectType |
teamwork.topbraidlive.org/file/teamworkfiles.ui.ttlx |
Glossary |
edg:GlossaryProjectType |
edg.topbraidlive.org/1.0/controller/CONTROLLER_EDG-common-v1.0.ui.ttlx |
Governance Assets Collection |
edg:GovernanceModelProjectType |
edg.topbraidlive.org/1.0/controller/CONTROLLER_EDG-governance-assets-v1.0.ui.ttlx |
Lineage Model |
edg:LineageModelProjectType |
edg.topbraidlive.org/1.0/controller/CONTROLLER_EDG-lineage-models-v1.0.ui.ttlx |
Ontology |
ontologyprojects:ProjectType |
teamwork.topbraidlive.org/ontology/ontologyprojects.ui.ttlx |
Reference Dataset |
rdmprojects:ProjectType |
teamwork.topbraidlive.org/dataset/datasetprojects.ui.ttlx |
Requirements Collection |
edg:RequirementsModelProjectType |
edg.topbraidlive.org/1.0/controller/CONTROLLER_EDG-requirements-model-v1.0.ui.ttlx |
Taxonomy |
taxonomies:ProjectType |
teamwork.topbraidlive.org/taxonomy/taxonomyprojects.ui.ttlx |
Technical Assets Collection |
edg:TechnicalAssetsProjectType |
edg.topbraidlive.org/1.0/controller/CONTROLLER_EDG-technical-assets-v1.0.ui.spin.ttlx |
Note
Your installation may not include licenses for all of those collection types.
Asset Collection Clone Plugins
This extension point can be used to install scripts that execute whenever an asset collection has been cloned, for example to modify the clone before its first use.
Samples:
In a .ui.ttlx file, make sure that teamwork.ui.ttlx is included so that you can create a subclass of teamwork:ClonePlugin.
In that subclass use dash:js to store the ADS script that shall be executed when an asset collection gets cloned.
In those scripts, you can use the variables oldProjectGraph and newProjectGraph to query the uri of the source and target of the clone operation.
You can use this, for example, to look up the type of the old or new asset collection to decide what actually needs to happen with the clone.
Custom Asset Collection Types
This extension point can be used to define new Asset Collection types in addition to the built-in types (such as Taxonomies).
Instructions:
All collections of the same type share the same features.
Note
Defining custom collection types is a licensed feature of EDG. While you will be able to develop and test new project types in TopBraid EDG Studio, once you deploy your code to the EDG server, new types of collections will only be available if your solution is licensed for creation of new asset collection types. To upgrade your license, please contact TopQuadrant.
Each of the default collection types that come with TopBraid EDG are plug-in modules within the more general Teamwork Framework.
It is possible to add new modules by creating an instance of the class teamwork:ProjectType in a globally registered file ending with .ui.*.
This file should import the file teamwork.ui.ttlx.
Simply create an instance of teamwork:ProjectType and fill in the properties similar to how it’s done in the default Ontology application (from ontologyprojects.ui.ttlx).
You need to enter values for teamwork:singularLabel and teamwork:pluralLabel.
You also need to enter value for the teamwork:vocabularyType.
These values must be subclasses of the teamwork:Vocabulary class.
For the ontologies this value is ontologyprojects:Ontology.
Under teamwork:Product select the one instance for EDG and add the “yourprojectype”:ProjectType to the defaultProjectType property
Hint
Use the Source Code panel where required, for properties that don’t show up on the form.
Also include the file edg.topbraidlive.org/edgproduct.ui.ttlx and add a triple such as edgproduct:EDG teamwork:defaultProjectType ex:MyProjectType to make sure your new teamwork:ProjectType is actually visible in the menus.
Adding a New Panel to the Editor Applications
The EDG Editor application is developed using React and a front-end build process. The Editor offers a choice of pre-built panels that can be organized into page layouts.
You can add your own custom panels to the editor. New panels will be available to users in exactly the same way as pre-built panels. In order to create new custom panels you will need to be familiar with RDF, React, WebPack and Babel.
We have prepared a sample guide and sample project that adds a new panel to the editor. Please download the items below to get started.
Adding new Java Components
It is technically possible to inject new Java components into TopBraid EDG servers. This is, obviously, a very low-level operation and only recommended for very experienced developers. As our Java code is not open source, this will most likely require hand-holding. We strongly recommend to use Premium Support hours for such endeavours.
To get an idea, see this thread on the TopBraid users mailing list.